Recover Arcserve UDP Data at Application Level Granularity
Arcserve Backup lets you recover Microsoft SQL Server and Microsoft Exchange Server database objects that were backed up from Arcserve UDP to Arcserve Backup media. You can recover the database objects at application level granularity.
The steps listed below describe how to perform the following recoveries:
- Recover Arcserve UDP nodes that was backed up via Arcserve UDP Recovery Point Servers at application level granularity.
Be aware of the following:
- Arcserve Backup lets you recover Microsoft Exchange Server data only at the mailbox level. To recover data at message level granularity, recover the data to a temporary location and then use Arcserve UDP to recover at a Granular Recovery Technology (GRT) level. For more details, see the Arcserve UDP user guide.
- The following steps describe how to submit restore jobs using the Restore by Session method. The process of restoring Arcserve UDP node data using the Restore by Tree method is identical to that of all other types of data. For more information about the Restore by Tree method, see Restoring Data.
Follow these steps:
- Verify that one of the following conditions exist on the Arcserve UDP destination server:
- You are logged in to the Arcserve UDP destination server.
- The Arcserve UDP service is running on the Arcserve UDP destination server.
- Open the Arcserve Backup Manager Console.
- From the Quick Start menu, click Restore.
- The Restore Manager window opens.
- From the drop-down list, click Restore by Session.
- The backup sessions appear in the Session tree.
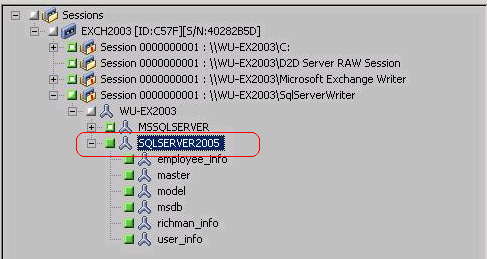
- From the Session tree, expand Sessions and locate the Arcserve UDP node that you want to recover.
- Expand the server that you want to recover and locate the session from which you want to recover Microsoft database data at application level granularity.
- Next, click the check boxes next to the objects that you want to recover, as illustrated by the following screen:
-
- (Optional) To specify options that affect only this restore job, right-click selected objects, select Local Options on the pop-up menu and then do either or both of the following options:
- Restore files to their original location--This option lets you restore data to the original location from where the backup image was captured.
- Dump files only--This option lets Arcserve Backup dump the selected Microsoft SQL database files to the specified folder. In addition, you can specify or browse to the folder location where the dump file is restored to.
- Restore to alternative location--This option lets you restore data to an alternative location.
- Because the backups can be copied to network locations, multiple SQL Server instances can be used. Multiple database restore can be performed (simultaneously) from the instance level. From this listing, you can select the database instance and specify a new database name and alternate location to restore the database to. In addition, you can browse to the alternate location where the database is restored to.
- Restore to Original Location--This option lets you restore data to the original location from where the backup image was captured.
- Dump files only--This option lets you restore only the dump files. For this option, Arcserve Backup restores the Microsoft Exchange database file to a specified folder, and will not bring it online after recovery is complete. You can then move this file to a different server and mount it to an Exchange server to view the data that is contained in the file.
- Replay log on database--This option lets you specify when the database files are dumped to the destination folder, you can replay and apply all Exchange transaction log files and commit them to the database file.
- Restore to Recovery Storage Group (Exchange 2007) / Restore to Recovery Database (Exchange 2010/2013)--This option lets you restore the database to a Recovery Storage Group (RSG) or Recovery Database.
- An RSG is a storage group that can be used for recovery purposes. You can restore Microsoft Exchange Server Mailbox Databases from a backup in a Recovery Storage Group and then recover and extract data from it, without affecting the production database that is being accessed by end users.
- If a single storage group or database (except a public folder database) from the same storage group are selected to restore, the default restore destination is Restore to Recovery Storage Group (or Restore to Recovery Database).
- If multiple storage groups or databases from multiple storage groups are selected to restore, Exchange can be restored only to the original location or restore with Dump file only option. The default restore destination is "Restore to original location".
- Before restoring an Exchange 2007 database to a Recovery Storage Group, you must create a Recovery Storage Group and Mailbox Database with the same name.
- Example:
- If you want to restore MailboxDatabase1 from the First Storage Group to a Recovery Storage Group, you need to create a Recovery Storage Group and add the database "MailboxDatabase1" to the Recovery Storage Group.
- Dismount Database--This option lets you dismount the database before you restore and mounts the database after restored.
- Typically before a restore, Microsoft Exchange will perform some checks to help ensure the following:
- The database to be restored is in "Dismounted" status.
- The database is not restored unexpectedly.
- If checked, specifies that the recovery process will automatically dismount the Microsoft Exchange database before the restore process and then mounts the database after the restore process is completed. In addition, if checked, this option also allows the Microsoft Exchange database to be overwritten during the restore.
- If unchecked, specifies that the recovery process will not automatically dismount the Microsoft Exchange database before recovery and mount the database after recovery.
- Click OK.
- Click the Destination tab.
- The Destination options appear.
- From the Destination tab, do one of the following:
- Click the check box next to Restore files to their original locations. With this option specified, Arcserve Backup restores the data to the location where the backup was taken.
- Clear the check box next to Restore files to their original locations. With this option specified, you must specify an alternative location. In addition, Arcserve Backup restores the data to the alternative location using the local restore options specified for the database.
- Example: Machine-A contains the following database:
- With the Restore files to their original locations option specified, Arcserve Backup restores the database to original path on Machine-A. If you clear the check box next to Restore files to their original locations, specify Machine-B as the alternative location, and the local restore option Restore to Original Location is specified for the database, Arcserve Backup restores the database to the original path (C:\Program Files\SQL Server\example.dat) on Machine-B.
C:\Program Files\SQL Server\example.dat
- Click the Schedule tab.
- The Schedule options appear.
- Specify the Schedule options that you require for the job.
- Click Options on the toolbar to specify the global options that you require for the job.
- Note: For more information, see Global Restore Options.
- Click Submit on the toolbar to submit the job.
- The Restore Media dialog opens to display a list of the media that is required to perform the operation.
- If the required media resides on multiple Arcserve Backup servers, click the drop-down list and specify the backup server that you want to execute the job and click OK.
- The Session User Name and Password dialog opens.
- On the Session User Name and Password dialog, edit or confirm the user name and password that is required to access the sessions and click OK.
- The Submit Job dialog opens.
- Complete the required fields on the Submit Job dialog and click OK.
- The job is submitted.
Microsoft SQL Server databases--Complete the following fields on the Arcserve UDP SQL Server Options dialog:
Microsoft Exchange Server databases--Complete the following fields on the Arcserve UDP Exchange Options dialog:
Note: When restoring the logs folder to the original location, the files that are in the logs folder will be skipped.
Note: When a Recovery Mailbox Database exists and you restore it with the ‘Dump file only’ option, it fails.
Note: This option is not applicable for Microsoft Exchange Server 2003 databases.
Note: This option is not applicable for Microsoft Exchange Server 2003.
To protect a Microsoft Exchange production database from being restored unexpectedly, a switch is added to allow the database to be overwritten during the restore process. Microsoft Exchange will refuse to restore a database if this switch is not set.
For Arcserve UDP, these two options are controlled by this "Dismount the database before restore and mount the database after restore" option. With this option, Arcserve UDP lets you launch the restore process automatically without any manual operations. (You can also specify to dismount/mount database manually).
The Microsoft Exchange administrator would have to perform some manual operations such as dismount the Microsoft Exchange database, set the Allow Overwrite flag on the database, and mount the Microsoft Exchange database. (The recovery procedure is performed by Exchange during the mounting of the database).
In addition, if unchecked, this option does not allow the Microsoft Exchange database to be overwritten during restore.