Restore Active Directory Objects
Arcserve Backup lets you restore the Active Directory at object level granularity. However, before you can restore Active Directory objects, you must back up the Active Directory as part of the computer's System State.
The process of recovering Active Directory objects consists of two phases:
- Restore the Active Directory backup data to an alternate location using the Restore Manager. The alternate location should reside on the server where the System State was backed up.
- Recover the Active Directory object to the current Active Directory using the Arcserve Active Directory Object Level Restore utility.
Restoring the Active Directory to its original location restores all of the objects contained in the Active Directory. The process for restoring the Active Directory to its original location is the same that of restoring files, directories, and so on. For more information, see "Restoring Data."
To restore Active Directory objects
- Open the Restore Manager window, click Source, and expand the server and System State containing the Active Directory that you want to restore.
- Click the check box next to Active Directory as illustrated by the following screen:
-

- Click the Destination tab.
- Clear the checkmark from Restore files to their original location(s).
- In the location field, specify a path to an alternative location.
- Example:
- Click Submit on the toolbar to submit the job.
- Complete the required fields on the Submit dialog and click OK.
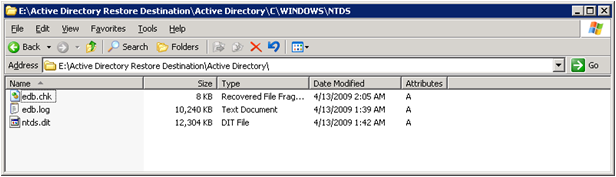
- After the restore is complete, the recovered data appears in the alternate location.
- (Optional) To restore the Active Directory to an alternative server, copy the files from the restore destination that you specified in the previous step to the alternative server.
- Note: The best practice is to specify an alternative directory on the server where you are restoring the Active Directory. However, if you must restore the Active Directory to an alternative server, you can copy the restored Active Directory files from the alternative server to the source server or any other domain controller that is in the same domain as the source server. The restrictions on this capability are as follows:
- The Client Agent for Windows must be installed on the alternative server.
- The operating system running on the alternative server must be the same version, release, and service pack as that of the server from which the backup was taken.
- Log into the Domain Controller server containing the restored, or copied, Active Directory data.
- Open Arcserve Backup Agent Admin by doing the following:
- From the Windows Start menu, click Start, select All Programs, Arcserve, Arcserve Backup, and click Server Configuration Wizard.
- Arcserve Backup Agent Admin opens.
- Note: To open the Arcserve Backup Agent Admin, you must be logged in to the server using an account that has Domain Administrative privileges.
- From the Options menu on the Arcserve Backup Agent Admin dialog, click AD Object Level Restore Utility.
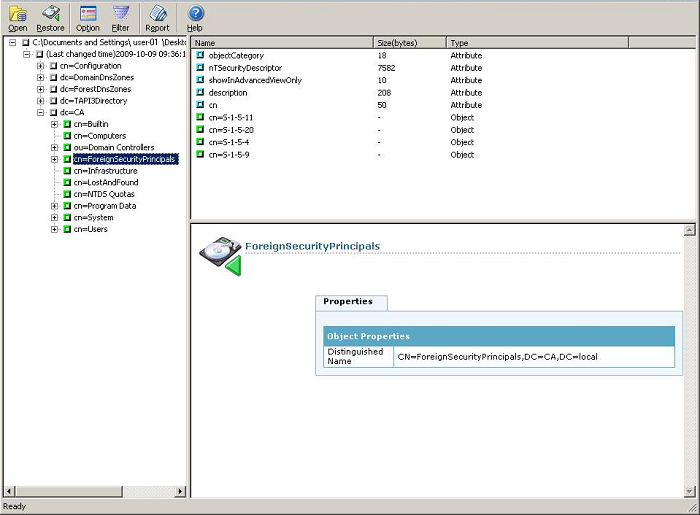
- The Arcserve Active Directory Object Level Restore dialog opens.
- Click Open on the Arcserve Active Directory Object Level Restore utility.
- The Open Active Directory Files dialog opens. The Active Directory backup restore points appear in the restore points list.
- (Optional) Click the ellipsis to browse for more restore points.
- Select a restore point and click OK.
- Left pane--Lets you view all objects included in the selected Active Directory ntds.dit database file.
- Right pane--Lets you view the attributes and child objects related to the item selected in the left pane.
- Note: Arcserve Backup lets you restore only the Active Directory Objects that appear in the Arcserve Active Directory Object Level Restore dialog. Arcserve Backup cannot restore system related objects.
-
- (Optional) Click Option on the toolbar to open the Restore Options dialog.
- Arcserve Backup lets you filter the active directory objects that you want to restore and specify a log level for the restore operation.
- Specify the restore options that you require:
- Restore Renamed Objects--Lets you restore objects that were renamed in the current Active Directory.
- Restore Moved Objects--Lets you restore objects that were moved to a different location in the current Active Directory.
- Restore Permanently Deleted Objects--Lets you restore objects that were deleted permanently from the current Active Directory.
- Specify the log level options that you require:
- Log Level--Lets you specify the level of details that you require in the debug log.
Default value: 0
Range: 0 to 3
0--Prints error messages to the log files.
1--Prints error and warning messages to the log files.
2--Prints error, warning, and information messages to the log files.
3--Prints error, warning, information, and debug messages to the log files.
Note: Level 3 is the highest level of logging details. If you encounter problems restoring active directory files, you should specify level 3 and then send the log files to Arcserve Support.
- Specify the restore options that you require:
- The Active Directory restore process generates the following log files:
- adrestorew.log
- CadRestore.exe.trc
- Arcserve Backup stores the log files in the following directory:
- Click OK to close the Restore Options dialog.
- (Optional) Click Filter on the toolbar to open the Filter Settings dialog.
- Note: The best practice is to use filters when you are searching for a specific object.
- Specify one of the following filter settings:
- Show all types of objects--Lets you display all objects in the Active Directory Object Restore dialog.
- (Optional) To limit the number of child nodes, click Maximum number nodes under each parent nodes and specify a limit in the text box.
- Show only the following types of objects--Lets you display only objects of a particular type in the Active Directory Object Restore dialog.
- Show only the following named objects--Lets you display only objects with a particular name in the Active Directory Object Restore dialog.
Note: The Active Directory for a computer can contain a large number of objects. The best practice is to filter the objects using the Show only the following named objects filter and specify the name of the object that you want to restore.
- Click OK to close the Filter Settings dialog.
- From the Active Directory Object Restore dialog, expand the Active Directory tree and click the check box next to the objects that you want to restore.
- Click Restore on the toolbar to restore the specified objects.
- Arcserve Backup restores the Active Directory objects to the current Active Directory.
- After the restore is complete the Restore Status message box opens.
- Note: The Restore Status messages box describes the outcome of the job.
- Click OK to close the message box.
- The Active Directory objects are restored.
- (Optional) Click Report on the toolbar to check the status of the restore.
- Note: You may want to view the Job Report if Arcserve Backup reports that it could not restore the objects.
\\172.31.255.254\E:\Active Directory Restore Destination
C:\Program Files\Arcserve\Arcserve Backup Client Agent for Windows