Import Cloud Data Store
This section provides information about how to import a cloud data store to the recovery point server.
Note: If the status of a data store shows Abnormal Blockall or Abnormal Restoreall after you create or import a data store, then refresh data store’s status from the Actions drop-down list, and check whether it changes to Running. If the status still doesn't update to Running, contact Arcserve Support.
Follow these steps:
- On the Protect screen, do one of the following:
- Navigate to Destinations > Recovery Point Servers.
- From the list of recovery point servers, click the Action drop-down list of a specific recovery point server, and then select Import Cloud Data Store.
- The Import Cloud Data Store screen appears with a name of the specified recovery point server.
- Navigate to Destinations > Data Stores.
- On the Data Store page, click Add Data Store, and then select Import Cloud Data Store.
- The Import Cloud Data Store screen appears.
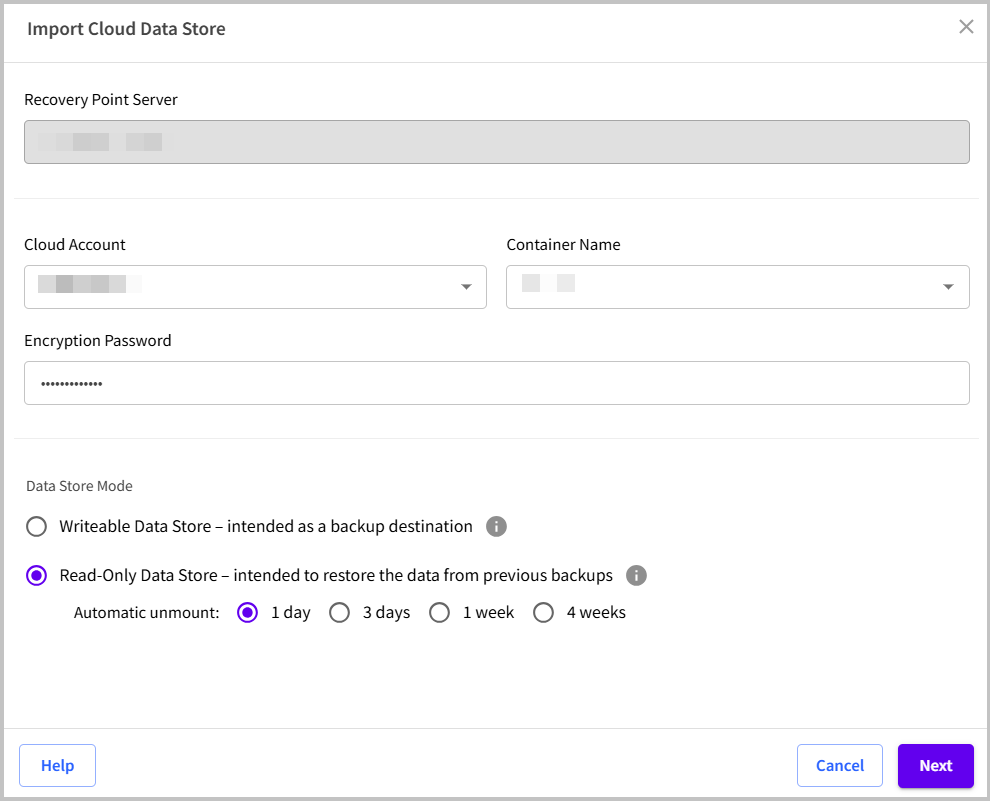
- Specify the following details, and then click Next:
- Recovery Point Server: From the drop-down list, select the RPS as needed.
- Note: If you have chosen the Recovery Point Server view to import a cloud data store, the Recovery Point Server is selected by default.
- Cloud Account: From the drop-down list, select the cloud account as needed.
- Bucket: From the drop-down list, select the bucket that you want to use as a Cloud destination.
- Region: From the drop-down list, select the region of the cloud account.
- Note: The Region field appears only for the Wasabi cloud account.
- Container Name: From the drop-down list, select a storage container for the Azure Blob Cloud account.
- Note: The Container Name field appears only for the Microsoft Azure Blob Cloud account.
- Encryption Password: Type the encryption password, if needed.
- Note: If the data store is not encrypted, you can leave this field empty.
- Data Store Mode: Specifies the mode in which you want to import the data store. Select one of the following:
- Writeable Data Store: If you want to import the data store in a writeable mode, select the Writeable Data Store option.
- Read-Only Data Store: If you want to import the data store in a read-only mode, select the Read-Only Data Store option. This option allows you to import and mount the inactive data store without affecting its original (writeable) data store.
- Note: For an Arcserve Cloud Cyber Resilient Data Store, importing a cloud data store in a read-only mode is not supported.
-
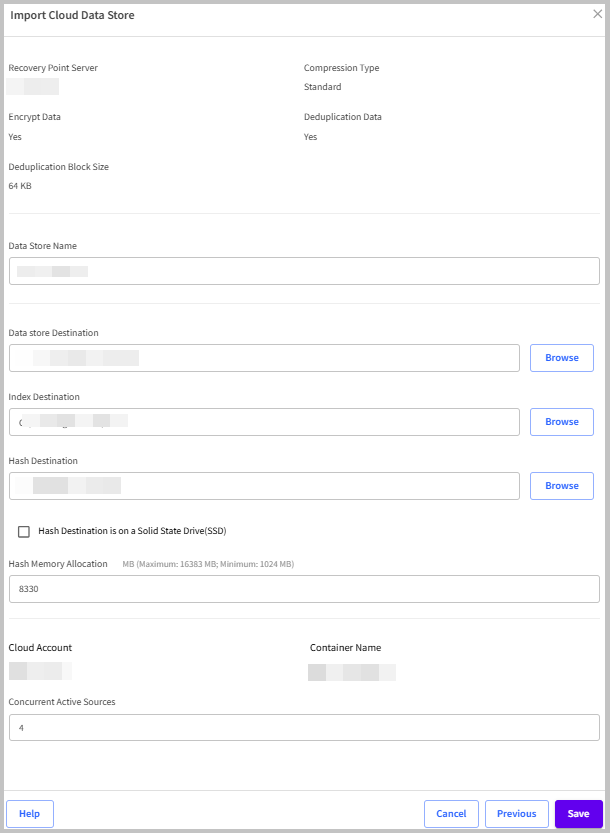
- The Import a Cloud Data Store screen appears with the details of the data store that you want to import.
- Modify the data store details as needed, and then click Save.
- Notes:
- The Hash Destination, Hash Destination is on a Solid State Drive(SSD), and Hash Memory Allocation options are available only for the Writeable data store and not for the Read-only data store.
- You cannot enable or disable the encryption option for an existing data store.
- The read-only data store does not support the backup, merge, and purge (delete) jobs.
- If you want to convert the read-only data store into a writeable data store, unmount the read-only data store first, and then re-import the data store as writeable data store.
-
- The cloud data store is imported successfully.
- To check whether the data store is imported, click the recovery point server name to which you have imported the data store, or click Data Stores from the left pane.
- A green check mark under the Status column displays the successful import.
- Note: If you want to unmount a data store from the recovery point server manually, do the following:
- On the Recovery Point Servers page, click the recovery point server name.
- Under the Data Stores tab, click the Action drop-down list of a data store that you want to remove, and then click Detach from RPS.
- A confirmation dialog appears.
- Click OK to confirm.
- The data store gets unmounted from the RPS.
 From the Recovery Point Servers View
From the Data Store View
From the Recovery Point Servers View
From the Data Store View
Automatic unmount
To unmount a cloud data store after a specific time, select the unmount time as needed from the available options. The available options are 1 day, 3 days, 1 week, and 4 weeks.