Review the Prerequisites for Oracle Database with RMAN (Windows and Linux)
Prerequisites to configure when Oracle is installed on Windows
During Oracle database installation, the Oracle installer needs the Oracle home user details to decide the logon user for Oracle services. The Oracle installer supports the following Oracle home users:
- Use Virtual Account
- Use Windows Built-in Account
- Use Existing Windows User
- Create New Windows User
Notes:
- For enhanced security, the Oracle installer recommends using the Virtual Account or a standard Windows user account (non-administrator account) as an Oracle home user.
- You cannot specify the Oracle home user explicitly for a Virtual Account and Windows built-in account unlike the Use Existing Windows User and Create New Windows User options.
- The Oracle installer displays an error message if the Windows user account used as an Oracle home user has administrator privileges.
- To enable RMAN backup and recovery with the appliance (workgroup) RPS, you must change the logon user for the database instance services.
To enable RMAN backup and recovery with the appliance (workgroup) RPS, do the following:
Note: This section contains information about Oracle installations within the domain or workgroup servers.
Follow these steps:
- Decide a low privileged local user for database instance service logon based on the following:
- If you have already installed the Oracle database with the Use Existing Windows User or Create New Windows User options, you can use the non-administrator local user that you specified for Oracle home installation (for example, OracleProtector) as a low privileged local user.
- If you installed the Oracle database with the Use Virtual Account or Use Windows Built-in Account options, log into the Oracle server as a local administrator, and then create a low privileged local user (for example, OracleProtector).
- To enable RDP or logon session for a low privileged local user, add a low privileged local user to the “Remote Desktop users” group of the Windows Oracle server.
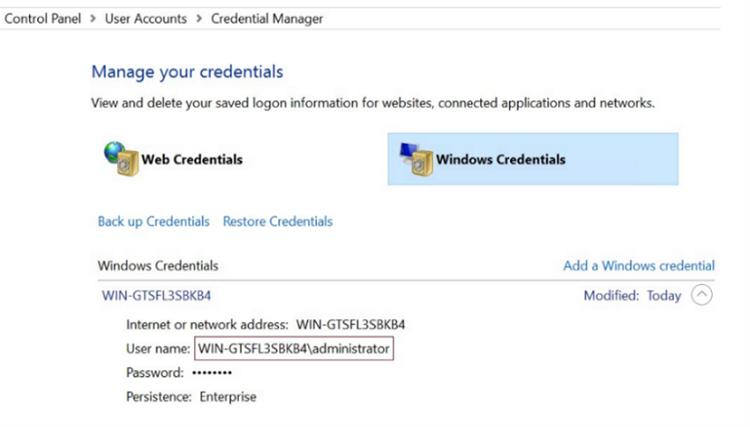
- To cache RPS credentials for a low privileged local user profile, log into the Oracle server as a low privileged local user and cache the RPS agent login credentials within the Credential Manager.
- For Oracle RMAN, the default agent installed on RPS performs different jobs such as backup, recovery, and so on.
- Note: If the low‑privileged local user (specified in Step 1) is different from the account used to add the Oracle node to UDP, an RMAN utility permission error may occur. To resolve this, log in to the Oracle server using the domain account that was used to add the Oracle node, and then cache the RPS credentials.
-
- Within the local/domain administrator remote session, change the database instance service logon to a low privileged local user, and then restart the service.
-

- Note: If you have specified a non-administrator low privileged local user for Oracle home installation (Use Existing Windows User or Create New Windows User type of installations), you don't have to change the service logon.
- Allow the low privileged local user to write audit records to Windows Event Log.
- Follow these steps:
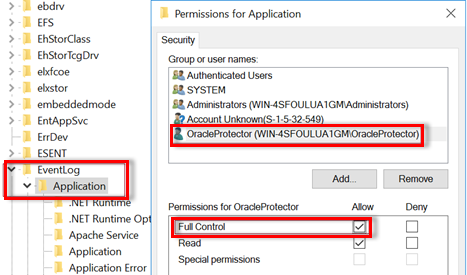
- Open the Windows Registry Editor, navigate to the following registry key, right-click Application, and then select Permissions:
- HKEY_LOCAL_MACHINE\System\CurrentControlSet\Services\Eventlog\Application
- The Permissions for Application dialog opens.
- Select the group or username that you want to give permission.
- Under Permissions for <low privileged local user>, to grant full control access to the low privileged local user, select the Full Control check box under Allow.
- Click OK.
-
- The Oracle service Log on user must be able to write the audit records to Windows Event Log during the restore and recovery operation.
- Grant full access to the low privileged local user to an auxiliary destination, which is required to recover the tablespace and/or table. By default, the auxiliary destination is set to C:\Windows\Temp.
- Notes:
- If you used a local administrator as an Oracle home user for Oracle instance service logon, follow the steps 1-4 mentioned above.
- If you used a low privileged local user (for example, OracleProtector) as an Oracle home user for Oracle instance service logon, follow the steps 1-6 mentioned above.
- If you installed Oracle using the Windows Built-in Account, Use Existing Windows User, or Create New Windows User options, then add the low privileged local user (for example, OracleProtector) to the local administrator group.
- Verify that the RMAN backup and recovery job works appropriately with the appliance (workgroup) RPS.
Note: This section contains information about Oracle installation within the domain server.
Follow these steps:
- Decide a low privileged domain user for database instance service logon.
- If you have already installed the database with a non-administrator domain user as an Oracle home user, use that domain user as a low privileged domain user. Otherwise, create a low privileged domain user (for example, rvdm\domainOraProtector) in the domain controller.
- To enable RDP for a low privileged domain user, log into the Oracle server as a local/domain administrator, and then add a low privileged domain user as part of the “Remote Desktop users” group.
- To cache RPS credentials for a low privileged domain user profile, log into the Oracle server as a low privileged domain user and cache RPS agent login credentials within Credential Manager.
- Note: If the low‑privileged domain user (specified in Step 1) is different from the account used to add the Oracle node to UDP, an RMAN utility permission error may occur. To resolve this, log in to the Oracle server using the domain account that was used to add the Oracle node, and then cache the RPS credentials.
- Within the local/domain administrator remote session, change the Oracle instance service logon to a low privileged domain user, and then restart the service.
-

- Note: If you have specified a non-administrator low privileged domain user for Oracle home installation (Use Existing Windows User or Create New Windows User type of installations), you don't have to change the service logon.
- Allow the low privileged domain user to write audit records to Windows Event Log.
- Follow these steps:
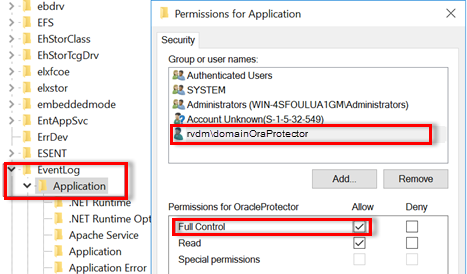
- Open the Windows Registry Editor, navigate to the following registry key, right-click Application, and then select Permissions:
- HKEY_LOCAL_MACHINE\System\CurrentControlSet\Services\Eventlog\Application
- The Permissions for Application dialog opens.
- Select the group or username that you want to give permission.
- Under Permissions for <low privileged domain user>, to grant full control access to the low privileged domain user, select the Full Control check box under Allow.
- Click OK.
-
- Grant full access to the low privileged local user to an auxiliary destination, which is required to recover the tablespace and/or table. By default, the auxiliary destination is set to C:\Windows\Temp.
- Notes:
- If you used a domain administrator as an Oracle home user for Oracle instance service logon, follow the steps 1-4 mentioned above.
- If you used a low privileged domain user as an Oracle home user for Oracle instance service logon, follow the steps 1-6 mentioned above.
- If you installed Oracle using the Windows Built-in Account, Use Existing Windows User, or Create New Windows User options, then add the low privileged domain user (for example, rvdm\domainOraProtector) to the local administrator group of Windows Oracle server.
- Verify that the RMAN backup and recovery job works appropriately with the appliance (workgroup) RPS.
- If RMAN backup or recovery job fails even after performing the previously mentioned steps, log into the Oracle server as a domain administrator, cache RPS credentials under Credential Manager, and then re-verify the job.
- UDP console and RPS systems must be installed and used with administrator or equivalent account.
- Add the Windows Oracle source into the Cloud Console using the administrator privileged user.
- Make sure that Listener configurations are appropriate to allow RMAN client to connect to the Oracle database instance using the following command:
- rman target /
- When you backup the Oracle database(s), make sure that it is in OPEN state with the ARCHIVELOG mode enabled. For more information, see How to enable ARCHIVELOG mode.
- To successfully perform the Oracle RMAN backups with Arcserve UDP, you must enable Windows native authentication. To confirm whether the Windows authentication is enabled, make sure the below line is added in sqlnet.ora file in the ORACLE_HOME/network/admin path.
- SQLNET.AUTHENTICATION_SERVICES= (NTS)
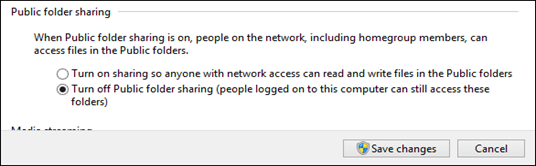
- Public Folder Sharing Sharing is disabled to enable secure access to the database(s).
- To disable the use of Public folder for network sharing, follow these steps:
- Go to Network and Sharing Center, and then click Change advanced sharing settings.
- On the left pane, search for Public folder sharing setting for the active network location, and then click Turn off Public folder sharing (people logged on to this computer can still access these folders).
- Click Save changes.
-
Tablespace and table level restores use Auxiliary database, which requires the following permissions:
- Domain User for Oracle Installation: Add the Oracle user service account to the “Administrators" group in Oracle source (s). For example, eptestdom\oracle is added to local administrator group.
- Virtual Account for Oracle Intallation: Open the registry key: HKLM\SYSTEM\CurrentControlSet\services\eventlog\Application, and then right click and add permissions to the group such as 'ORA_OraDB18Home1_SVCACCTS'.
- The same version of Oracle with the same configuration is installed on the target system.
- The database is installed with the same SID as your source (original) machine.
- The Oracle database on the destination source must be in shutdown state.
|
netsh advfirewall firewall add rule name="AS ora" dir=in action=allow program="C:\path\to\oracle\home\bin\oracle.exe" enable=yes |
|
|
netsh advfirewall firewall add rule name="AS tns" dir=in action=allow program="C:\path\to\oracle\home\tnslsnr.exe" enable=yes |
|
|
netsh advfirewall firewall add rule name="AS ora" dir=out action=allow program="C:\path\to\oracle\home\bin\oracle.exe" enable=yes |
|
|
netsh advfirewall firewall add rule name="AS tns" dir=out action=allow program="C:\path\to\oracle\home\bin\tnslsnr.exe" enable=yes |
|
| netsh advfirewall firewall add rule name="ora_1521" dir=in action=allow protocol=TCP localport=1521 | |
|
netsh advfirewall firewall add rule name="ora_1521" dir=out action=allow protocol=TCP localport=1521 |
Port number may change based on the port configured. |
Prerequisites to configure when Oracle is installed on Linux/Solaris
- The Oracle source /etc/hosts must have an entry for FQDN and “resolv.conf” with the appropriate DNS entry.
- Every database that needs to be protected must have an entry in the /etc/oratab file.
- Notes:
- For the Solaris Oracle installation, the Oratab file is located in the following path:
- /var/opt/oracle/oratab
- RAC environment, make sure the content is updated for both the sources.
- The syntax in /etc/oratab file is as follows:
- <DB_UNIQUE_NAME>:<ORACLE_HOME>:<ACTIVE/INACTIVE>
- Example: ORCL:/u01/app/oracle/ORCL/:Y
- If you add a source as a sudo user, make sure to amend the sudoers policy.
- To amend the sudoers policy, follow these steps:
- Open the /etc/sudoers policy using the 'visudo' command.
- Add the following sudo policy for the sudo user under the User privilege specification section:
- <sudo_user> ALL=(ALL) NOPASSWD:/usr/bin/bash,/usr/bin/cd,/usr/bin/mkdir,/usr/bin/chown,/usr/bin/chmod,/usr/bin/mount,/usr/sbin/mount,/usr/bin/rm,/usr/sbin/umount,/usr/gnu/bin/egrep,/usr/bin/umount,/usr/bin/egrep
- When you backup the Oracle database(s), make sure that it is in OPEN state with the ARCHIVELOG mode enabled. For more information, see How to enable ARCHIVELOG mode.
- For Linux, install smb client using the following command:
- #yum install samba-client samba-common cifs-utils
- For Solaris, enable smb client service as root using the following commands:
- su – root
- svcadm enable -r network/smb/client
- Make sure to appropriately configure Listener, which helps to protect the Oracle database and connect to sqlplus and RMAN for that database.
- Example: Check “lsnrctl status” for the databases available to a particular Listener.
- The “rman target / “ command must be connected to right database specified for the backup.
- Make sure that the Oracle databases for backup is in MOUNT state or OPEN state.