Add an Arcserve Cloud Cyber Resilient Data Store
This section provides information about how to add an Arcserve Cloud Cyber Resilient Data Store as a destination.
Notes:
- The Add Arcserve Cloud Cyber Resilient Data Store option is disabled for UDP 10.0. To use this option, upgrade Recovery Point Server (RPS) to UDP 10.1.
- For Arcserve Cloud Storage and Arcserve Cloud Cyber Resilient Storage to work properly, ensure TCP outbound ports 80 and 443 are open.
- Arcserve does not recommend directly modifying cloud bucket properties within a cloud storage portal.
- Creating an Arcserve Cloud Cyber Resilient Data Store is not supported on a GUID or on a volume mounted without a drive letter.
- If you reset access keys in the cloud storage portal, the connections to the cloud account or data stores will be lost if the old keys were previously used while adding cloud account in the Cloud Console. This is because the cloud provider will no longer recognize the old keys. As a workaround, update cloud account with the new access keys. To update, see Modify a Cloud Account.
- If you have not purchased Arcserve Cloud Storage, the Add Arcserve Cloud Cyber Resilient Data Store option is disabled. If you want to request a trial for Arcserve Cloud Cyber Resilient Data Store, click Try It.
- For purchase related information, contact your sales account manager. If you consume all the purchased storage capacity, you must purchase additional storage. For more information, see Subscription and Storage Expiry Behavior in Cloud Console. After purchasing Arcserve Cloud Storage, the Add Arcserve Cloud Cyber Resilient Data Store option is enabled only after you add the Arcserve Cloud Storage account. For more information, see Add a Cloud Account for Arcserve Cloud Storage.
- When you modify your cloud storage, such as increasing or decreasing storage capacity or purchasing additional storage, it may take up to 24 hours for the system to reflect these changes. However, to immediately update your cloud storage usage, you can manually refresh the cloud account information. To do this, go to Protect > Destinations > Cloud Accounts, and then from the Action drop-down list of the required cloud account, select Refresh.
Follow these steps:
- On the Protect screen, do one of the following:
- Navigate to Destinations > Recovery Point Servers.
- From the list of recovery point servers, click the Action drop-down list of a specific recovery point server, and then select Add Arcserve Cloud Cyber Resilient Data Store.
- The Add Arcserve Cloud Cyber Resilient Data Store screen appears with a name of the specified recovery point server.
- Navigate to Destinations > Data Stores.
- On the Data Store page, click Add Data Store, and then select Add Arcserve Cloud Cyber Resilient Data Store.
- The Add Arcserve Cloud Cyber Resilient Data Store screen appears.
- Specify the following fields, and then click Save:
- Recovery Point Server: From the drop-down list, select the RPS as needed.
- Note: If you have chosen the Recovery Point Server view to add an Arcserve Cloud Cyber Resilient Data Store, the Recovery Point Server is selected by default.
- Data Store Name: Specifies the name of the data store.
- Concurrent Active Sources Limit to: Specifies the maximum concurrent jobs on the data store.
- Default Value: 4
- Data Store folder: Refers to the location of the folder where the data store is created. Type the local full path or click Browse to navigate and select the desired local folder.
- Arcserve Cloud Account: Select the Arcserve cloud account from the drop-down list as needed.
- Note: If you have added a single Arcserve cloud account to the Console, the cloud account is selected by default.
- Region: Select the region for the Arcserve cloud account as needed.
- Bucket: Refers to the bucket name that you want to use as a Cloud destination. All files and folders moved or copied to the cloud vendor are stored and organized in your buckets (or containers). Buckets are fundamental containers used to group and organize your files. Every object stored with the cloud vendor is placed in a bucket. For more information about naming convention, see Bucket Name Convention.
- Retention Policy: Refers to the duration for which data is retained before it can be deleted or overwritten. Retention policy offers two object lock-in modes (Governance and Compliance), providing different levels of protection, ensuring data integrity and compliance with internal policies and regulatory requirements. Select one of the following as object lock mode:
- Governance Mode: Governance mode allows you to modify or delete protected objects with specific IAM permissions during the retention period.
- Compliance Mode: Compliance mode provides strict immutable storage, where you cannot delete or overwrite a protected object version for the duration of the retention period, including the root user in your cloud account. When an object is locked in compliance mode, its retention mode cannot be changed, and its retention period cannot be shortened.
- Note: To delete an object under the compliance mode before its retention date expires, delete the associated cloud account.
- Note: You cannot change the retention mode after the creation of a data store.
- Immutable Snapshot Schedule Frequency: Allows you to schedule daily, weekly, and monthly snapshots and set a retention period for those snapshots, ensuring the snapshots are taken regularly and remain unchangeable for a specified duration.
- Daily: Creates snapshots for a specified time each day.
- Snapshot Time: Set a time at which you want the snapshot to be taken.
- Retention Period in Days: Define how long a snapshot can be retained before it is automatically deleted.
- Note: To optimize cloud consumption, Arcserve recommends that you use a retention period of less than or equal to 7 days or use weekly snapshots instead of retaining daily snapshots for more than 7 days.
- Weekly: Creates snapshots for a specified day of the week.
- Run Schedule Day: Select a specific day of the week on which you want the snapshot to be taken.
- Snapshot Time: Set a time at which you want the snapshot to be taken.
- Retention Period in Weeks: Define how long a snapshot can be retained before it is automatically deleted.
- Note: To optimize cloud consumption, Arcserve recommends that you use a retention period of less than or equal to 5 weeks or use monthly snapshots instead of retaining weekly snapshots for more than 5 weeks.
- Monthly: Creates snapshots for a specified day or week of the month.
- Start Day/Week: From the drop-down list, select one of the following as needed:
- Day: Select a specific day of the month or the last day on which you want the snapshot to be taken.
- Week: Select First or Last week as needed, and then select a specific day of the week on which you want the snapshot to be taken.
- Snapshot Time: Set a time at which you want the snapshot to be taken.
- Retention Period in Months: Define how long a snapshot can be retained before it is automatically deleted.
- Note: To optimize cloud consumption, Arcserve recommends that you use a retention period of less than or equal to 12 months.
- Notes:
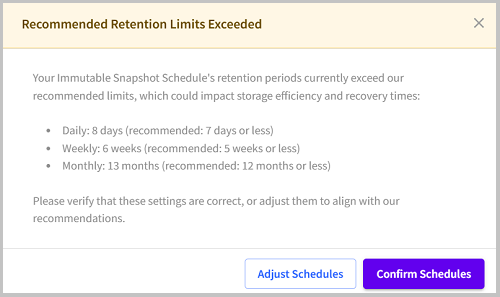
- If you set the retention period for daily, weekly, and/or monthly immutable snapshots to be longer than the recommended limits, and then you click Save, the Recommended Retention Limit Exceeded dialog appears. If you want to go back and update settings as per the recommended values, click Adjust Schedules. Otherwise, click Confirm Schedules to proceed with the current settings.
-
- By default, the snapshot time for all the daily, weekly, and monthly schedules is set to 2 AM. If you proceed with this default snapshot time, the snapshots with lower frequency such as weekly or monthly might overlap with daily snapshots. To avoid this, Arcserve recommends that you configure different snapshot times for different frequencies (daily, weekly, and monthly).
- Enable Deduplication: Specifies that deduplication is enabled for this data store. Arcserve Cloud Console supports both types of deduplication: Source-side deduplication and Global deduplication. Source-side deduplication prevents duplicate data blocks to move across network from a particular agent. Global deduplication eliminates duplicate data across all client machines based on the volume cluster level. By default, the Enable Deduplication check box is selected and grayed out.
- Deduplication Block Size: By default, the deduplication block size is selected as 64 KB.
- Hash Memory Allocation: Type the amount of physical memory that you want to allocate to keep hashes. This field is pre-filled with a default value. The default value is based on the following calculation:
- If the physical memory of the RPS is smaller than 4 GB (or is identical to 4 GB), the default value of Hash Memory Allocation is identical to the physical memory of the RPS.
- If the physical memory of the RPS is greater than 4 GB, Arcserve Cloud Console calculates the available free memory at this time. Assume that the available free memory is X GB at present. Arcserve Cloud Console further checks the following conditions:
- If (X * 80%) > = 4 GB, the default value of Hash Memory Allocation is (X * 80%).
- If (X * 80%) < 4 GB, the default value of Hash Memory Allocation is 4 GB.
- Example: Consider the RPS has 32 GB of physical memory. Assume that operating system and other applications use 4 GB memory while creating the data store. So, the available free memory at this time is 28 GB. Then, the default value of Hash Memory Allocation is 22.4 GB (22.4 GB = 28 GB * 80%).
- Hash destination is on a Solid State Drive (SSD: Specifies that the hash folder is on a solid state drive.
- Note: Configure the hash destination on local SSD if the Hash destination is on a Solid State Drive(SSD) check box is selected.
- Index Destination: Defines the index destination folder to store the index files. Select a different disk to improve the deduplication processing.
- Note: The Index Destination path must be an empty folder.
- Hash Destination: Defines the path to store the hash database. Arcserve Cloud Console uses the SHA1 algorithm to generate the hash for source data. The hash database manages the hash values. Selecting a high speed Solid State Drive (SSD) increases the deduplication capacity and requires a lower memory allocation. For better hash performance, we recommend you that format the SSD volume as NTFS file system with 4 KB volume cluster size.
- Note: The Hash Destination path must be an empty folder.
- Notes:
- You cannot specify the same path for the following folders: Data Store folder, Index Destination, and Hash Destination.
- Remote or network share paths are not supported for Arcserve Cloud Cyber Resilient Cloud data stores.
- Enable Compression: Specifies that the data compression settings are enabled.
- Compression Type: Specifies whether to use the Standard or Maximum as the compression type.
- Compression is often selected to decrease the usage of the disk space, but also has an inverse impact on your backup speed due to the increased CPU usage. Based on your requirement, you can select one of the three available options.
- Enable Encryption: Specifies that encryption settings are enabled. When you select this option, you must specify and confirm the encryption password.
- Data encryption is the translation of data into a form that is unintelligible without a deciphering mechanism. The Arcserve UDP solution uses secure, AES (Advanced Encryption Standard) encryption algorithms to achieve maximum security and privacy of your data. For data stores, encryption or No encryption is supported. For Encryption, only AES-256 is available.
- A password is not required when you are attempting to restore to the computer from which the backup was performed. However, when you attempt to restore to a different computer, a password is required which is set in the policy and not the password set in the data store.
- Note: After the data store is created, you cannot enable or disable deduplication, compression, or encryption.
- The Arcserve Cloud Cyber Resilient Data Store is added successfully.