How to Add an Assured Security - AI Anomaly Detection Task to a Policy
The Assured Security – AI Anomaly Detection task analyzes backup data to detect anomalies, ensure data integrity, and enhance overall data protection. Before you create an Assured Security - AI Anomaly Detection task, make sure to add a plan for the backup task.
This section provides information about how to add an Assured Security - AI Anomaly Detection task to a plan.
Follow these steps:
- Log into Cloud Console.
- Navigate to Protect > Policies.
- Click the name of the policy you want to edit.
- In the left pane, click Tasks.
- To add a secondary task, click Add Task on the RPS section, and then click the newly added RPS section.
- On the What to protect tab, from the Activity Type drop-down list, select Assured Security - AI Anomaly Detection.
- On the What to Test tab, do the following:
- Specify one of the following:
- Select Daily, Weekly, or Monthly backups based on your requirements.
- Note: The available options depend on the schedule type selected for the source backup. For example, if the source backup has only monthly backup scheduled, then only Monthly backup displays.
- Select the Latest Recovery Points check box.
- Under Anomaly Detection Methods, to configure the types of anomalies to detect and set their sensitivity levels, follow these steps:
- Select one or both detection methods based on your monitoring requirements:
- Suspicious Files: This method continuously monitors files for characteristics that indicate malicious behavior, such as unexpected types, naming patterns, or unusual modification behaviors. This option is selected by default.
- Mass Deletions and Renames: This method detects sudden, large-scale file or directory changes, such as multiple deletions or renames occurring within a short period. This option is selected by default.
- For each selected detection method, select a detection level to define the sensitivity of anomaly detection:
- Low: Performs minimal analysis and reports only major anomalies. Use this level if your environment experiences frequent, legitimate file changes and you want to reduce false positives.
- Medium: Provides a balanced level of detection. It detects moderate deviations from normal patterns without generating excessive alerts. This level is selected by default.
- High: Increases the detection sensitivity to capture even minor or infrequent anomalies, but may increase false positives.
- Use this option if you want to exclude specific files or directories from the anomaly detection scan. To add paths, click Add and then specify the Windows path you want to exclude from the anomaly detection scan. You can add multiple paths using the Add button.
- On the Where to Test tab, specify the following details.
- For Windows Proxy Server, do one of the following:
- If you have already added a proxy server to the selected Site in the Console, select a proxy server from the Windows Proxy Server drop-down list.
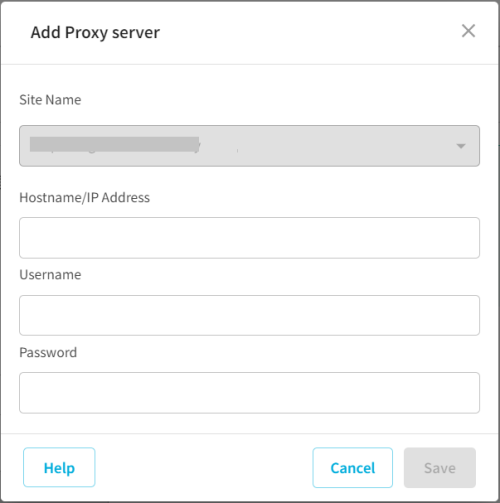
- If you have not added any proxy server, provide the following details, and then click Save:
- Site Name: Select a site from the drop-down list as needed.
- Hostname/IP Address: Specify the hostname or IP address.
- Username: Type the username as needed.
- Password: Type the password for the corresponding username.
- Note: For the newly added RPS servers, RPS is added as a default proxy.
-
- For Folder Path to Mount Recovery Points, click Browse, navigate to the folder where the virtual hard disk file is located, select the folder, and then click Select.
- On the When to Test tab, to add an Assured Security - AI Anomaly Detection Job Schedule, click Add.
- The schedule section refreshes and displays the following fields:
- Run Schedule Days: By default, all the days of the week are selected. If you do not want to run the Assured Security - AI Anomaly Detection job on any specific day, click the day of the week to clear the selected day.
- Start Time: From the hour and minute drop-down list, select the time at which you want the Assured Security - AI Anomaly Detection job to start.
- End Time: From the hour and minute drop-down list, select the time at which you want the Assured Security - AI Anomaly Detection job to stop.
- Note: If no schedule is defined, the Assured Security - AI Anomaly Detection job runs immediately after the primary task. If a schedule is defined, it runs according to the defined schedule.
- On the Additional Settings tab, set Timeout (1–30 days). This is the maximum time the proxy server can wait for the item to complete its scan. If the Assured Security VM remains unavailable beyond the timeout, the Assured Security - AI Anomaly Detection job fails.
- Click Save Policy.
- You have successfully created the Assured Security - AI Anomaly Detection task.
 Select Recovery Points
Anomaly Detection Methods
Exclude Paths (Optional)
Select Recovery Points
Anomaly Detection Methods
Exclude Paths (Optional)