How to Add an Assured Recovery Task to a Policy
Create an Assured Recovery task based on a backup task to verify accessibility and assured recovery of the data and provide the data integrity check. The assured recovery task comprises a source, test settings, schedule, and advanced settings. You can also run an Assured Recovery job manually.
This section provides information about how to add an Assured Recovery task to a policy.
Follow these steps:
- Navigate to Protect > Policies.
- Click the policy name that you have already created.
- On the Tasks tab, to add a secondary task, click the add (+) symbol on the RPS section, and then click the newly added RPS section.
- On the What to protect tab, select Assured Recovery Task from the Activity Type drop-down list.
- On the What to Test tab, under Select Recovery Points, do one of the following:
- Based on the requirement, you can select Daily, Weekly, or Monthly backups. The daily, weekly, or monthly options are enabled depending on the schedule type you have selected for the source backup. For example, if the source backup has only monthly backup scheduled, then only Monthly backup displays.
- Select the Latest Recovery Points check box.
- On the Where to Test tab, select one of the following as the Test Type:
- Selecting Instant Virtual Machine (IVM) as the Test Type lets you start the virtual machine from the recovery point and optionally executes the custom script. The recovery point is considered in a good state if the VM boots successfully, and the verification script returns a successful result within the user-specified time interval.
- Note: The Instant Virtual Machine task type is not applicable when the Assured Recovery test source is UNC/NFS Backup to RPS.
- Do the following:
- Select Instant Virtual Machine as Test Type.
- Note: For Nutanix AHV, the Instant Virtual Machine (IVM) option is supported only for the Linux virtual machines.
- For Hypervisor, select the hypervisor from the Server drop-down list as needed.
- For Proxy Server, do one of the following:
- If you have already added a proxy source to the selected Site in the Console, select the source from the Proxy Server drop-down list.
- If you have not added any proxy sources, click Add.
- For Windows Proxy Server
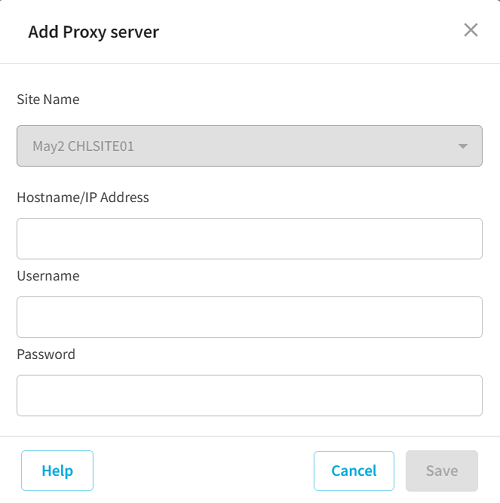
- The Add Proxy server dialog opens.
- Provide the following details, and then click Save:
- Site Name: Select a site from the drop-down list as needed.
- Hostname/IP Address: Specify the hostname or IP address.
- Username: Type the username as needed.
- Password: Type the password as needed.
- Note: For the newly added RPS servers, RPS is added as a default proxy.
-
- For Linux Proxy Server
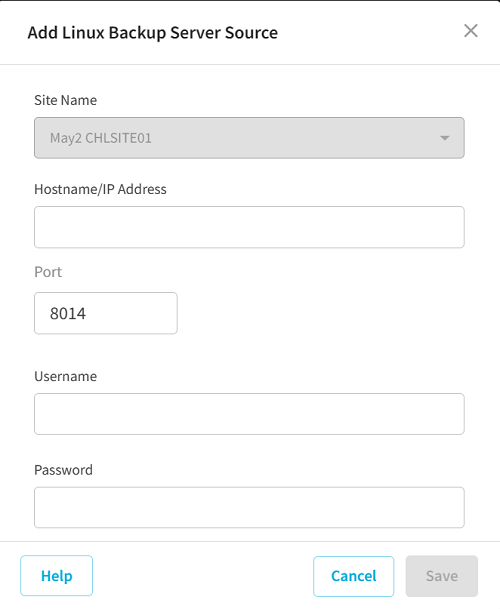
- The Add Linux Backup Server Source dialog opens.
- Provide the following details, and then click Save:
- Site Name: Select a site from the drop-down list as needed.
- Hostname/IP Address: Specify the hostname or IP address.
- Port: Type the port number. The default port value is 8014.
- Username: Type the username as needed.
- Password: Type the password as needed.
-
- Notes:
- You must select a Proxy Server only when the hypervisor is VMware vSphere.
- When the hypervisor is VMware vSphere, you must get the Windows Network File System (NFS) role installed on the Recovery Point Server. Instant VM process automatically installs the NFS. To manually install the Network File System, see How to manually install Network File System on a Windows Server.
- (Optional) Specify the Gateway Settings for Assured Recovery.
- Note: Applicable only to Linux.
- Note: Gateway Settings is required only when the Assured Recovery Test source is Agent-Based Linux backup/Replication (Copy to another Data Store) or Host-Based Agentless backup/Replication (Copy to another Data Store).
- Specify details for VM Settings.
- Specify Network Settings.
- Note: The Adapter Type option is not applicable when the Assured Recovery Test source is an Agent-Based Linux backup or Host-Based Agentless backup.
- Selecting Instant Virtual Disk as Test Type for Test Settings lets you mount the recovery point as local disk, verifies integrity of volume/file system, and optionally executes the custom script. The recovery point is considered as in good state if you successfully mount the recovery point, and all the tests return successful result.
- Note: The Instant Virtual Disk (IVD) option is supported only for the Windows virtual machines.
- Follow these steps:
- From the Windows Proxy Server drop-down list, select one of the available sources as needed.
- Notes:
- If you have already added a proxy source to the selected Site in the Console, you can view list of sources from the Windows Proxy Server drop-down list.
- If you have not added any proxy sources, do the following:
- Click Add.
- The Adding Host based agentless Backup Proxy Server dialog opens.
- Specify the proxy server details, and then click Save.
- Click Browse to navigate to the folder location of the Virtual Hard Disk on the proxy server.
- On the Additional Settings tab, do the following:
- Timeout: Specifies the longest time that the proxy server can wait for the heartbeat of the Assured Recovery VM. If Assured Recovery VM is not available longer than the defined timeout, the Assured Recovery test job fails.
- Frequency: Specifies the frequency with which the proxy server checks the heartbeat status of Assured Recovery VM.
- Note: The Frequency option is not available when the Assured Recovery Test source is an Agent-Based Linux backup.
- Run on Linux Backup Server after Job is Over: Specifies the script located on Linux Proxy that runs after completion of the Assured Recovery job on Linux Backup Server.
- Run on Assured Recovery VM after it is Booted: Specifies the script located on Linux Proxy that runs after the Assured Recovery VM is booted on Assured Recovery VM.
- Fail job if it Runs Longer Than: Specifies if the script runs longer than the specified times.
- Verify File System: Verifies if the file system and size of volume are similar to what the source machine has.
- Run Check Disk Command: Runs the check disk command on the volumes that instant virtual disk exposes, and checks the data integrity.
- For Instant Virtual Machine test type: "%ScriptPath%\test.bat PlanName NodeName ProxyServer RecoveryPointName
- For Instant Virtual Disk test type: %ScriptPath%\test.bat PlanName NodeName ProxyServer RecoveryPointName MountPointRootPathName
- Succeed Job
- Specifies that the assured recovery job is set to succeed when the script returns the exit code.
- Fail Job
- Specifies that the assured recovery job is set to fail when the script returns the exit code.
- Click Create Policy.
VMware vSphere
Note: If AR task setting is IVM to vSphere, the needed VMware license is similar to the one that Instant VM feature requires.
For vCenter/ESXi, select the resource pool or Host System as the location.
Note: Specify the data store of ESX(i) server if the source task is Agent-Based Linux backup/Replication (Copy to another Data Store) Host-Based Agentless backup/Replication (Copy to another Data Store).
Hyper-V
Select the host.
Note: When you connect to the Hyper-V Instant VM using a local non-built-in administrator account, the remote UAC needs to be disabled. For more information on how to disable the remote UAC for non-built-in administrator, see How to disable a remote UAC for a non-built-in administrator.
Use DHCP Settings for Instant Virtual Machine Gateway
By default, the Use DHCP Settings for Instant Virtual Machine Gateway check box is selected. If you do not want to use the DHCP settings, clear the check box, and then specify the IP Address, Mask, and Default Gateway manually.
Virtual Network
Select the desired network from the Virtual Network drop-down list.
VM Name Prefix
Specifies the VM name prefix. The name of the source with a prefix is the default name of the Instant VM. The name must have atleast 1 or maximum 80 characters. Only alphanumeric characters, underscore(_), and hyphen(-) are allowed in the name.
Default value: ARVM_
On Proxy Server
Specifies the folder location of Assured Recovery VM on the proxy server. Click Browse to select the folder for Assured recovery VM.
Note: The folder you select must have sufficient disk space.
VM Files Folder
Specifies the folder location of the Assured Recovery VM on the proxy server. You can browse the volume information of the proxy server.
Note: VM Files Folder option is not applicable when the Assured Recovery Test source is an Agent-Based Linux backup or Host-Based Agentless backup.
CPU Count
Specifies the number of CPUs that you require in the Assured Recovery VM.
Memory Size
Specifies the size of memory that you require in the Assured Recovery VM.
Connect Assured Recovery VM to Network
To connect Assured Recovery VM to network, select the Connect Assured Recovery VM to Network check box, and then select the desired network from the drop-down list.
Select Use DHCP settings for Assured Recovery VM or Use TCP/IP settings from Backup Session as needed.
Adapter Type
Specifies the Adapter Type in the Assured Recovery VM. The available Adapter Type may vary depending on the hypervisor.
Heartbeat Properties
Note: The Heartbeat properties option is available only if you have selected the Instant Virtual Machine as your Test Type.
Pre/Post Scripts to Settings
Note: The Pre/Post Scripts to Settings option is available only if you select Agent-Based Linux backup/Replication (Copy to another Data Store) or Host-Based Agentless backup/Replication (Copy to another Data Store) as Recovery Point Source of Assured Recovery Test.
Check Points
Note: The Check Points option is available only if you have selected the Instant Virtual Disk as your Test Type.
Custom Command Location On Proxy
Note: The Custom Command Location On Proxy options is not available if you have selected the Agent-Based Linux backup as Recovery Point Source of Assured Recovery Test.
Specifies the custom script that is stored on the proxy server. You can browse the volume information of the proxy server. If IVM assured recovery type is selected, the script is copied into VM and executed when VM boots. If IVHD assured recovery type is selected, the script is executed on the proxy server.
Note: The Assured Recovery job can only support the executable Windows bat script or executable binary. But, this limitation does not restrict your usage of Assured Recovery job. You can use a Windows batch script written to start your powershell script, such as the name test.bat with the following content:
Powershell.exe -NoProfile -ExecutionPolicy ByPass -Command "& '%ScriptPath%\AR-check.ps1'"
Additionally, the following arguments are passed to the script as per your requirement.
- set PlanName=%1%
- set NodeName=%2%
- set ProxyServer=%3%
- set RecoveryPointName=%3%
- set MountPointRootPathName=%5% (Applicable only to Instant Virtual Disk test type)
As a result, the bat is invoked and run as below:
On Exit Code
Specifies the exit code for Succeed Job or Fail Job.
Fail job if it Runs Longer Than
Specifies if the script runs longer than the specified times.
Default value: 15 Minutes.
You have successfully created the Assured Recovery task.