How to Recover or Pin a Recovery Point for Cloud Direct
You can recover or pin a recovery point. From the recovery point tab of a destination, click the drop-down option for action. Pin or Recover option appear.
Pin a Recovery Point: Using the Pin option keeps a recovery point highlighted. If you select Pin from the drop-down option of a recovery point, the icon at start turns yellow.
Recover a Recovery Point: To recover, you need to perform two steps in the Restore Wizard.
Follow these steps:
- Do one of the following:
- Navigate to Protect > Sources, and then select Start Recovery from the Action drop-down list of a source that you want to recover.
- Navigate to Protect > Destinations > Arcserve Cloud, and then select View Recovery Points from the Action drop-down list of a cloud volume that you want to recover.
- From the Action drop-down list of a recovery point that you want to recover, click Recover.
- Notes:
- If your source is an Agentless Machine or Windows Image Backup recovery point, click Browse Recovery Point and select the .img file associated with each disk of your Agentless Machine.
- If your disk is a static NTFS format drive (likely on a Windows system), double-click the .img file, select a folder or file on the disk, and then click Restore Using Cloud Direct Agent.
- If you select the .img file, select a format to convert your .img file. Mac, Windows, and Linux can restore as vhdx. Linux 64 bit can also restore as vmdk.
- If you select a Folder or SQL backup task point, click Browse Recovery Point, navigate to the file or folder that you want to recover, and then click Restore Using Cloud Direct Agent.
- If you click Browse Recovery Point, right-click any file that is less than 140 MB and then click Download. As the option is a result of a browser download, none of the original ACLs and timestamps are preserved.
- If you select a File backup, then you can just enter the destination path.
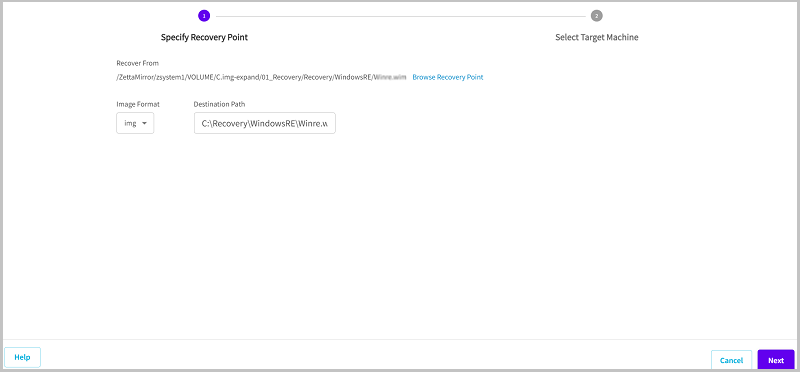
- On the Specify Recovery Point page, to download the data from cloud, do one of the following, and then click Next:
- Do the following:
- Click the Browse Recovery Point link.
- The Browse Recovery Point dialog appears.
- Browse the data available within a recovery point, and then click Restore Using Cloud Direct Agent on the toolbar, or right-click the file/folder, and then click Restore <file/folder> using the Cloud Direct Agent.
- From the Image Format drop-down list, select the image format and then specify the destination path.
- Notes:
- Verify if the destination path is a valid path for the destination system where you will recover to.
- For Windows destinations, you can enter local drive or UNC paths if you have selected a folder. If you have selected a .img file and want to recover to a Windows system, enter a local drive path.
- For Linux or Mac destinations, you can enter a Linux path.
- If a folder is selected, the CD Agent will recover the contents of the selected folder into the path entered. If you want to restore the selected folder with the same name, enter the folder name at the end of the destination path.
-
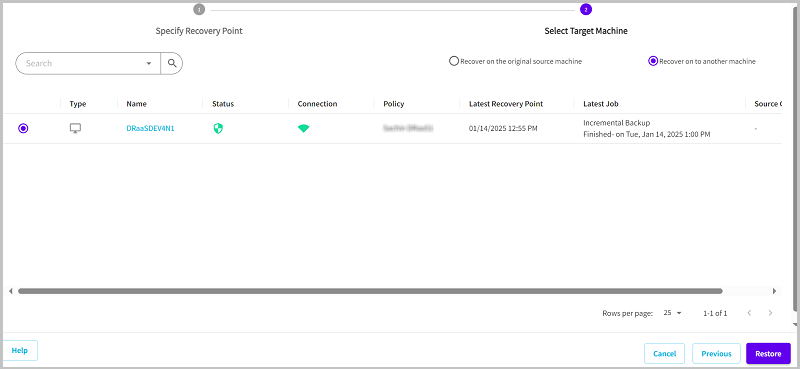
- On the Select Target Machine page, to select a target machine, do one of the following, and then click Restore:
- If you want to restore on the original source machine, select Recover on the original source machine.
- If you want to restore on another machine, select Recover on to another machine, and then select the desired machine from the list.
- Notes:
- If you want to restore a file/folder from a Windows source or SQL backup, select a Windows source as a destination.
- If you want to restore a file/folder from a Mac or Linux source, select a Mac or Linux source as a destination.
-
- A message confirms that recovery started successfully and you return to the selected destination.
The detailed page of a selected source or a cloud volume displays with the Recovery Points tab.
On the Specify Recovery Point tab, when you click Browse Recovery point, the Browse Recovery Point dialog appears displaying folders with details. You can perform the following actions:
- Level Up: Navigates you one level up in the folder structure.
- Show/Hide Folders panel: Displays or hides the complete folder structure of the volume based on your selection.
- Restore: To restore, select one file/ folder and click Restore Using Cloud Direct Agent.
- Refresh: Click the Refresh icon on top to get the latest information on Recovery points.
- Views: Customize the views of folders according to your requirement. You can customize to view details or view folder names only in desired size.