Who has Access to the Information on OneXafe—Adding, Removing, or Editing Users’ Access to Storage?
Users must have an account created in OneSystem by a user with Admin permissions before they can access shares on the network with ’restricted’ or ’registered user’ access permissions.
Note: This does not apply to OneXafe Clusters that are authenticated with Active Directory.
To add a User
- Login to OneSystem at https://onesystem.exablox.com and click the ‘Users & Groups’ tab on the left-hand navigation bar.
- Click the teal Add Users radio tab on the left half of the window.
- Enter the name (first, last).
- Enter an email address (confirmation is required upon acceptance of email before the account is active).
- Select a role:
- The user role will only have access to the shares that are configured for them. A user has no administrative rights on OneSystem.
- The admin role allows the user to administrate OneXafe (create more users, groups, shares, and so on).
- In the "Group Member of" area, type or select any group(s) from the field as necessary.
- Note: Users can be added to groups at any time. Users can be added to more than one group.
- Assign the user Share Access.
- In the "Share Access" area, type or select the shares the user will have access to.
- Assign read/write permissions to each of the shares for the user. Different permissions can be assigned to different shares.
-
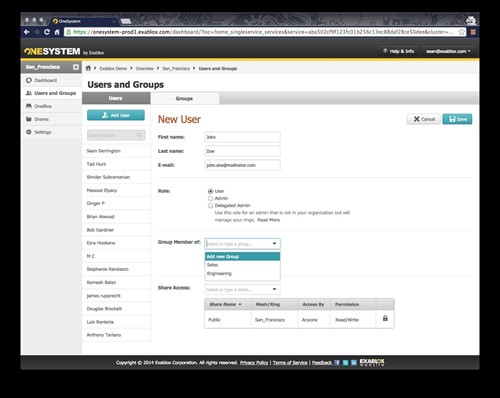
- Note: Some shares have permissions that cannot be changed (e.g., for a Public share, everyone has read/write access).
-
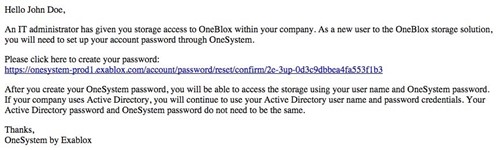
- Once the password is created, the user will see a confirmation and can begin using OneSystem.
- Note: The user permissions for access to shares will go into effect only after the account is confirmed, and the user clicks on the confirmation link and creates a password to use OneSystem.

8. Click Save.
The user will get a confirmation email from OneSystem. The user will need to click on the confirmation link in the email to activate the account. In so doing, the user will be directed to https://onesystem.exablox.com and prompted to create a password.
To edit a User
- Select the user to edit from the list of users on the left-hand panel, then click on the pencil next to the user’s name.
-
- Make the necessary changes to the name, group membership, and/or the share access.
- Click Save to save the changes.
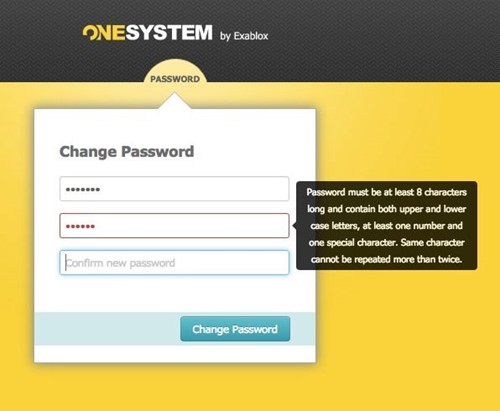
To change the password for a user
- Click on the user email address in the top right corner of the browser.
- Select change password, then enter the old and new desired password.
- Click Change Password to confirm the changes.
-