Protecting Full Systems › Configure the Web Proxy to Connect to the Cloud Service › Create a New Full System EC2 High Availability Scenario
Create a New Full System EC2 High Availability Scenario
You can create a Full System EC2 High Availability scenario and replicate an entire on-premises Windows system into offline EBS-backed Windows AMIs that will be brought online should the master server fail. This procedure launches a Wizard that guides you through the steps required for High Availability scenario creation. However, properties can also be configured outside of the wizard.
To create a new full system EC2 High Availability Scenario
- Open the Manager and choose Scenario, New or click the New Scenario button to launch the wizard.
The Welcome screen opens.
- Choose Create a New Scenario, select a Group from the list and then click Next.
The Select Server and Product Type screen opens.

- Choose Full System, High Availability Scenario (HA) and then click Next.
The Master and Replica Hosts screen opens.
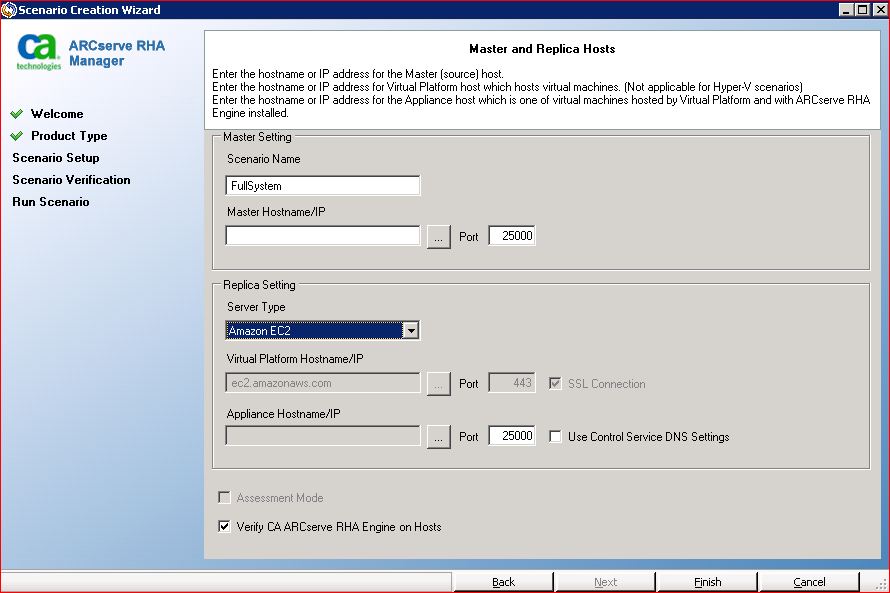
- Do the following in the Master and Replica Hosts screen:
- Type a Scenario Name and enter the Hostname or IP Address and Port number for the Master server.
- Specify Amazon EC2 as the Replica server.
- Specify the EC2 replica instance (appliance). Click the
 button to browse for and select the AWS account and EC2 replica instance (appliance).
The Cloud Instance Selection dialog opens.
- Select the AWS account, cloud replica (appliance), and region and click OK.
- Select or clear the Use Control Service DNS check box as needed. Selecting this check box applies the DNS settings from the Control Service server to the EC2 replica instance (appliance) host.
- Ensure the Verify CA ARCserve RHA Engine on Hosts option is enabled (default) and click Next.
The Engine Verification screen opens.
- Wait for Engine Verification to complete and click Next. If required, click Install to upgrade the Engine on one or both servers and Verify Again.
The Volume Setting screen opens.
- Select one or more volumes for the physical machine you want to protect and click Next.
The Scenario Properties screen opens.
- Accept the default values or set new values as required and click Next when you are done.
Note: Scenario properties control the entire scenario. These properties can also be configured outside of the Wizard. For more information, see Configuring Scenario Properties.
The Master and Replica Properties screen opens.
- Master and Replica properties apply only to host servers. Accept the default values or change values as needed and click Next.
Note: All Cloud Replica properties are read-only except for the Cleanup Cloud Resources When Remove Scenario property, disabled by default.
The Switchover Properties screen opens.
- Expand the Switchover property and enter the Switchover Hostname.
- Expand the Hosts property and enter the Master Fully Qualified Name and Replica Fully Qualified Name.
- Expand the Network Traffic Redirection property and specify redirection options, including Redirect DNS, DNS Servers IPs, and Master IPs in DNS.
Note: When you set the Redirect DNS option to Off, you can also specify a value for the Virtual Machine IPs on Replica server in DNS option. If the Redirect DNS property value is On, then the Virtual Machine IPs on Replica server in DNS option will not display in the list.
- Expand the Physical Network Mappings option under Network Traffic Redirection.
The Network Adapter Mapping dialog opens.
- Set network mapping between the master adapter and the replica adapter and click OK.
The Switchover and Reverse Replication Initiation screen opens.
- Select a switchover option. Automatic is not recommended. For more information, see Switchover. Click Next.
Wait for Scenario Verification to complete.
- If errors or warnings are listed, resolve them before continuing. When ready, click Next.
The Scenario Run screen opens.
- Click Run Now to start synchronization and activate the scenario, or click Finish to run the scenario later.
Additional Properties for Full System Scenarios
You can manually change the following properties after the scenario creation process is complete:
- Virtual Machine Local Directory (Scenario Properties tab)
-
In the Replica Root Directory list, double-click the virtual machine local directory to browse and select a new location. Click OK and then click the disk icon to save the modified scenario.
- CPU Core (Replica Properties tab)
-
On the High Availability Properties tab, expand Virtual Machine settings. Click CPU Core to modify the number.
- Memory Size (Replica Properties tab)
-
Click Memory Size to modify the value.
- Virtual Network Mappings (Scenario Properties tab)
-
Besides the Virtual Network Mappings setting, click the entry, "Click to edit Virtual Network Mappings" to display the Physical Network Mapping dialog.
- Virtual Machine Name (Replica Properties tab)
-
You may change the Virtual Machine Name, if desired. By default, the Master hostname is used.
Save the modified scenario when you are done modifying these settings.
Configure Additional Properties in Full System-to-ESX Scenarios
When configuring full system scenarios on ESX servers, you must manually enter an IP address on the Replica server to prevent scenarios from failing to run.
To manually enter a virtual machine IP address on the Replica server
- Configure the scenario as described in the Create Full System Scenarios topic.
- When you reach the Switchover Properties screen, expand the Network Traffic Redirection properties.
- Set the following property to On: Redirect DNS.
- Enter the DNS IP address.
- Expand Master IPs in DNS. Click the value column and enter the IP address for the Master host.
- Expand Virtual Machine IPs on Replica server in DNS.
- Select Click here to add new IP and specify the IP address of the virtual machine on the Replica server to be used in case a switchover or failover is triggered.

