Creating the IT Edition USB Key
Note: Previous editions of the IT Edition USB key included a pre-built Windows environment. Microsoft discontinued the distribution of this product, requiring users to create this environment manually.
Arcserve provides the Recovery Environment Builder (REBuilder) to create the Recovery Environment for Windows IT Edition (also known as Windows Recovery Environment IT edition) either in the Standard or PRO version. The resulting IT Edition works as previous editions with tools to restore system volumes.
IT Edition USB Key
Arcserve ships a USB key for the IT Edition which includes:
- Recovery Environment CrossPlatform.
- Recovery Environment for Windows.
- ShadowProtect Granular Recovery for Exchange (GRE)--runs in Demo mode.
- Configuration files to support the Windows Recovery Environment IT edition.
The USB key can boot a system into Recovery Environment CrossPlatform for backing up or restoring system volumes. The REBuilder tool adds Windows Recovery Environment IT edition to the key to create the familiar IT Edition. Once the tool adds Windows Recovery Environment IT edition to the key, the key can perform two operations:
- Insert the key into a live system to run ShadowProtect without installing any software.
- Boot a system using the key displays a menu to run either Windows Recovery Environment IT edition or Recovery Environment CrossPlatform.
To create the IT Edition, follow these steps:
Warning! The dual-boot capability of the IT Edition requires using the assigned volume name on the USB drive as shipped. Do not change this. Doing so prevents the dual boot option.
- Download and run the Setup executable on a working Windows 7 or newer system.
- Note: If this system is a VM, verify that the CD-ROM settings for the VM do not use Legacy Emulation. Otherwise, the VM cannot burn the ISO to a CD or DVD disc, Also, on ESXi systems, verify that the client uses Passthrough IDE and not Emulate IDE.
- Select the REBuilder's language then click Next.
- Note: This language selection only applies to dialogs in the REBuilder, not to the IT Edition that it builds.
- Follow the wizard to install the REBuilder.
- Once the install completes, select Start\All Programs\Arcserve\Recovery Environment Builder to run the program (if it is installed using the default location of Program Files\Arcserve\ReBuilder.
- If the software does not detect the installed Windows Assessment and Deployment Kit (ADK), it displays the following error message:
-
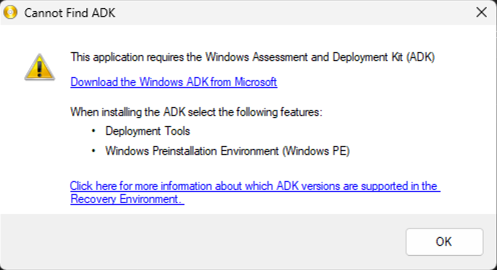
- Click Download the Windows ADK from Microsoft in the dialog window.
- This will take you to the Microsoft ADK Install page.
- Note: Don't click OK yet. You first need to select the ADK and PE components as described below.
- On the Microsoft ADK Install page, scroll down until you see the following information.
-
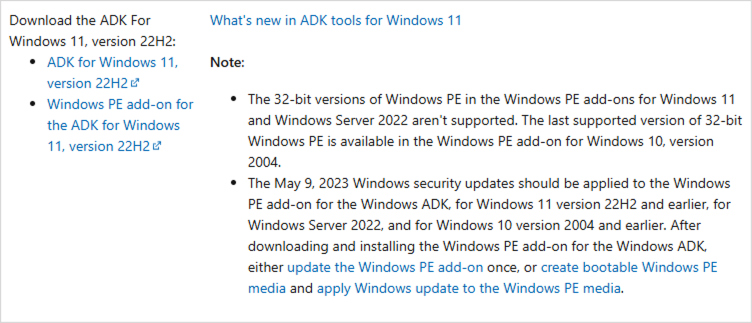
- You will now need to install the ADK for Windows 11, and the Windows PE add-on separately as described in the sections below.
- Close the REBuilder program then complete all the steps in the following sections.
Download and install ADK for Windows 11
- Click ADK for Windows 11, version 22H2.
-
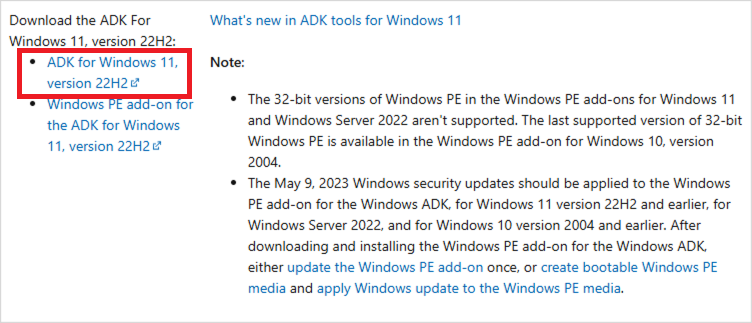
- On the Windows Assessment and Deployment Kit screen check only the box for Deployment Tools (uncheck all other boxes) then click Install.
-
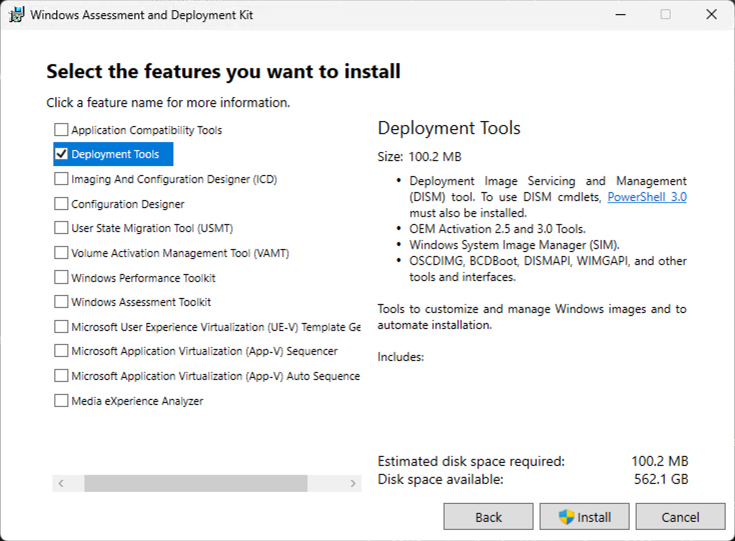
- Run the ADK setup program. Follow the wizard prompts to begin the install.
Download and install ADK for Windows 11
- Click Windows PE add-on for the ADK for Windows 11, version 22H2.
-
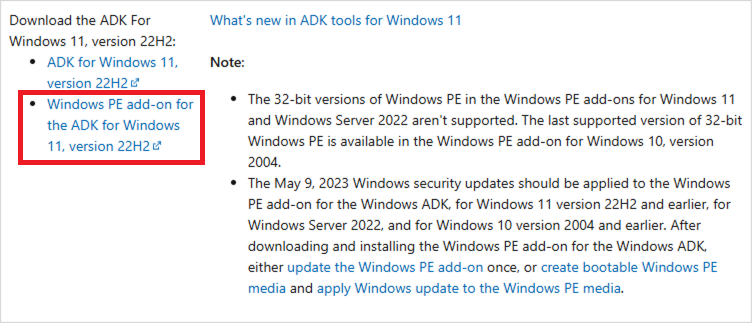
- On the Windows Assessment and Deployment Kit Windows Preinstallation Environment Add-ons screen check the box for Windows Preinstallation Environment (Windows PE) then click Installl.
-
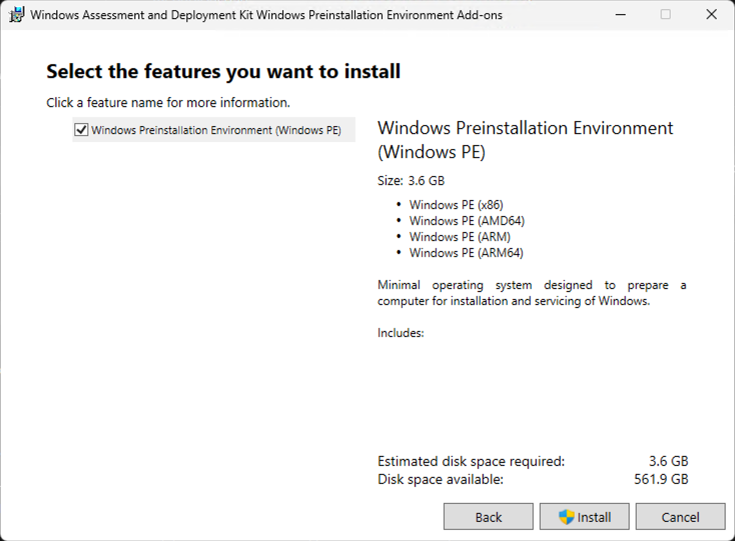
- Close the installer when it completes.
Rerunning REBuilder to Complete the Installation
- Rerun the REBuilder. The software displays its main dialog:
-
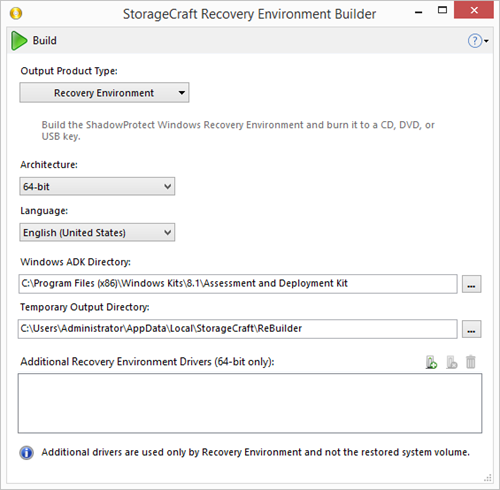
- Select the Output Product Type as IT Edition.
- Note: The list includes IT Edition 3-Day ISO as well as this ISO is no longer available from Arcserve directly.
- Select the appropriate language.
- Note: This language selection only applies to the IT Edition, not to any OS being restored. The default is the language selected with the REBuilder Setup program.
- Keep the default paths for the ADK and the ISO output unless necessary.
- (Optional) The IT Edition may need additional drivers to view specific storage devices. Adding these drivers here means that these drivers are included on the USB stick. To install these drivers, click
 on the menu bar.
 - Note: You can use 32-bit drivers to build the 32-bit IT Edition. You can use 64-bit drivers to build the 64-bit IT edition. You cannot use 32-bit drivers to build the 64-bit IT Edition (or any 64-bit RE). You cannot use 64-bit drivers to build the 32-bit IT Edition (or any 32-bit RE). Attempting to build an IT Edition (or any RE) with the wrong drivers will result in an error.
- Locate each needed .inf driver file to include in the Recovery Environment.
- To remove a listed driver, select the driver and click
 .
. - Click
 to build the IT Edition Recovery Environment.
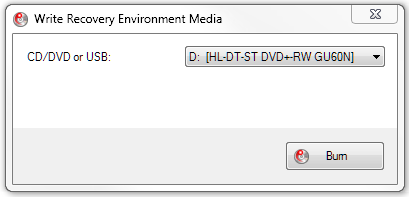
 - When finished, REBuilder stores the IT Edition ISO in the selected path. REBuilder then asks if you want to burn the ISO to a CD, DVD, or to USB:
-
- Note: REBuilder displays an error if the system has no recorder.
- If you don't want to burn an ISO, simply close the dialog.
- To burn the ISO later, rerun the REBuilder tool.
- NOTE: You can also use the ShadowProtect ISOTool to burn this ISO to a CD.
- Click
 to open the Burn dialog.
 - Select the destination in the dropdown box.
- Click Burn.
Important! The IT Edition Recovery Environment created by REBuilder does not currently support iSCSI.
Warning! Do not delete any of the listed driver files or move them to a different folder until after using the REBuilder to burn the last required copy of the ISO. (Which may be later on.) If the REBuilder cannot find the driver file(s), it fails. If this occurs, restart the program and recreate the list with the correct driver location(s).
The program burns the ISO to the disc or USB key.
You can now use the disc (or insert the USB key) to boot a PC and recover a system volume. If this is an IT Edition PRO, you can also run ShadowProtect Granular Recovery for Exchange (GRE) to restore mailboxes, folders, or messages.