Using the Boot Configuration Utility
In most restores, the Recovery Environment's automated boot configuration repair ensures that a system volume is bootable. In cases where this process encounters problems or where the volume is part of a complex multi-boot scenario, the Boot Configuration Utility (BCU) can manage the boot configuration repair process. The utility modifies the configuration data (hence BCD in the interface for "boot configuration data"). The BCU can also test the "bootability" of a system volume while still in Recovery Environment and do an automatic repair even before rebooting the system.
Review the Windows Boot Process to better understand the BCU process.
To use the Boot Configuration Utility
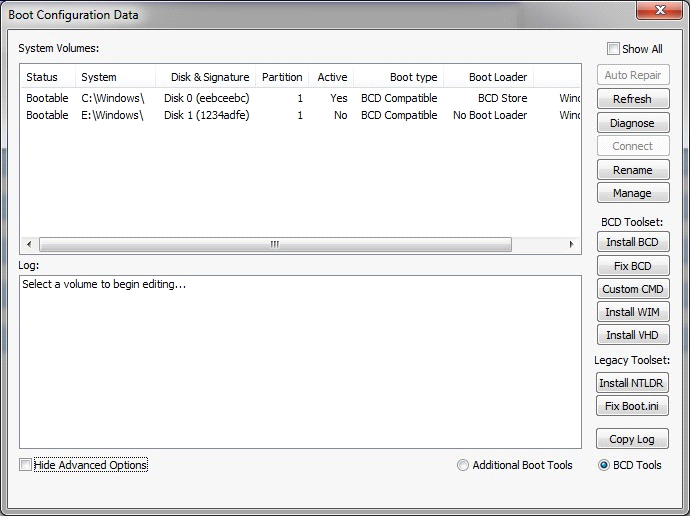
BCU interface lists
|
Available tools |
Buttons at the right side of the dialog |
|
Accessible volumes |
System Volumes in the top pane |
|
Running event log |
Log in the lower pane |
It also displays options to:
|
Show All |
(Default: Not Selected) Displays either all volumes on the system (Show All) or only system volumes in the top pane. |
|
Hide Advanced Options |
(Default: Selected) Hides all of the boot configuration tools except Auto Repair. |
|
Additional Boot Tools |
(Default: Not selected) Displays a set of advanced tools for working with the registry and disks. Toggles with the BCD Tools option. |
|
BCD Tools |
(Default: Selected) Displays the BCD toolset. Toggles with the Additional Boot Tools option. |
To use the BCU, follow these steps:
- Select Tools > Boot Configuration Utility.
- The System Volumes pane lists all accessible partitions that contain a Windows installation.
- Select Show All to display all detected volumes on the system even if they do not contain a Windows installation. (This might be necessary for advanced boot scenarios). Each System Volumesentry includes the following information:
- Status - The status of the current boot configuration. Piossible values include Bootable and Broken.
- System - The root and drive letter of the detected Windows installation.
- Disk & Signature - The disk number and its signature. Every disk has a unique signature.
- Note: Duplicate disk signatures can cause boot failures.
- Partition - The disk partition where this volume resides.
- Active - Indicates if the partition is configured as a Boot Partition. Although each disk in the system can have a defined boot partition, when using the Boot Configuration Utility it is best to have only a single boot partition.
- Boot Type - The type of boot loader required by the Windows installation. Possible values include:
- Legacy: Uses the pre-Windows-Vista boot loader.
- BCD Compatible: Uses the BCD boot loader introduced with Windows Vista.
- Boot Loader - The boot loader installed on the partition, if any.
- Click on the desired boot repair action to fix a broken volume:
- Auto Repair: Runs the automated boot configuration routine. (This appears only when the System Volumes pane lists the selected volume status as Broken.)
- Note: Using Auto Repair should be the first course of action when attempting to fix a boot configuration.
- Refresh: Refreshes the volume data in the System Volumes pane.
- Diagnose: Runs the same automated boot configuration routine as Auto Repair except it is in read-only mode. This routine displays a description of the boot configuration error and presents possible courses of action.
- Connect: Links additional bootable partition(s) to the active partition for use in dual- or multi-boot environments. Without this connection, the additional boot environments would not be accessible. To link each additional partition, select one partition at a time, click Connect, then select the active partition and click OK.
- Rename: Opens the Boot Loader Entry Name dialog box. Use this dialog to change the selected volume's name at boot time.
- Manage: Opens the Manage Boot Entries dialog box. Use this dialog to delete unwanted boot entries from the selected volume. Each entry displays the technical name and the listed name. Use this option to remove unwanted boot entries at startup time.
- Warning!Deleting valid entries renders a volume unbootable until repaired.
- Copy Log: Copies the contents of the event Log shown in the lower pane to the clipboard so you can save it to a text file.
- Note: The contents of the log refresh after each action runs. Using Copy Log allows you to preserve the results of each action.
- Install BCD: Installs a BCD boot loader. This might be necessary if the Windows installation was not the Active partition on the system where it was created.
- Note: This option only works for post-Windows-Vista OSes.
- Fix BCD: Repairs BCD-compatible boot configurations. When migrating a volume to a different disk, information required for startup might be altered or lost. This option repairs or replaces this information.
- Note: This option only works for post-Windows-Vista OSes.
- Custom CMD: Opens the BCDEdit utility for the BCD store of the selected Windows Vista or later installation.
- Install WIM: Selects a Windows Image (WIM) as a boot option.
- Install VHD: Selects a Virtual Hard Disk (VHD) image as a boot option.
- Install NTLDR: Installs a legacy (NTLDR) boot loader. This includes the NTLDR, NTDETECT.COM, and BOOT.INI files. This install may be necessary if the Windows installation was not the Active partition on the system where it was created.
- Note: This option only works with pre-Windows-Vista OSes.
- Fix Boot.ini: Repairs the boot.ini file used by legacy (NTLDR) boot configurations.
- Note: This option only works with pre-Windows-Vista OSes.
- Edit Services: Opens the Service Explorer. Use the Explorer to enable or disable services and drivers for the selected volume. This is very helpful to debug a migration compatibility issue or identify a driver or service that is causing a startup failure.
- Drive Letter: Opens the Drive Letter editor. Use this editor to assign a specific letter to any drive in the selected volume. This is useful to restore drive letters as they were before the migration.
- Undo: Loads the registry backups for the selected volume. The BCU makes a backup of the registry whenever you use the Drive Letter Editor or the Service Explorer. This lets you back out of any changes that resulted in unexpected behavior.
- Note: This registry backup is the same one used by the Hardware Independent Restore (HIR), so any HIR changes are lost when you use Undo.
- Patch MBR: Replaces the currently selected MBR and Hidden tracks with the MBR and Hidden Tracks from the selected source: default Legacy (pre-Vista), default Windows Vista, default Windows 7, or fom the volume's corresponding ShadowProtect backup image. This is useful if data from Hidden tracks were not restored.
- Set Signature: Opens the Enter New Disk Signature dialog. Use this dialog to manually set a disk signature. Typically, Windows sets the disk signature during installation, but migration and disk duplication can result in two disks having the same signature.
- Note: The Boot Configuration Utility warns the user if there is a conflict between two disks.
- Toggle Active: Sets the active partition flag for the selected partition. There can only be one active partition per disk. If the partition is already set active, Toggle Active disables it.
- Initialize: Opens the Initialize Disks dialog. Use this dialog to initialize a disk as either MBR or GPT.
- Note: Initializing a disk erases all partitions and data from the drive. After initializing a disk, you must reboot before using the disk.
- Review entries in the Log pane to see the result of each boot configuration action.
- Note: If an action fails, the log information identifies the point of failure.
- Close the utility.
General Tools
BCD Toolset (displayed by selecting BCD Tools)
Legacy Toolset (displayed by selecting BCD Tools)
Registry Toolset (displayed by selecting Additional Boot Tools)
Disk Toolset (displayed by selecting Additional Boot Tools)
This section contains the following topics: