To use the Image Conversion Tool
Follow these steps:
- In the ShadowProtect Tools menu at the left (or in the Tasks dropdown menu), click Image Conversion Tool.
- The Image Conversion Tool wizard appears. Click Next.
- On the Source Image File page, browse to the location of the backup image files you want to modify.
- ShadowProtect displays the a list of the backup chains stored in this location.
-
- Select the chain by selecting the chain's full image file.
- Click Next.
- Note: Provide the password If the backup image is encrypted.
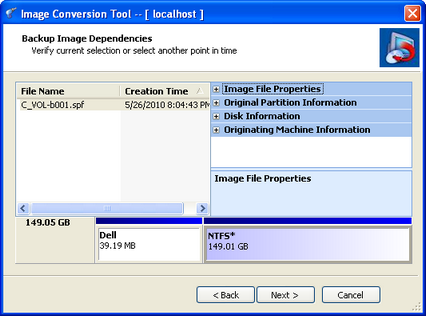
- In the Backup Image Dependencies page, select the incremental image that represents the point in time you want. (The default is the full image.)
-

- ShadowProtect also displays the selected file's properties in four groups in the right panel:
- Originating machine: The operating system version, the machine name, MAC address and the engine version of ShadowProtect used to create the image file.
- Disk Information: Disk geometry, disk size and number of the first track sectors. You can view the original disk layout in graphical form at the bottom of the screen.
- Original Partition Information: Style, number, type, bootable option, starting offset and length.
- Image File Properties: Volume size, creation time, compression, password protection, comment.
- In the Destination Image File page, specify the required information, then click Next.
- In the Wizard Summary page, review the job summary, then click Finish.
- Note: After converting a system volume backup image to a VHD or VMDK, make sure to load Recovery Environment in the VM first and run Hardware Independent Restore (HIR) using this converted system volume. Since the VM uses different hardware than the original system, you must do this before the operating system will boot successfully. If you still have boot problems refer to "Using HIR" and "Using the Boot Configuration Utility" in the Recovery Environment User Guide.
-
Caution! Hyper-V currently does not support attaching and booting a VHDX file created from a system volume backup image.
|
Select network location or browse to a local path |
From the drop-down menu, select the Destination where you want to store the destination image file. If the menu doesn't show the path, click Browse to find the desired location. |
|
Specify image name |
Specify a name for the destination image file. |
|
Save As |
Select the type of image file you want to create. Supported options include: SPF: Creates a new full (base) image file by consolidating the original full image plus all the incremental files up to the point in time of the incremental selected. This full image can then be archived. VHD: Creates a Microsoft Virtual Hard Disk file compatible with Hyper-V virtual environments. VHDX: Creates a newer generation of Microsoft Virtual Hard Disk which supports volumes greater than 2TB. VMDK: Creates a Virtual Machine Disk file compatible with VMWare virtual environments. NOTE: Both the Recovery Environment-CrossPlatform and the one for Windows also support conversion of image files to .VHDx format. |
The Image Conversion tool then creates the appropriate converted file.
Canceling an Image Conversion
Click Cancel to abort the conversion. For VMDK conversions, note that ShadowProtect creates a temporary file during the conversion. Unlike other Arcserve products, the Image Conversion tool creates this temporary file with the actual name and .VMDK extension of the final completed conversion. After canceling this type of conversion, this temporary *.vmdk file may remain. This stub is incomplete and cannot be used for mounting.