Rear Panel of 9012-9048
The rear panel of the Arcserve Appliance contains the power supplies, cable connections, and ports for the appliance. The following table describes these items:
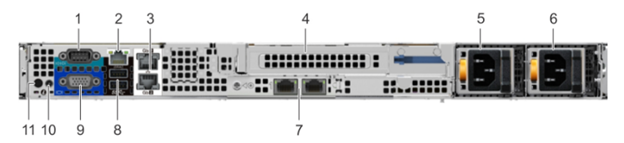
|
Number |
Control / Indicator |
Icon |
Description |
|
1 |
Serial port |

|
Use the serial port to connect a serial device to the system. For more information, see link. |
|
2 |
iDRAC9 dedicated network port |
Use the iDRAC9 dedicated network port to securely access the embedded iDRAC on a separate management network. For more information, see link. |
|
|
3 |
Ethernet ports (2) |

|
Use the Ethernet ports to connect Local Area Networks (LANs) to the system. For more information, see link. |
|
4 |
Full height riser slot |
Use the card slots to connect full-height PCIe expansion cards on full height riser. |
|
|
5 |
Power supply unit (PSU) |
For more information about the PSU configurations, see link. |
|
|
6 |
Power supply unit (PSU) |
For more information about the PSU configurations, see link. |
|
|
7 |
LOM riser ports (2) |

|
For more information about the PSU configurations, see link. |
|
8 |
USB 3.0 port (2) |

|
Use the USB 3.0 port to connect USB devices to the system. These ports are 4-pin, USB 3.0-compliant. |
|
9 |
VGA port |

|
Use the VGA port to connect a display to the system. |
|
10 |
CMA power port |
The Cable Management Arm (CMA) power port enables you to connect to the CMA. |
|
|
11 |
System identification button |

|
Press the system ID button:
To reset iDRAC, press and hold the button for 15 seconds. Notes:
|