How to Create Bootstrap VM
This section provides information about how to create Bootstrap VM in the Nutanix dashboard.
Follow these steps:
- Log into the Nutanix cluster console using Admin credentials.
- Click the settings icon on the top-right corner.
- From the left pane, click Image Configuration.
- The Image Configuration dialog appears.
- On the Image Configuration dialog, click + Upload Image button.
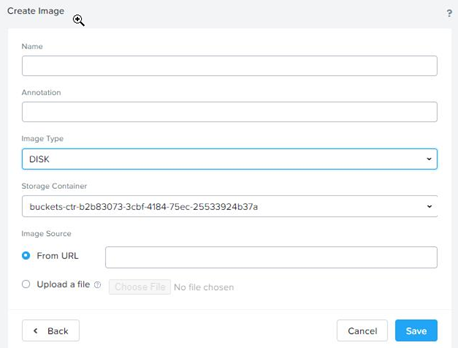
- The Create Image dialog appears.
- On the Create Image dialog, do the following, and then click Save:
- Name: Type a name for the bootstrap image.
- Annotation: Type a description if required. It is optional.
- Image Type: From the drop-down list, select DISK as the image type.
- Storage Container: From the drop-down list, select the default storage container.
- Image Source: To upload the image, do the following:
- Select the Upload a file option, and then click Choose File.
- Navigate to the location where the Arcserve bootstrap VM Disk image is saved, select the image, and then click Open.
-
- Wait until the image gets uploaded.
- After the bootstrap VM Disk image is uploaded, from the Tasks drop-down list, select VM.
- On the VM dashboard, click + Create VM.
- The Create VM dialog appears.
- On the Create VM dialog, do the following:
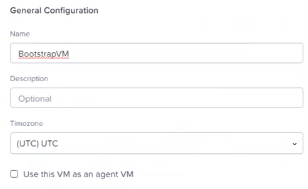
- Under General Configuration, specify the following:
- Name: Type a name for the VM.
- Description: Type a description for the VM. It is optional.
- Timezone: From the drop-down list, select the time zone that you want the VM to use.
- Note: Make sure the Use this VM as an agent VM check box is not selected as it is not required for bootstrap VM.
-
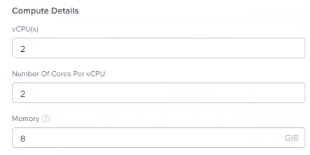
- Under Compute Details, specify the following:
- vCPU(s): Enter the number of virtual CPUs to allocate to this VM. The default value is 2.
- Number of Cores Per vCPU: Enter the number of cores assigned to each vCPU. The default value is 2.
- Memory: Enter the amount of memory to allocate to the VM. The default value is 8 GiB (minimum).
-
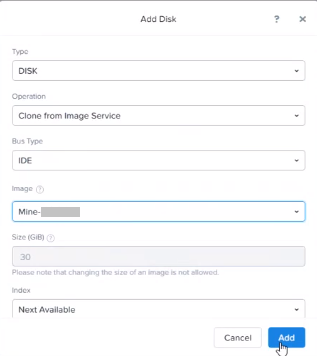
- Under Disks, do the following:
- Click + Add New Disk.
- The Add Disk dialog appears.
- On the Add Disk dialog, do the following, and then click Add:
- Type: From the drop-down list, select the type of storage disk. The default option is DISK.
- Operation: To copy an image that you have uploaded using image service feature onto the disk, select the Clone from Image Service option from the drop-down list.
- Bus Type: From the drop-down list, select IDE as the bus type.
- Image: From the drop-down list, select the image that you have uploaded previously to Image Configuration.
- Notes:
- The Image field gets populated automatically when you select the Clone from Image Service option.
- After the image is selected, the Size (GiB) field displays the size of image automatically and gets disabled.
- Index: From the drop-down list, select the index.
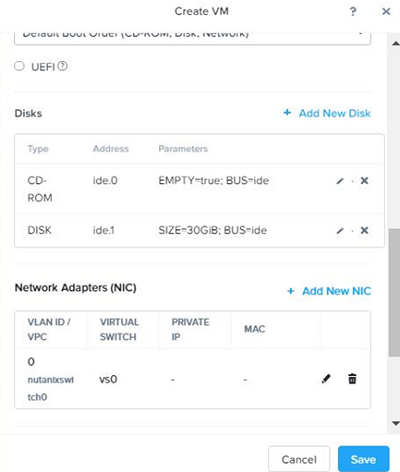
- The disk gets added to the VM and appears in the table. You can edit and remove the disk as needed.
-
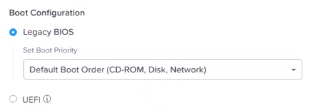
- For Boot Configuration, retain defaults.
-
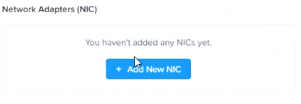
- For Network Adapters (NIC), to create network interface for the VM, click + Add New NIC.
-
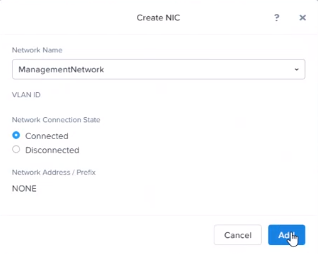
- The Create NIC dialog appears.
- On the Create NIC dialog, retain defaults, and then click Add.
-
- The network gets added in the table under Network Adapters (NIC). You can edit and remove the network as needed.
- Note: The bootstrap VM must have at least one NIC added.
- Verify the details, and then click Save.
-
- The Bootstrap VM is created successfully and appears in the VM table.