Specify the Source
The Source page lets you specify the source nodes that you want to protect. You can select more than one node in a plan. If you have not added any nodes to the Console, you can add nodes when you create or modify a plan from the Source page. You can also save a plan without adding any source nodes. The plan gets deployed only after you add source nodes.
Follow these steps:
- On the Source tab, to confirm the configurations of prerequisites, select the The prerequisites for creating this plan have been configured check box. For more information, see Review the Prerequisites for Oracle Database for RMAN (Windows and Linux).
-
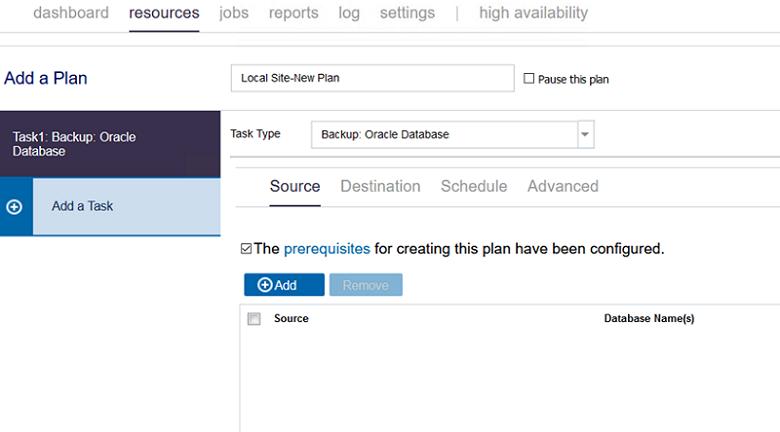
- Click + Add.
- Select one of the following options:
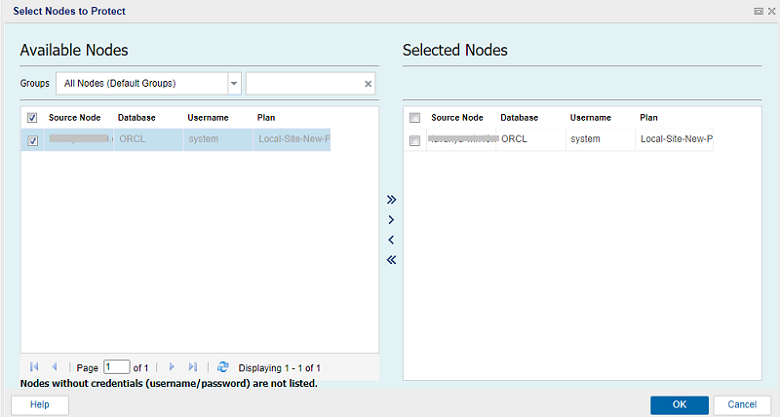
- If you select the Select Sources to Protect in Arcserve UDP option, on the Select Nodes to Protect dialog, do the following:
- (Optional) Select a filter from the Groups drop-down list to filter nodes. You can enter keywords to further filter your nodes.
- The nodes are displayed on the Available Nodes column.
- Select the nodes from the Available Nodes column, and then click the single right arrow (>) or double right arrow (>>) to move the selected nodes or all the nodes respectively to the Selected Nodes column.
- The nodes are displayed in the Selected Nodes column.
- Click OK to close the dialog.
- If you select the Add Windows Node option, on the Add windows oracle node dialog, do the following:
- Enter the node name or IP address of the Oracle node that you want to add.
- Type a description for the node.
- Enter the admin credentials.
- Click Add.
- Wait until the validation of username and password completes.
- The node is added on the center pane.
- To add multiple nodes, follow the steps again. All the added nodes get listed on the center pane.
- Click the expand symbol next to the IP address, and then verify the details that are added.
- Notes:
- To edit the added nodes from the list, select the node that you want to edit, and then click Edit.
- To remove the added nodes from the list, select the nodes that you want to remove, and then click Remove.
- To remove all the added nodes, click Remove all.
- Click Next.
-

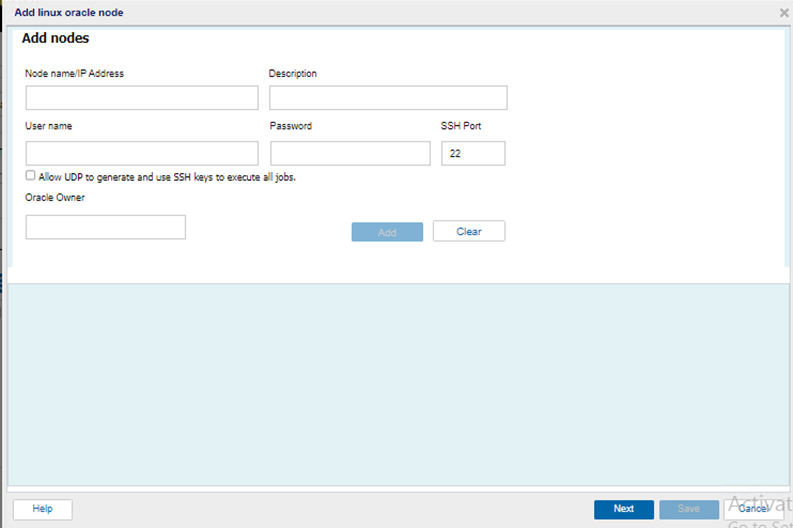
- If you select the Add Linux Node option, on the Add linux oracle node dialog, do the following:
- Enter the node name or IP address of the Oracle node that you want to add.
- Type a description for the node.
- Type the user name and password as needed.
- For SSH Port, specify the port value. The default port value is 22.
- (Optional) If you want to allow UDP to generate and use the SSH keys to execute all jobs, select the Allow UDP to generate and use SSH keys to execute all jobs check box.
- For Oracle Owner, type the user name, which is used for Oracle installation.
- Click Add.
- Wait until the validation of user name and password completes.
- The node is added on the center pane.
- To add multiple nodes, follow the steps again.
- All the added nodes get listed on the center pane.
- Click the expand symbol next to the IP address, and then verify the details that are added.
- Notes:
- To edit the added nodes from the list, select the node that you want to edit, and then click Edit.
- To remove the added nodes from the list, select the nodes that you want to remove, and then click Remove.
- To remove all the added nodes, click Remove all.
- Click Next.
- Note: To add the Oracle Solaris node, select the Add Linux Node option, and then follow Step 6.
-
- On the Add database dialog, do the following:
-

- Select the node from the drop-down list.
- Wait until the list of databases available on the selected host appears and the drop-down list gets enabled.
- From the drop-down list, do one of the following:
- To add a new database, follow these steps:
- Select the Add New Database option.
- On the Add New database to List dialog, do the following, and then click Add:
- Database name/SID: Type the database name or SID name.
- Port Number: Enter the port number. The default port value is 1521.
- Service Name: Enter the service name.
-
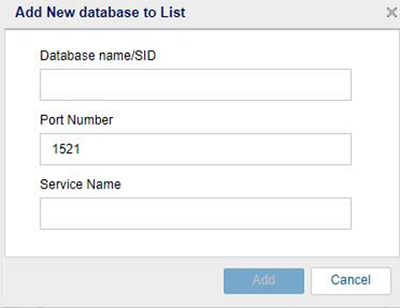
- The new database gets added in the drop-down list.
- Select the database from the drop-down list as needed. After the database is selected, it gets moved out of the list and appears in the center pane.
- Notes:
- To avoid multiple inputs for each database, group the databases that you have configured with the same user name and password.
- To add different file types to the databases having different credentials, select the individual databases, and then add.
- To remove database from the group (in the center pane), do the following:
- Click the database name.
- A confirmation message appears.
- Click Yes to confirm.
- The database is removed successfully and gets added back to the drop-down list.
- Enter the system user credentials for Oracle DB.
- Notes:
- All the items to be protected such as Database (includes Datafiles and Tablespaces), Control Files, Parameter Files, and Archive Logs are enabled by default.
- Make sure to enable the database ARCHIVELOG before the backup operation is triggered. To verify if the ARCHIVELOG log mode is enabled, see Review the Prerequisites for Oracle Database for RMAN (Windows and Linux). If the ARCHIVELOG is not enabled, the backup job fails.
- For Options, specify the following:
- Delete archive logs from the source database after a successful backup
- Lets you delete the archive logs from the source database after a successful backup.
- No of channels
- Lets you select the number of channels or threads that you want to create for the backup job.
- Note: The maximum number of channels supported are 10.
- Enable change block tracking
- Lets you enable the change block tracking feature. Use this option to enhance the performance of the RMAN. It helps the RMAN utility or the binary to find the differential data faster and perform the backup job.
- Disable change block tracking
- Lets you disable the change block tracking feature.
- Note: Oracle supports the Disable change block tracking feature only for its Enterprise Edition (EE).
- Click Add.
- All the added databases get listed.
- Note: After you click the Add button, all the database credentials and the firewall parameters are verified.
- To add multiple databases, follow the steps again. All the added databases get listed.
- Click the expand symbol next to the IP address, and then verify the details that are added.
- Notes:
- To edit the added databases from the list, select the database that you want to edit, and then click Edit.
- To remove the added databases from the list, select the databases that you want to remove, and then click Remove.
- Click Save.
- Notes:
- You can add multiple nodes and multiple databases.
- To remove the source, select the check box next to the added source, and then click Remove.
Select Sources to Protect in Arcserve UDP
The Select Nodes to Protect dialog opens. Select the nodes from the displayed list. Select this option if you have already added the nodes to the Console.
Add Windows Node
The Add windows oracle node dialog opens. Select this option if you have not added the nodes and you want to manually add the nodes to protect.
Add Linux Node
The Add linux oracle node dialog opens. Select this option if you have not added the nodes and you want to manually add the nodes to protect.
The source is specified.