Define the Restore Options
After you specify the Exchange Online information to restore, define the restore options for the selected content.
Follow these steps:
- On the Restore Options dialog, select the restore destination.
-
- The available destination options are:
- Notes:
- If you restore to original location, the data does not reflect to the Teams messages. This is not a complete restore to original location as you cannot perform the restore of root folder.
- If you restore a mail item to original location using the overwrite option twice, then after restoring second time, the first restore mail item is not overwritten. As a result, two similar mail items appear in original location.
- If you restore a mail item to original location using the skip option, and in the original folder an item similar to the restored item already exists, then the backup job displays incomplete result.
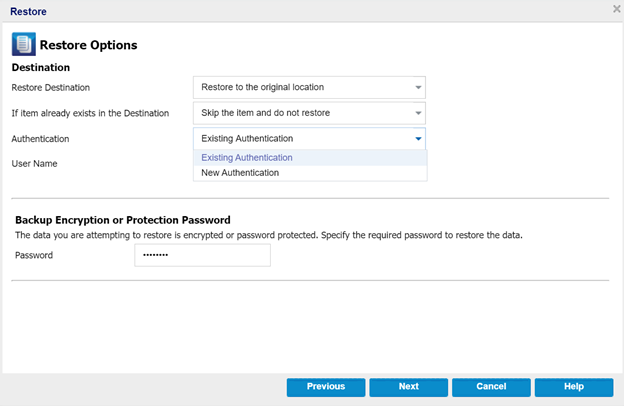
- Specify one of the following options from the If Item already exists in the Destination drop-down:
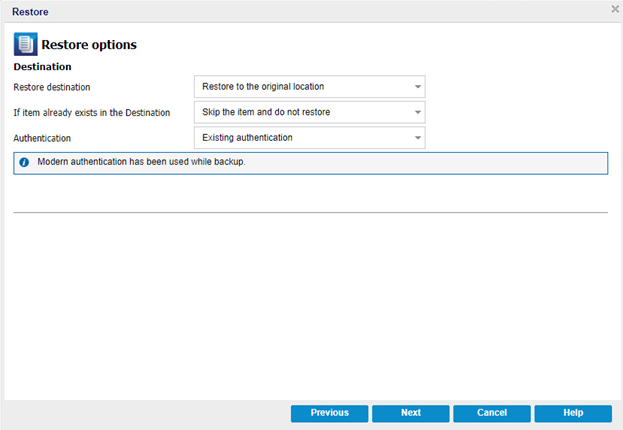
- Existing Authentication
- When you select Existing Authentication, the authentication type that was selected during Node creation is used.
- If the Node Authentication is basic, parameters such as Username, Password and Backup Encryption or Protection Password [If Encrypted] are loaded automatically to proceed with the restore.
- If the Node Authentication is modern, parameters such as Username and Backup Encryption or Protection Password [If Encrypted] are loaded automatically to proceed with the restore.
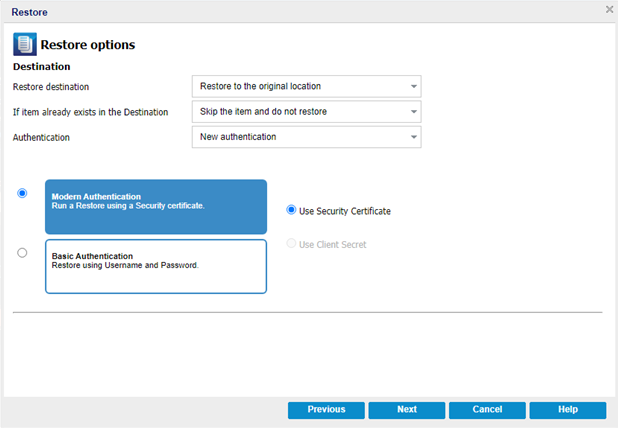
- New Authentication
- During restore, you can select one of the following to change the authentication type:
- Modern Authentication
- Basic Authentication
- To apply authentication, do one of the following:
- For modern authentication, you can run a restore using security certificate.
- Use security certificate
- Note: By default, the backup plan selects Use security certificate for modern authentication.
- Follow these steps:
- To authenticate using a self-signed certificate, see Downloading the Certificate from UDP and Uploading it to Azure.
- Enter the Application ID and Username.
- To apply the required roles and permissions, select the Allow Arcserve UDP to set the required Azure roles and permissions for this application check box, and then click Next.
- For Basic Authentication, to proceed with the restore, enter User Name and Password.
- Note: This option fails if you have Modern Authentication enabled on the Tenant or Account.
- Click Next.
- The Restore Summary dialog opens.
-
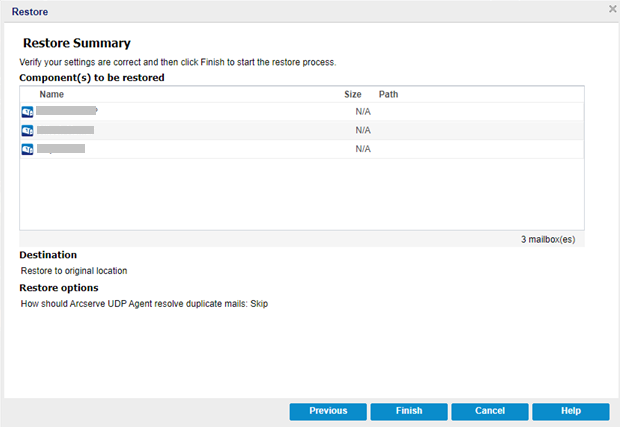
- On the Restore Summary window, verify the settings, and then click Finish.
Restore to original location
Restores the mail data to the same location from where you took a backup.
Restore to an alternate location
Restores the mail data to another mailbox or another folder in the original mailbox. When you select this option, you can browse and select the destination.
Skip the item and do not restore
Skips over the items and does not restore.
Default: The Skip the item and do not restore.
Overwrite the item in the destination
Overwrites the item in the destination.
Note: The If Item already exists in the Destination drop-down list is available if you select the Restore to original location option from the Restore Destination drop-down list.
Authentication
Validates and identifies the user account. Select one of the following options:
The restore options are defined to restore the Exchange Online information.