Perform Point-In-Time Restore
This section provides information about how to perform Point-In-Time recovery.
Follow these steps:
- Log into the Arcserve UDP Console.
- Navigate to resources > Plans > All Plans.
- If you have created plans earlier, those plans are displayed on the center pane.
- From the Action drop-down list of a plan, select Modify.
- To enable PIT restore for respective nodes, under Advanced tab, select the Enable Point-in-time recovery for SQL Server check box, and then click Save.
-
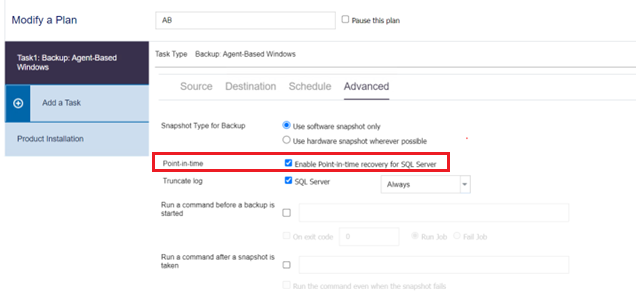
- The Point-in-time backup is enabled.
- On the Arcserve UDP Console, perform a backup of SQL database.
- The N recovery point is created.
- Verify that the following files are generated under the Catalog folder:
- If the SQL Server Instance name is MSSQLSERVER (default Instance Name):
- _<DatabaseName>.idx.pit
- Contains fixed size of time point summary.
- _<DatabaseName>.cat.pit
- Contains variable size of time point details.
- _<DatabaseName>.map.pit
- Contains mapping between the internal string and internal string identity.
- If the SQL Server Instance name is other than MSSQLSERVER (not the default Instance Name):
- <SQLInstanceName>_<DatabaseName>.idx.pit
- Contains fixed size of time point summary.
- <SQLInstanceName>_<DatabaseName>.cat.pit
- Contains variable size of time point details.
- <SQLInstanceName>_<DatabaseName>.map.pit
- Contains mapping between the internal string and the internal string identity.
- If the SQL Server Instance name is MSSQLSERVER (default Instance Name):
- On the Arcserve UDP Console, perform another backup of SQL database.
- The N+1 recovery point is created.
- Access the restore method selection dialog in one of the following ways:
- From Arcserve UDP Console:
- Log into the Arcserve UDP Console.
- Navigate to resources > Node > All Nodes.
- All the added nodes are displayed in the center pane.
- Right-click the node, and then click Restore.
- You are automatically logged into the agent node console, and the Restore dialog opens.
- From Arcserve UDP Agent (Windows):
- Log into the Arcserve UDP Agent (Windows).
- On the home page, select Restore.
- The Restore dialog opens.
- On the Restore dialog, click the Browse Recovery Points option.
- The Browse Recovery Points page appears.
- To perform the Point-in-time restore, select the date for recovery from Recovery Point Date, the scheduled time for recovery from Time Range, select the Microsoft SQL Server database to be restored, and then click Next.
- Note: You can enable the PIT option only when the N and N+1 backup sessions have PIT enabled.
-
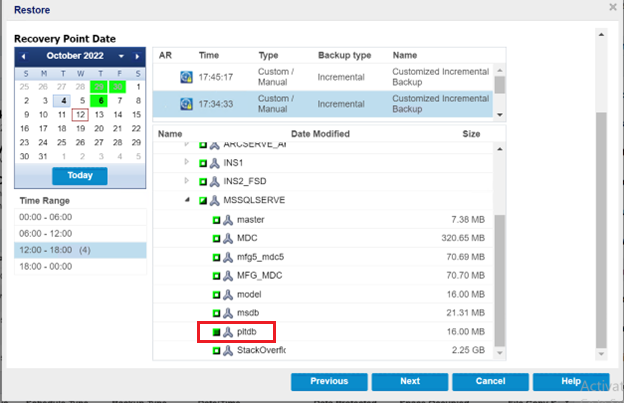
- The Restore Options page opens.
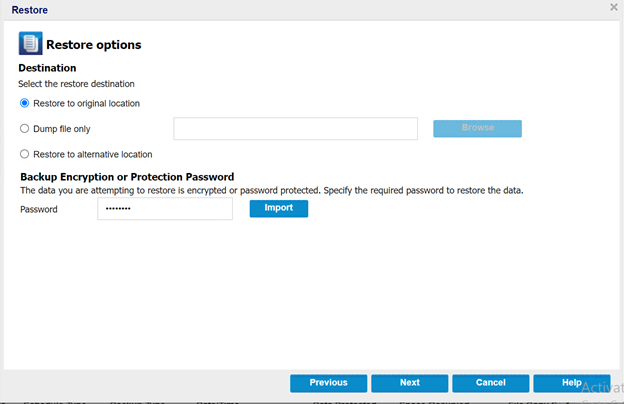
- On the Restore Options page, do the following, and then click Next:
- Destination: Select the Restore to original location option as the restore destination.
- Backup Encryption or Password Protection: Specify the backup encryption password when the data you are trying to restore is encrypted, if necessary.
- Notes:
- Password is not required if you are attempting to restore from the same Arcserve UDP Agent (Windows) computer from where the encrypted backup was performed. However, if you are attempting to restore from a different Arcserve UDP Agent (Windows) computer, a password is required.
- If a clock icon appears with a lock symbol, it indicates that the recovery point contains encrypted information and may require a password for restore.
-
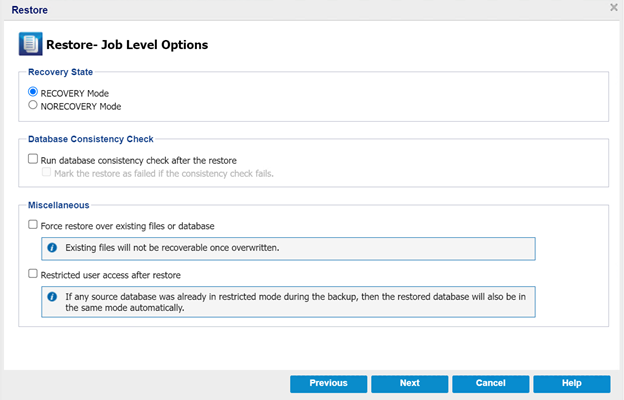
- The Restore- Job Level Options page appears
- Select the Job level options for restore, and then click Next.
- Recovery State
- RECOVERY Mode: By default, this option is enabled. It makes the SQL database online to allow data recovery and provides you permission to access the restored database.
- NORECOVERY Mode: The database transitions to a ‘RESTORING’ state to prevent users from accessing the database. To restore the last backup and bring the database online for usage, use the RECOVERY Mode option.
- Database Consistency Check
- To make sure that the database is consistent after a restore, select the Run database consistency check after the restore checkbox. This option checks the physical and logical integrity of objects in an SQL Server database. If you want to mark the restore job as failed when the consistency check fails for the selected database, select the Mark the restore as failed if the consistency check fails check box.
- Miscellaneous
- Force restore over existing files or database: This option overwrites the existing database files located at the restore destination. Not selecting this option for an existing database file can make the restore incomplete. You can skip this option when the database file is new.
- Restricted user access after restore: This option restricts access to the database file for a specific group of users such as sysadmin, dbcreator, and/or db_owner. These users have permissions to modify the database.
- Note: If the source database was already in the restricted mode during the backup, the restored database automatically stays in the same mode.
-
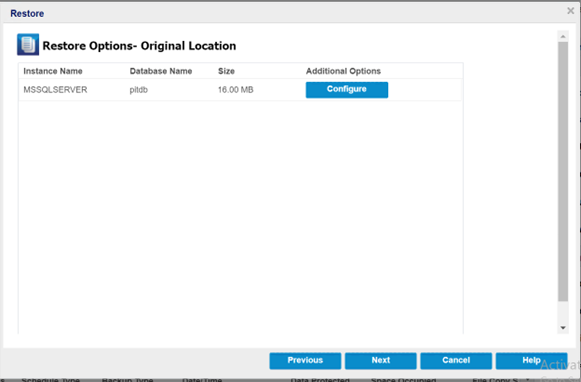
- The Restore Options- Original Location page appears.
- To configure or change the configuration at a database level, click the Configure button.
-
- The Additional Database Options dialog appears.
- To perform PIT restore, under Miscellaneous, select the Log point-in-time restore check box, set the time point, and then click OK.
-
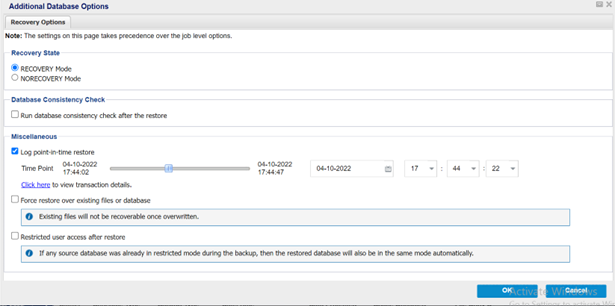
- Note: To view transaction details, click the Click here hyperlink.
- The Transaction Details dialog appears and displays the list of transactions based on the date time selected on the Additional Database dialog.
- On the Transaction Details dialog, do the following:
- To configure the transactions listed at a database level, click the Select this event button.
-
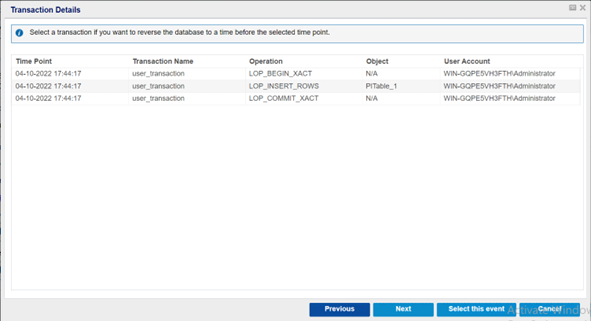
- Note: To view the transactions performed between N and (N+1) recovery points, use the Previous and Next buttons.
- The Additional Database Options dialog appears.
- Select the Log point-in-time restore check box, set the time point, and then click OK to return to the Restore Options- Original Location page.
- The Restore Options- Original Location page appears.
- Click Next.
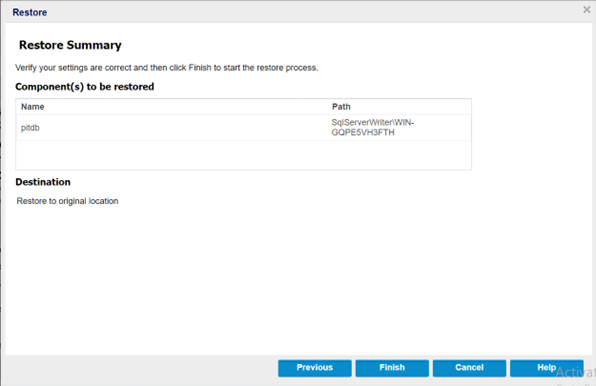
- The Restore Summary page opens.
- On the Restore Summary page, review the displayed information to verify that all the restore options and settings are correct.
- If the summary information is not correct, click Previous to go back to the applicable dialog and change the incorrect setting.
- If the summary information is correct, click Finish to launch the restore process.
-
- The Point-In-Time restore is successfully completed.
- After the restore finishes, view the restore status in the Activity Log. Also verify that the expected data is restored to database.