Specify the Destination
The destination is a location where you store the backup data. You must at least specify the destination to save the plan.
Follow these steps:
- Click the Destination tab.
-
- Select one of the following destination types:
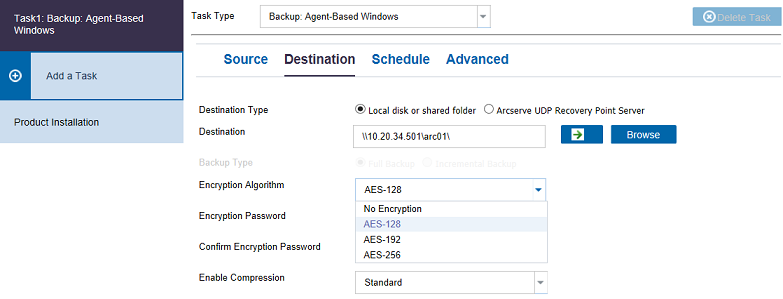
- If you select the Local disk or shared folder as a Destination Type, provide the following details:
- Destination: Provide the full path of the local or network destination. For the network destination, specify the credentials with the write access. Click Browse to locate the destination or click the forward arrow icon to test connection and provide the credentials for the folder destination provided.
- Encryption Algorithm: From the list of drop-down options, select the encryption algorithm. For more information, see Encryption Settings.
- (Optional) Encryption Password: Provide an encryption password.
- Confirm Encryption Password: Type the encryption password again to confirm.
- Enable Compression: Select a type of compression from the drop-down list. For more information, see Compression Type.
- Note: If you store the data to a local disk or shared folder, you cannot replicate the data to another recovery point server. Replication is supported only if you store the data to a recovery point server.
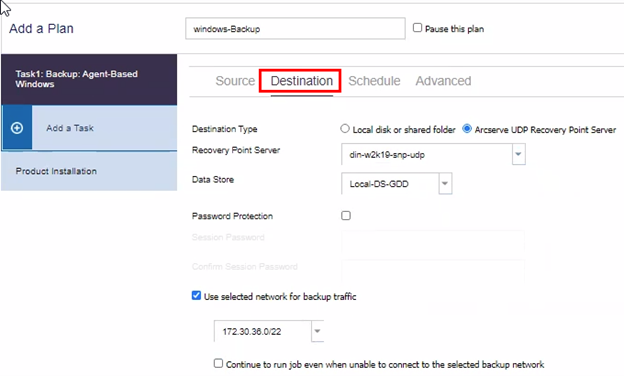
- If you select the Arcserve UDP Recovery Point Server as a Destination Type, do the following:
- Recovery Point Server: From the drop-down list, select the destination Recovery Point Server (RPS).
- Data Store: From the drop-down list, select the destination data store.
- Password Protection: Select the Password Protection check box, provide the session password, and then retype the session password to confirm.
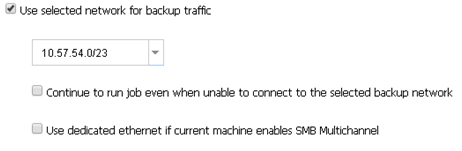
- (Optional) Select the Use selected network for backup traffic check box and follow these steps:
- To enable communication between the Windows Agent and Recovery Point Server, from the drop-down list, select the CIDR network.
-
- Notes:
- The selected backup network is applicable only for the Backup job but not for other tasks such as Browse Recovery Points, Restore and so on.
- If the selected backup network is not accessible and to continue the job with the available network or with the default network, click the Continue to run job even when unable to connect to the selected backup network check box.
- To disable the SMB Multichannel so that the data transfers only through the selected network, select the Use dedicated ethernet if current machine enables SMB Multichannel check box.
- Notes:
- This option is not available by default. To enable this option, go to the following folder location: C:\Program Files\Arcserve\Unified Data Protection\Management\Configuration\ConsoleConfiguration.xml.Then, modify the value for useDedicatedEthernet as True.
-

- The Specify Network function becomes disabled in case of remote datastore, which used network shared folder as destination.
- When the Arcserve UDP management services restarts, the SMB Multichannel feature gets enabled.
- The SMB Multichannel feature is enabled in Windows, by default.
Local disk or shared folder
Specifies that the backup destination is a local destination or a shared folder. If you select this option, you can save data as either recovery points or recovery sets. The recovery points and recovery sets options are available on the Schedule tab.
Arcserve UDP Recovery Point Server
Specifies that the backup destination is a recovery point server. If you select this option, then data is stored as recovery points. You cannot store data as recovery sets.
Note: The session password is optional when the backup destination is an unencrypted RPS data store..
The destination is specified.