Define BMR Options
Prior to initiating the BMR process, you must specify some preliminary BMR options.
Follow these steps:
- Insert the saved Boot Kit image media and boot the computer.
- If you are using a BMR ISO image burned onto a CD/DVD, insert the saved CD/DVD.
- If you are using a BMR ISO image burned onto a USB stick, insert the saved USB stick.
- From the BIOS Setup Utility screen, select the CD-ROM Drive option or the USB option to launch the boot process. Select an architecture (x86/x64) and press Enter to continue.
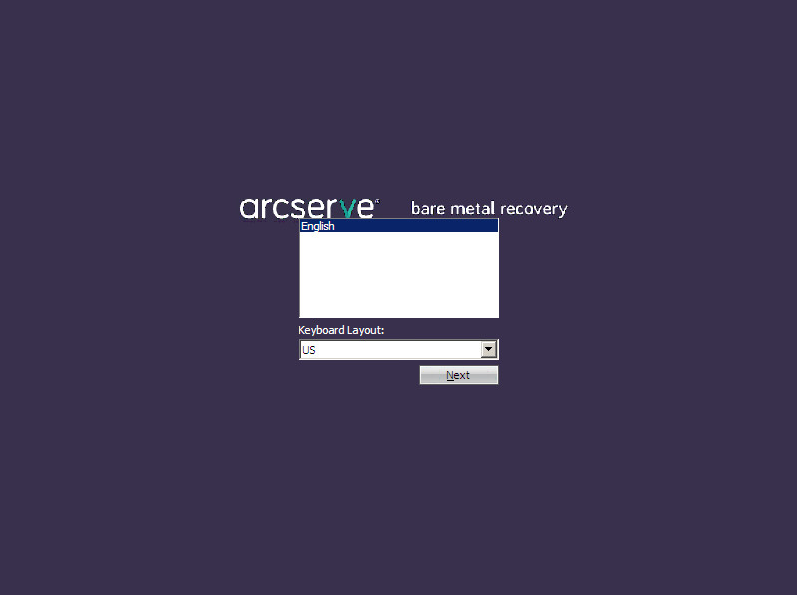
- The Arcserve UDP Agent (Windows) language select screen is displayed. Select a language and click Next to continue.
- The Bare Metal Recovery process is initiated and the initial BMR wizard screen is displayed.
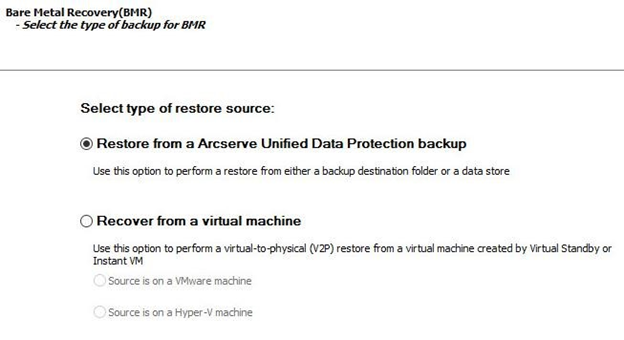
- The BMR wizard screen allows you to select the type of BMR you want to perform:
- Restore from an Arcserve UDP backup
- Use this option to perform a restore from either a backup destination folder or a data store.
- This option lets you recover data that was backed up using Arcserve UDP Agent (Windows). This option is used in connection with backup sessions performed with Arcserve UDP Agent (Windows) or with the Arcserve UDP host-based VM backup application.
- If you select this option, continue this procedure from here.
- Recover from a virtual machine
- Use this option to perform a virtual-to-physical (V2P) restore from a virtual standby VM. Virtual-to-physical (V2P) is a term that refers to the migration of an operating system (OS), application programs and data from a virtual machine or disk partition to a computer's main hard disk. The target can be a single computer or multiple computers.
- Source is on a VMware machine
- Source is on a Hyper-V machine
- Select Restore from an Arcserve UDP backup and click Next.
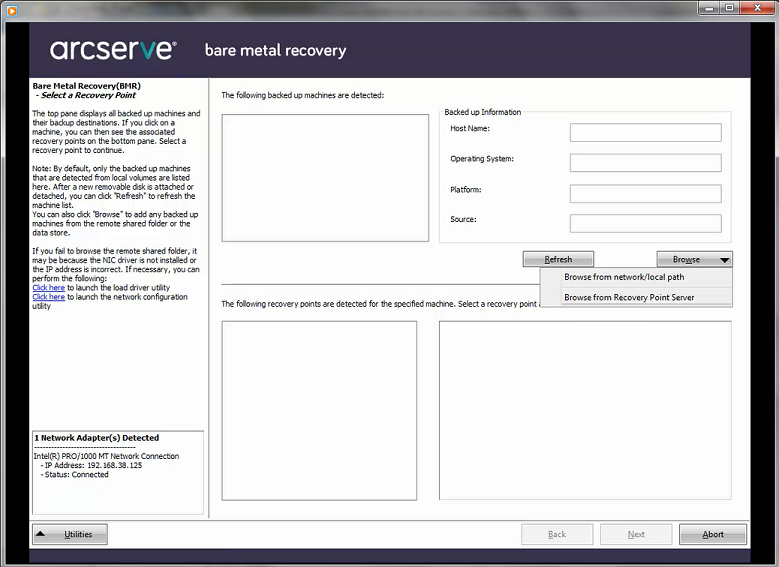
- The Select a Recovery Point wizard screen is displayed.
- From the Select a Recovery Point wizard screen, click Browse and select either Browse from network/local path or select Browse from Recovery Point Server.
- If you select Browse from network/local path, select the machine (or volume) which contains recovery points for your backup image.
- Arcserve UDP Agent (Windows) lets you recover from any local drive or from a network share.
- If you recover from a local backup, the BMR wizard automatically detects and displays all volumes containing recovery points.
- If you recover from a remote share, browse to the remote location where the recovery points are stored. If there are multiple machines containing recovery points, all machines are displayed.
- If the BMR module cannot detect any local destination volume, the Select a Folder dialog automatically displays. Provide the remote share where the backups are residing.
- If you are restoring from an iSCSI destination, the BMR module may not detect this destination and you need to perform the following:
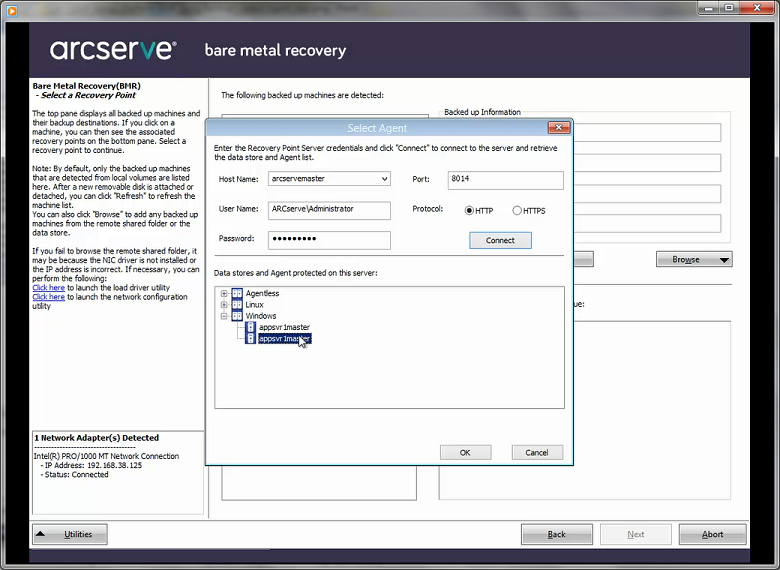
- If you select Browse the Recovery Point Server, the Select Agent dialog displays. Provide the Recovery Point Server Host Name, User Name, Password, Port, and Protocol. Click Connect.
- Select the folder or Agent Name under Data Store where the recovery points for your backup are stored and click OK.
- The BMR wizard screen now displays the following information:
- Machine name (in the upper left pane).
- Related backup information (in the upper right pane).
- All the corresponding recovery points (in the lower left pane).
- Note: For supported operating systems, you can perform a BMR from a backup performed on a UEFI machine to a BIOS-compatible machine and from a BIOS machine to a UEFI-compatible machine. See Operating Systems that Support UEFI/BIOS Conversion for a complete listing of firmware conversion supported systems.
- For operating systems that do not support firmware conversion, to perform BMR for a UEFI system, you must boot the computer in UEFI mode. BMR does not support restoring a computer with different firmware. To verify that the boot firmware is UEFI and not BIOS, click Utilities, About.
- For operating systems that do support firmware conversion, after you select a recovery point, if it is detected that the source machine is not the same firmware as your system, you will be asked if you want to convert UEFI to a BIOS-compatible system or BIOS to UEFI-compatible system.
-
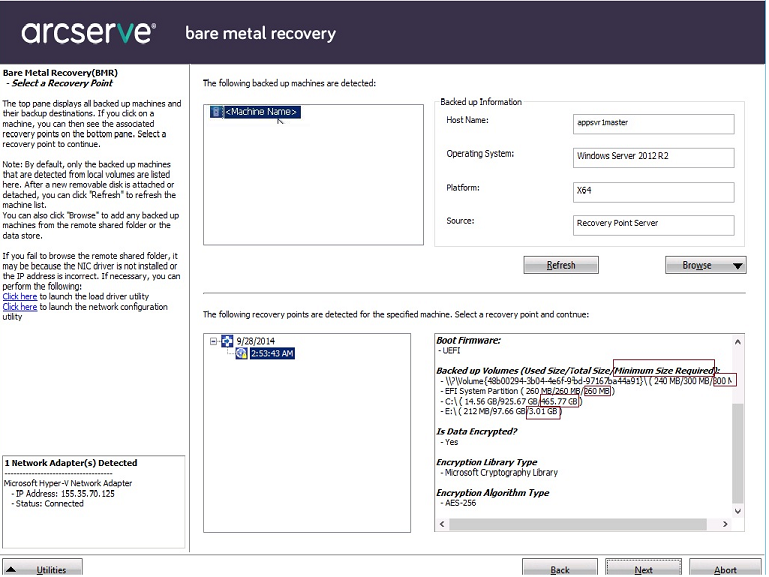
- Note: The Arcserve UDP Version 5.0 Update 2 only supports BMR to a smaller disk when the sessions are backed up from Arcserve UDP Version 5.0 Update 2. See the field Minimum Size Required for the destination disk size. BMR to a smaller disk is only supported in Advanced Mode.
- Select which recovery point to restore.
- The related information for the selected recovery point is displayed (in the lower right pane). This display includes information such as the type of backup that was performed (and saved), the backup destination, and the volumes that were backed up.
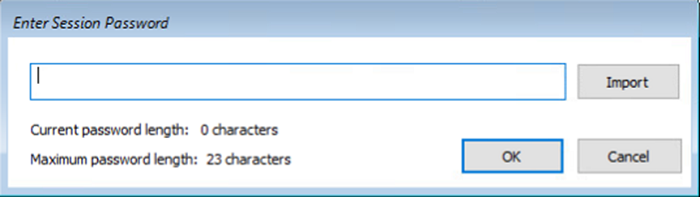
- If the recovery point you are attempting to restore is encrypted and you click the Next button, the Enter Session Password dialog opens and prompts you to provide the session password.
- To provide the session password, do the following:
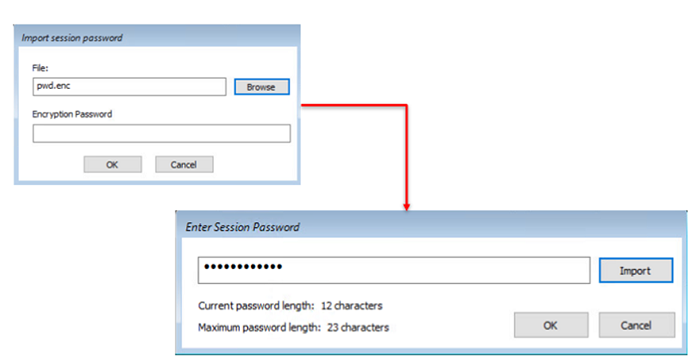
- On the Enter Session Password dialog, click the Import button.
-
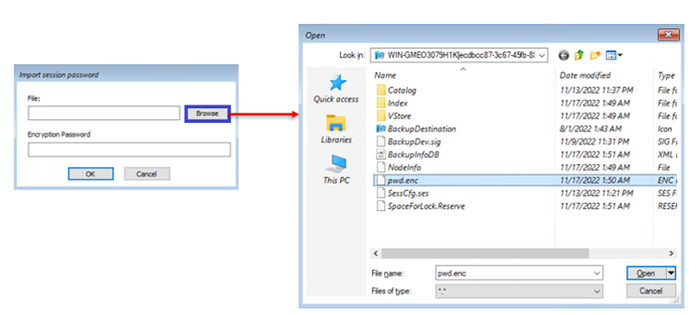
- The Import session password dialog appears.
- Specify or browse to the datastore location on the source machine where the session password file is located, enter the encryption password, and then click OK.
-
- On successful import, the session password gets auto filled in the Password field.
-
- Notes:
- If you are restoring from a Arcserve UDP Recovery Point Server, you are asked to provide a session password.
- If your machine is a Domain Controller, Arcserve UDP Agent (Windows) supports a non-authoritative restore of the active directory (AD) database file during BMR. (It does not support restoring MSCS clusters).
- Verify the recovery point that you want to restore and click Next.
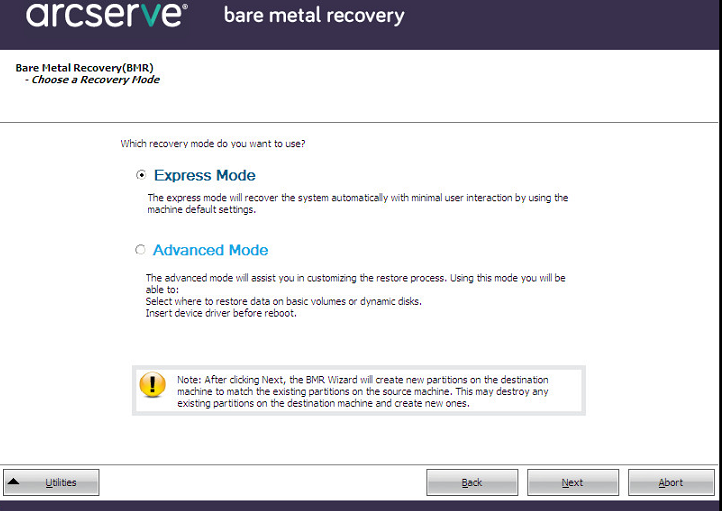
- A BMR wizard screen is displayed with the available recovery mode options.
- The available options are Advanced Mode and Express Mode.
- Select Express Mode if you want minimal interaction during the recovery process.
- Select Advanced Mode if you want to customize the recovery process.
- Default: Express Mode.
The BIOS Setup Utility screen is displayed.
Lets you recover data for a machine for which virtual conversion is done to a VMware virtual machine. This option is used in connection with the Arcserve Central Virtual Standby application.
Note: For this option, you can only recover data if the virtual conversion to a VMDK file (for VMware) was performed using Arcserve Central Virtual Standby.
If you select this option, see Recover using a VMware Virtual Standby VM to continue this procedure.
For more information, see Recover using a VMware Virtual Standby VM in the Agent for Windows online help.
Lets you recover data for a machine for which virtual conversion is performed to a Hyper-V virtual machine. This option is used in connection with the Arcserve Central Virtual Standby application.
Note: For this option, you can only recover data if the virtual conversion to a VHD file (for Hyper-V) was performed using Arcserve Central Virtual Standby.
If you select this option, see Recover using a Hyper-V Virtual Standby VM to continue this procedure.
For more information, see Recover using a Hyper-V Virtual Standby VM in the Agent for Windows online help.
You may also need access information (User Name and Password) for the remote machine.
Note: The network must be up and running to browse to remote recovery points. If necessary, you can check/refresh your network configuration information or you can load any missing drivers from the Utilities menu.
1. Click Utilities, select Run from the pop-up menu, type cmd, and then click OK.
2. In the command prompt window, use the following Windows iSCSI commands to set up iSCSI connections:
> net start msiscsi
> iSCSICLI QAddTargetPortal <TargetPortalAddress>
> iSCSICLI QLoginTarget <TargetName > [CHAP username] [CHAP password]
Note: CHAP = Challenge-Handshake Authentication Protocol
For more information about Windows iSCSI command line options, see the relevant Microsoft page.
Note: Extra steps may be needed depending on the iSCSI target software being used. For more information, see the manual of the iSCSI target software.
3. From the BMR screen the disks/volumes connected through the iSCSI disk should be displayed. The iSCSI disk can now be used as the source volume or the backup destination volume.
Note: BMR does not support the case where the OS is installed on an iSCSI disk. Only data disks are supported.