Define the Restore Options
After you specify a recovery point and content to restore, define the copy options for the selected recovery point. This section explains how to define the restore options for the selected recovery point.
Follow these steps:
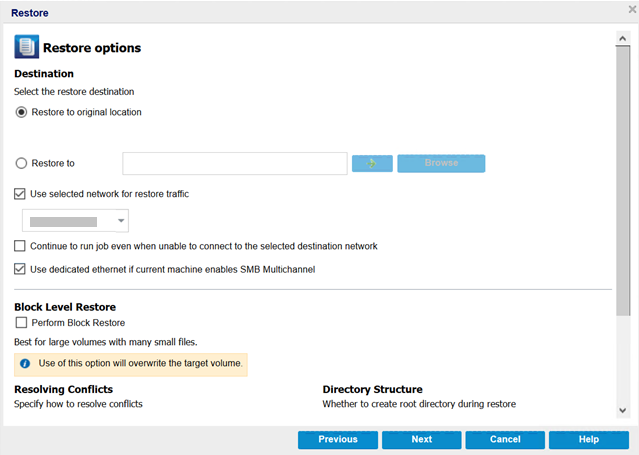
- On the Restore Options dialog, select the restore destination.
- The available destination options are:
-
- VMware Tools is installed and running.
- Firewall must allow File and Printer Sharing.
- The account is built-in local administrator, built-in domain administrator, or domain account that is member of the local Administrators group. If other accounts are used, do the following:
- Disable the UAC remote access. To disable UAC remote access, see Import Virtual Machine Using Additional Administrative Account.
- Disable UAC in the Local Security Policy by disabling the setting Run all administrator in Admin Approval Mode at secpol.msc -> Local Policies -> Security Options. (Secpol.msc is Microsoft's security policy editor).
- Hyper-V integration services are installed and running.
- Firewall must allow File and Printer Sharing.
- The account is built-in local administrator, built-in domain administrator, or domain account that is member of the local Administrators group. If other accounts are used, disable the UAC remote access. To disable UAC remote access, see Import Virtual Machine Using Additional Administrative Account.
- If virtual machine guest OS is Client version Windows (such as Windows 10), you need to manually configure firewall to allow Windows Management Instrumentation (WMI).
- Restores to the specified location. To restore data to the specified location, do the following:
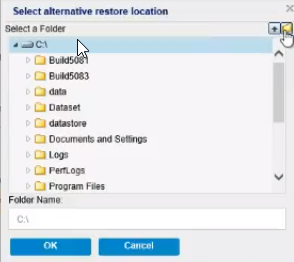
- To provide the destination, click Browse.
- The Select alternative restore location dialog appears.
- Select the existing folder or create a new folder as needed, and then click OK.
-
- To verify the connection to the specified location, click the green arrow button. If necessary, enter the Username and Password to gain access to that location.
- (Optional) To enable the communication between Windows Agent and Recovery Point Server, select the Use selected network for restore traffic check box, and then select the network from the drop-down list.
- Notes:
- If the selected backup network is not accessible and to continue the backup job with the available network or with the default network, click the Continue to run job even when unable to connect to the selected backup network check box.
- To define the constraint on SMB Multichannel so that the data transfers only through the selected network, select the Use dedicated ethernet if current machine enables SMB Multichannel check box.
- This option is not available by default. To enable this option, create the UseDedicatedEthernet string registry in the following path, and then set the registry value to 1:
- SOFTWARE\Arcserve\Unified Data Protection\Engine
- When you perform a restore job from the Nodes page, create a registry key on the backup proxy.
- When you perform a restore job from the normal agent using the RPS backup session, create a registry key on the normal agent.
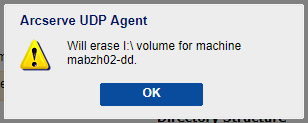
- To improve the throughput when restoring a large volume with many small files, select a volume, and then under Block Level Restore, click the Perform Block Restore check box. Other options get disabled and a notification appears. To continue with the block level restore, click OK.
-
- Notes:
- The data gets restored to current UDP Agent machine, and the target volume is overwritten. The target volume is not accessible during the restore job.
- To avoid UDP volume level restoration failure, do the following:
- Temporarily disable anti-virus software on the target machine.
- Temporarily disable the File Screening or Quota Management from the File Server Resource Manager.
- Specify the Resolving Conflicts option that Arcserve UDP performs if conflicts are encountered during the restore process.
- The available options are:
- For Directory Structure, if you want to create a root directory during restore, select the Create root directory checkbox.
- If you select to restore the "A.txt" and "B.txt" files individually, the destination for the restored files will be "D:\Restore\A.txt" and "D:\Restore\B.txt" (the root directory above the specified file level will not be recreated).
- If you select to restore from the "SubFolder2" level, the destination for the restored files will be "D:\Restore\SubFolder2\A.txt" and "D:\Restore\SubFolder2\B.txt" (the root directory above the specified folder level will not be recreated).
- If you select to restore just the "A.txt" file, the destination for the restored file will be "D:\Restore\ Folder1\SubFolder2\A.txt" (the entire root directory without the volume name will be recreated).
- If you select to restore both the "A.txt" and "C.txt" files, the destination for the restored files will be "D:\Restore\C\Folder1\SubFolder2\A.txt" and "D:\Restore\E\Folder3\SubFolder4\C.txt" (the entire root directory with the volume name will be recreated).
- For Recovering ACL, to skip the original permission for the restored files/folders, select the skip recovering ACL of files / folders checkbox. Selecting this option lets you inherit the permissions of target folder instead. If you do not select this option, the original permissions are kept.
- If the data you are attempting to restore is encrypted and you click the Next button without providing the session password, the Import session password dialog opens and prompts you to provide the session password.
- To provide the session password, do the following:
- Under Backup Encryption or Password Protection, click the Import button.
- The Import session password dialog appears.
- Specify or browse to the location where the session password file is located, enter the encryption key if needed, and then click OK.
-
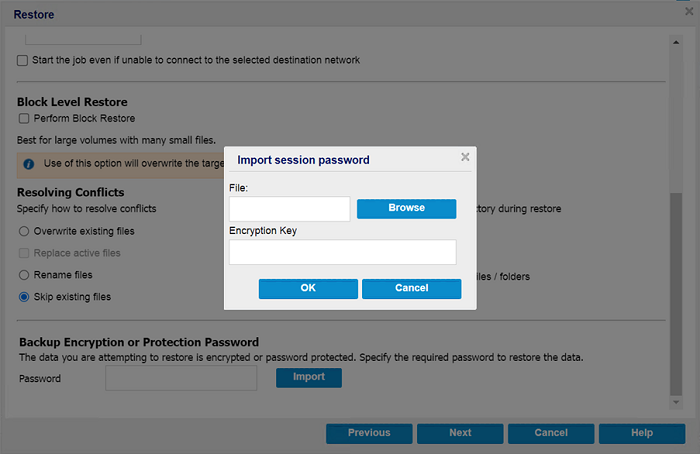
- On successful import, the session password gets auto filled in the Password field.
- Notes:
- If a clock icon appears with a lock symbol, it indicates that the recovery point contains encrypted information and may require a password for restore.
- Password is not required if you are attempting to restore from the same Arcserve UDP Agent (Windows) computer from where the encrypted backup was performed. However, if you are attempting to restore from a different Arcserve UDP Agent (Windows) computer, a password is required.
Restore to original location
Restores to the original location from where the backup image was captured.
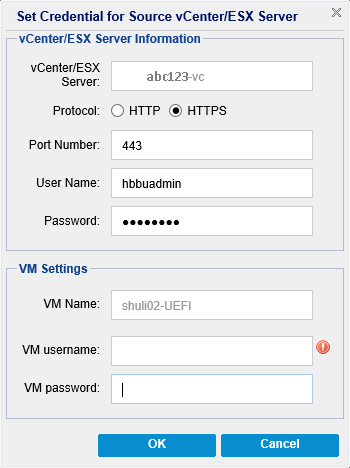
Note: If you performed the recovery point backup using host-based agentless backup, restoring to original location is to restore the file back in to the virtual machine. In this case, a dialog box opens. You may enter the credentials of the hypervisor, and the operating system of the virtual machine.
For VMware VM:
Note: To create or write files inside the VM, consider the following requirements for the settings and account permission of virtual machine:
Important! Do not attempt to disable the UAC in the User Account Control Settings dialog box that opens from the control panel.
For Hyper-V VM:
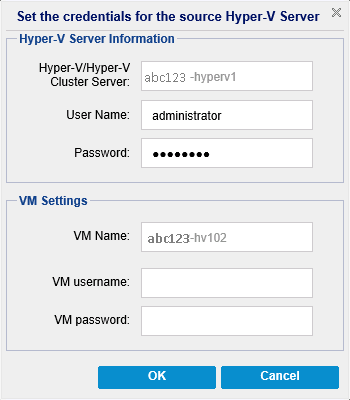
Note: To create or write files inside the VM, consider the following requirements for the settings and account permission of virtual machine:
Restore to
Overwrite existing files
Overwrites (replaces) any existing files, which are at the restore destination. All the objects are restored from the backup files regardless of their current presence on your computer.
Replace active files
Replaces any active files upon reboot. If during the restore attempt Arcserve UDP Agent (Windows) discovers that the existing file is currently in use or being accessed, it will not immediately replace that file, but instead to avoid any problems will delay the replacement of the active files until the next time the machine is rebooted. (The restore occurs immediately, but the replacement of any active files is done during the next reboot).
This option is only available if you select the Overwrite existing files option.
Note: If you do not select this option, any active file is skipped from the restore.
Rename files
Creates a new file if the file name already exists. Selecting this option copies the source file to the destination with the same file name but a different extension. Data is then restored to the new file.
Skip existing files
Skips over and not overwrite (replace) any existing files that are located at the restore destination. Only objects that are not currently existing on your machine are restored from the backup files.
Default: Skip existing files.
The Create root directory checkbox specifies that if a root directory structure exists in the captured backup image, Arcserve UDP recreates that same root directory structure on the restore destination path.
If this option not selected, the file or folder is restored directly to the destination folder.
For example, if during the backup you captured the files "C:\Folder1\SubFolder2\A.txt" and "C:\Folder1\SubFolder2\B.txt", and during the restore you specified the restore destination as "D:\Restore".
If this option selected, the entire root directory path for the files/folders (including the volume name) is recreated to the destination folder. If the files/folders to be restored are from the same volume name, then the destination root directory path does not include that volume name. However, if the files/folders to be restored are from different volume names, then the destination root directory path does include the volume name.
For example, if during the backup you captured the files "C:\Folder1\SubFolder2\A.txt", "C:\Folder1\SubFolder2\B.txt", and also E:\Folder3\SubFolder4\C.txt", and during the restore you specified the restore destination as "D:\Restore".
- Click Next.
- The Restore Summary page opens.
The restore options are defined to restore from a recovery point.