Specify the Virtual Machine and the Recovery Point to Restore
Use the Recover VM option to restore a virtual machine that you previously backed up. This method quickly and consistently creates a virtual machine from an Arcserve UDP recovery point on an ESX or Hyper-V server. The recovered virtual machine can then simply be started to complete the recovery process.
Follow these steps:
- Access the restore method selection dialog in one of the following ways:
- Log into Arcserve UDP.
- Click the resources tab.
- Select All Nodes in the left pane.
- In the center pane, select the node and click Actions.
- Click Restore from the Actions drop-down option.
- Log into Arcserve UDP Agent (Windows).
- From the home page, select Restore.
- Click the Recover VM option.
- The Recover VM dialog opens.
- Click Change to change the Backup Location.
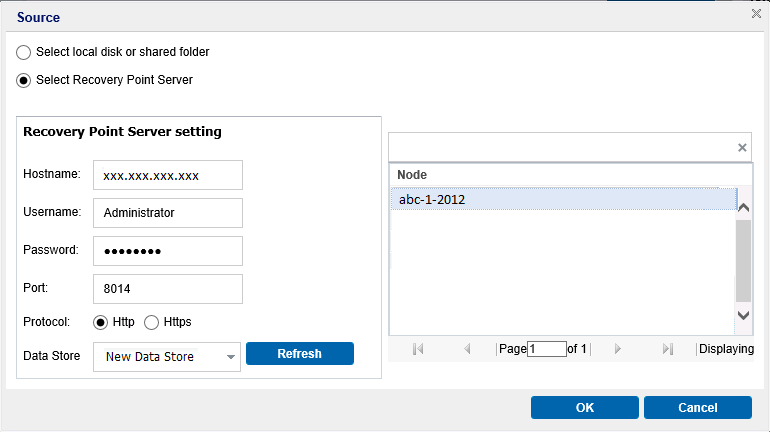
- The Source dialog opens. You can select the backup location in this dialog.
- Select one of the following options:
- Specify or browse to the location where your backup images are stored and select the appropriate backup source.
- Select the folder where the recovery points are stored and click OK.
- The Select backup location dialog closes and you can see the backup location in the Source dialog.
- Click OK.
- The recovery points are listed in the Recover VM dialog.
- Specify the Recovery Point Server setting details and click Refresh.
- All the nodes (agents/virtual machines) are listed in the Node column in the Source dialog.
- Select the node (agent/virtual machine) from the displayed list and click OK.
- The recovery points are listed in the Recover VM dialog.
- From the Virtual Machine drop-down list, select the virtual machine to recover.
- The calendar view appears and all the dates containing recovery points for the specified backup source are highlighted in green.
- Select the calendar date for the virtual machine image to restore.
- The corresponding recovery points for that date are displayed, with the time of the backup, the type of backup that was performed, and the name of the backup.
- Select a recovery point to restore.
- The backup content (including any applications) for the selected recovery point is displayed. When restoring a virtual machine, the entire system is restored. As a result, you can view, but not select individual volumes, folders, or files from within the selected virtual machine.
- Note: A clock icon with a lock symbol indicates that the recovery point contains encrypted information and can require a password for restore.
- Click Next.
- The Restore Options dialog opens.
From Arcserve UDP:
All the added nodes are displayed in the center pane.
The restore method selection dialog opens.
Note: You are automatically logged in to the agent node and the restore method selection dialog is opened from the agent node.
From Arcserve UDP Agent (Windows):
The restore method selection dialog opens.


Select local disk or shared folder
You can click the green arrow button to verify the connection to the specified location. If necessary, enter the Username and Password credentials to gain access to that source location.
The Select backup location dialog opens.
Select Recovery Point Server
The virtual machine and the recovery point to restore are specified.