Select the Oracle Database Items to Restore
This section provides information about how to browse and select Oracle Database items to restore.
Follow these steps:
- Log into the UDP console account.
- On the UDP console page, click the resources tab.
- From the left pane, navigate to Nodes > All Nodes.
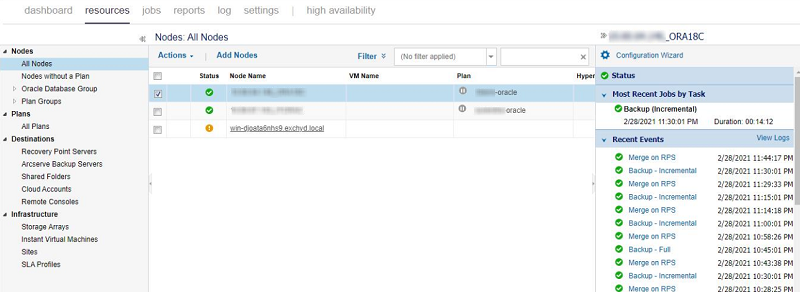
- The list of existing nodes appears on the center pane.
-
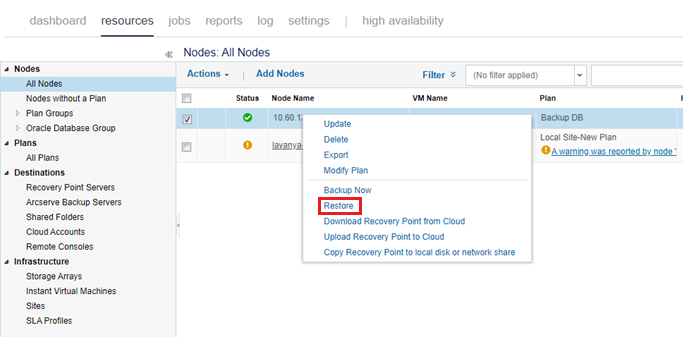
- Right-click the Oracle node, and then select the Restore option.
-
- You are automatically logged into the agent node and the Restore wizard appears.
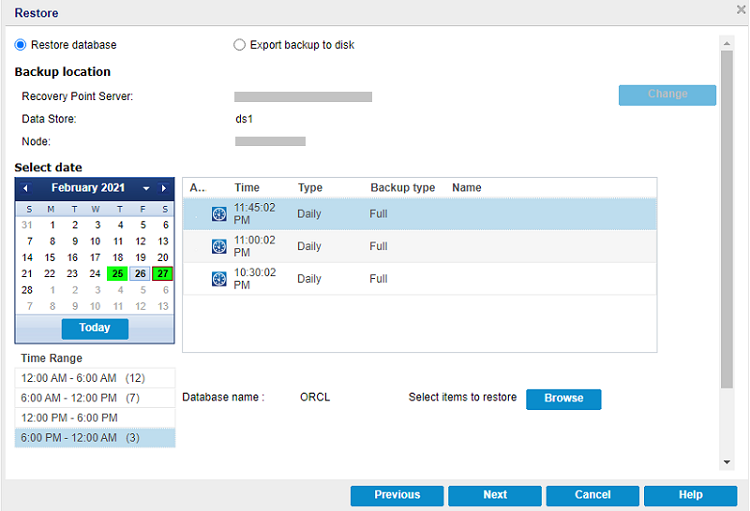
- On the Restore wizard, select one of the following:
- Restore database includes steps for both Full database restore and Granular restore.
-
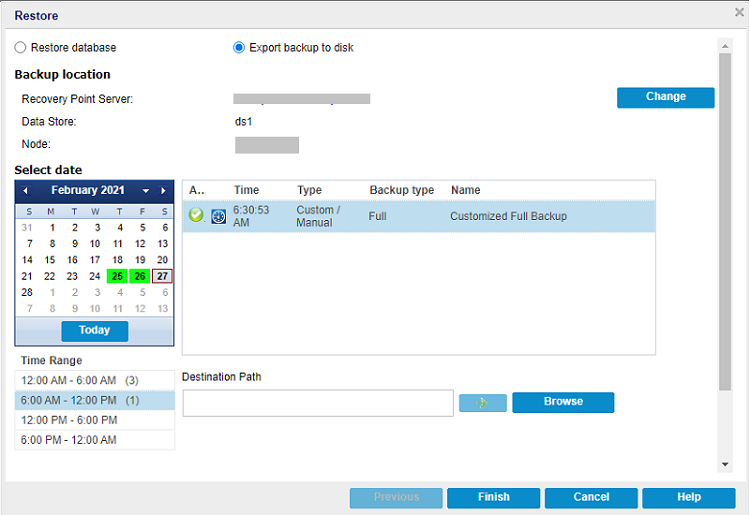
- (Optional) To modify the details of backup location, click Change.
- Note: This option is valid only when the Export backup to disk option is selected.
- From the Select date section, select a date.
- Based on selection, the list of backup recovery points is displayed with the time of the backup, the type of backup that was performed (Full or Incremental), and the name of the backup.
- From the list of backup recovery points, select a backup recovery point you want to restore.
- Note: By default, the latest backup recovery point is selected.
- To select the database items, follow these steps:
- Click the Browse button.
- The Restore dialog appears.
- On the Restore dialog, do the following:
-
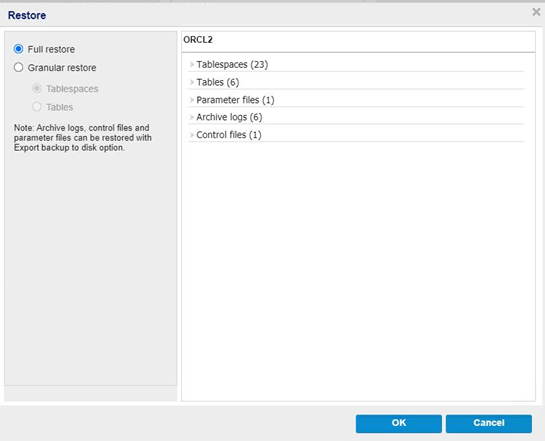
- From the left-pane, perform the following:
- To perform full restore of entire database items, select Full restore.
- To perform restore of Tablespaces and Tables, select Granular restore.
- To perform restore of PDB tablespaces, select Granular restore, Tablespaces, and then select the PDB under datastore name on the left pane.
-
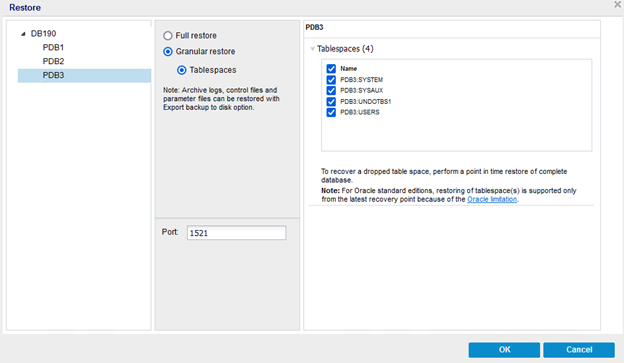
- Note: The Oracle database items such as Archive Logs, Control Files, and Parameter Files are selected by default when the Restore dialog appears. Additionally, these items get restored if needed.
- From the right-pane, click each file to expand, and then view the details.
- (Optional) To select the specific tables, from the right-pane, click the Tables option.
- A table selection dialog appears.
- On the table selection dialog, do the following, and then click OK:
-
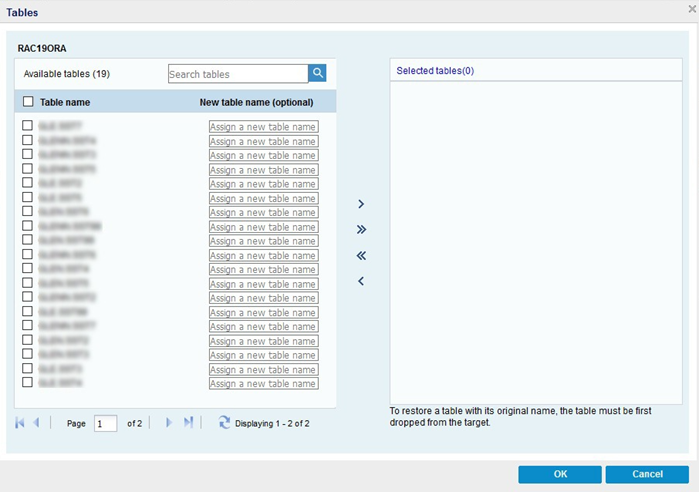
- From the left-pane, perform the following:
- To search the available tables, in the search box, select the name of the table and then click the search icon.
- Select the tables you want to restore.
- (Optional) Type the new name for a table you want to restore.
- After the selection of tables, click the right arrow (>) to move them to the selected tables() list.
- From the right-pane, deselect the tables you do not want to restore, and then click the left arrow (<) to move them to the Available tables() list.
- Click OK.
- Click Next.
- The Restore Options dialog appears.
- (Optional) To modify the details of the backup location, click Change.
- From the Select date section, select a date.
- Based on selection, the list of backup recovery points is displayed with the time of the backup, the type of backup that was performed (Full or Incremental), and the name of the backup.
- From the list of backup recovery points, select a backup recovery point you want to restore.
- Note: By default, the latest backup recovery point is selected.
- In the Destination Path field, provide the full path of the local folder or the remote network share.
- To validate the connection, click the green arrow icon next to the Destination Path field, enter the username and password as needed, and then click OK.
- On successful connection to the remote network share, click the Browse button.
- The Select backup location dialog appears.
- On the Select backup location dialog, select a folder to restore, and then click OK.
- Click Finish.
- The Oracle database items get exported to the disk.
- Note: If you specify the local folder as a destination path for 'Export backup to disk', you need to expose the exported backup as a network share explicitly.
- While performing manual recovery, make sure the exported backup files are accessible within the Oracle server to catalog them with the Oracle database.
- For the Windows Oracle database recovery, use the exported backup files from the network share.
- For the Linux/Solaris Oracle database recovery, mount the CIFS network share within the Oracle server to access the exported backup files.
- To mount the CIFS network share on the Linux/Solaris servers, do the following:
- Log into the Oracle server as a root or sudo user.
- Run the following commands:
- cd /mnt
- mkdir -p ExportedBackup
- chown -R root:root ExportedBackup
- chmod 0777 /mnt/ExportedBackup
- When the Export backup to disk job is performed to serverX, the exported backup data gets exposed as the following network share:
- //serverX/ExportBackup
- For Solaris
- echo "UserPassword" | mount -F smbfs -o user="UserName",uid=oracle //serverX/ExportBackup/ /mnt/ExportedBackup
- For Linux
- mount -t cifs -o sec=ntlmssp,vers=<SMB version>,domain="<serverX>",username="UserName",password="UserPassword" //serverX/ExportBackup /mnt/ExportedBackup -o uid=oracle --verbose
- For SMB version, use one of the following: 3.1.1, 3.0, 2.1, 2.0, 1.0.
- Note: The UserName and UserPassword terms in the above mount commands are specific to serverX.
- Catalog the exported backup files to Oracle database and execute the RMAN commands based on the type of recovery you want to perform.
- After the manual recovery is completed, run the following command to unmount the CIFS volume:
- cd /mnt
- For Solaris
- umount -f ExportedBackup
- rm -rf ExportedBackup
- For Linux
- umount -f -l ExportedBackup
- rm -rf ExportedBackup
To select the Oracle database items, follow these steps:
The Oracle database items to restore are selected. Now, you can define the restore options.
Restores the Oracle database items to folder or share folder in disk.
To export backup to disk, follow these steps:
After the Oracle database items are exported to the disk, perform manual recovery.
To use the exported backup files for manual recovery, follow these steps: