How to Restore Database to Alternate Node
This section provides information about how to restore database to alternate node. To explain this procedure, we have used Windows. This procedure is applicable even for Linux.
Notes:
- When Change Block Tracker is disabled and alternate node restore performed, the restore might fail. Hence, select the restore only option when you have the required logs available with you and you can recover database manually after restore. As a workaround, enable Change Block Tracker before performing alternate node restore on source node.
- Make sure to install same version of Oracle software and create database with same SID on alternate node where you planned to perform restore as Original node (source node). For example, when source node SID is orcl, create orcl on alternate node before starting restore. This is needed when Oracle software is installed with domain account. This is not required while using virtual account.
Follow these steps:
- From the UDP Console, select the recovery point from where you need to perform restore. For more information, see Define the Restore Options.
- On the Restore Options dialog, from the Restore destination drop-down, select Restore to the alternate node.
-
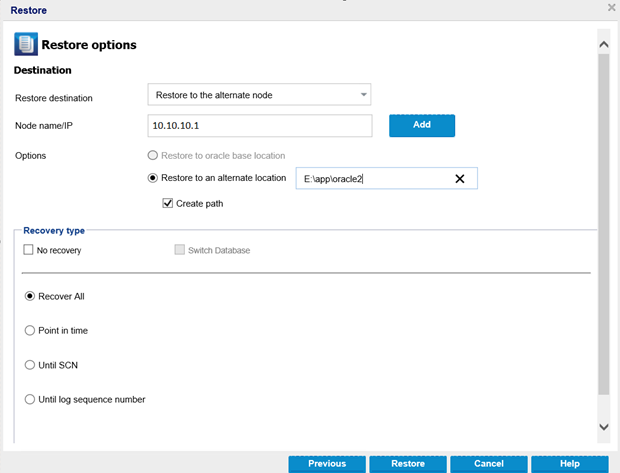
- For Node name/IP, enter the node name or IP address.
- For Options, select the Restore to an alternate location option, and then add a path of the alternate location.
- Notes:
- Make sure the path added does not have any special characters or space.
- The Create path check box is selected automatically when you select the Restore to an alternate location option.
- If the database is not already shut down, a notification appears and prompts you to shut down the database. To confirm, click OK.
- Confirm that Restore Job is successful from the UDP Console.
- Connect to sqlplus on alternate node and confirm that the database is up and running.
- Restored database is operational with specified alternate location. However, after database restarts, the database might go back to previous copy or might not come back properly because of a known issue. To avoid any further problems after restoring to alternate location, it is recommended to follow the steps below. These steps help to create or place right copy of spfile/pfile.
- Go to %ORACLE_HOME%\database and rename spfile<SID>.ora.
- Note: For Linux Oracle installation, spfile<SID>.ora is located in the $ORACLE_HOME\dbs path.
- Connect to sqlplus.
- Go to SQL prompt and run the following command:
- sqlplus > create pfile from spfile.
- Go to %ORACLE_HOME%\database, open init<SID>.ora in any editor, and then do the following:
- Update “db_create_file_dest” value with the path specified for alternate restored location.
- Example: *.db_create_file_dest='E:\app\oracle2\ORA19C280220211833'
- Remove additional ‘\’ from end of path under the diagnostic_dest parameter.
- Change the following:
- From diagnostic_dest='E:\app\oracle2\ORA19C280220211833\'
- To diagnostic_dest='E:\app\oracle2\ORA19C280220211833'
- Save the file.
- Go to SQL prompt and run the following commands:
- Sqlplus > shutdown immediate
- sqlplus > startup
- sqlplus > create spfile from pfile
- Note: If DB is not started from the spfile, restores from the corresponding backups are limited to the original node only. To avoid it, restart the database again after creation of the spfile. To restart, run the follow commands:
- Sqlplus > shutdown immediate
- sqlplus > startup