Specify Protection Settings
Protection settings for the information that is going to be backed up ensures that the backup data is reliably protected (copied and saved) against any form of data loss.
Specify the protection settings
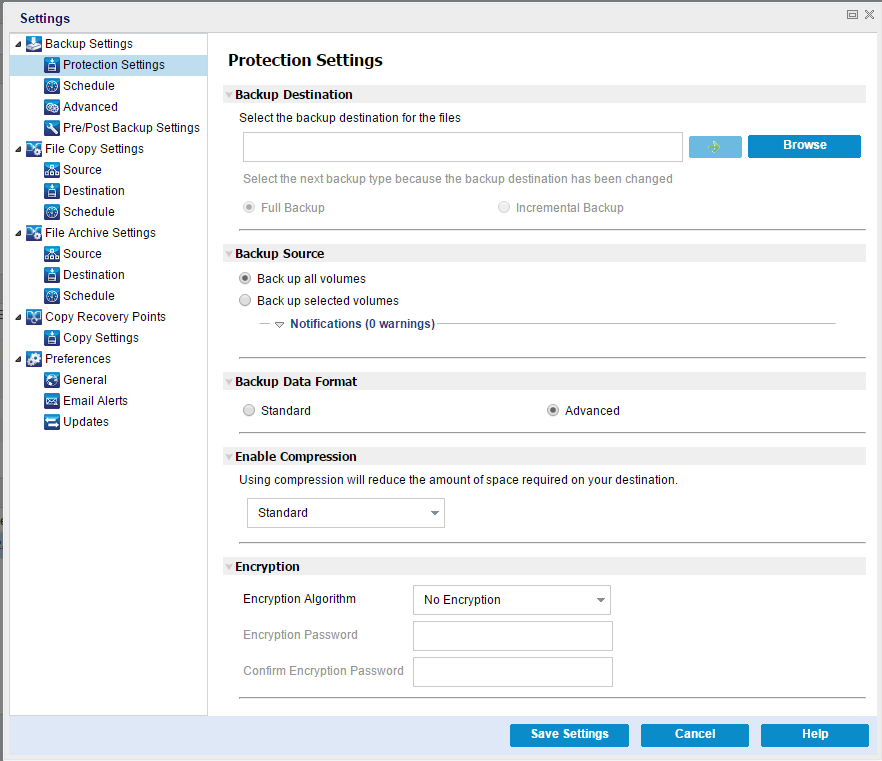
- From the Arcserve UDP Agent (Windows) home page (or Arcserve UDP Agent (Windows) Monitor), select Settings from the taskbar and then select the Backup Settings tab. When the Backup Settings dialog opens, select Protection Settings.
- The Protection Settings dialog opens.
- If the Arcserve UDP Agent (Windows) is being managed by Console, not all settings are available and will be displayed as read-only information.
- When agent is managed by console and not protected in a plan, all the setings are still available except the Preference > Updates panel.
- Specify the Backup Destination.
- Use local disk or shared folder
- If you entered a local path for the destination, this button is disabled.
- If you enter a network path and click this button, you are prompted to provide the username and password.
- If you are already connected to this path successfully, and click the arrow button you can change the username and password you used to connect.
- If you do not click the arrow button, the destination path is verified. If needed, you are prompted for the username and password.
- If you want to back up to your local path (volume or folder), the specified backup destination cannot be the same location as your backup source. If you inadvertently include the source in your destination, the backup job ignores this portion of the source and it is not included in the backup.
- If you want to back up to a remote shared location, specify a location path or browse to the location. You also have to provide user credentials (Username and Password) to access the remote machine.
- If the backup destination has changed after the last backup was performed, select the backup type: Full Backup or Incremental Backup. These options are only enabled when you change your backup destination.
- Specify the Backup Source.
- Local volume related
- BMR related
- Application related
- Specify the Backup Data Format.
- Week-based repeat backup schedule
- Week-based backup throttling schedule
- Week-based merge schedule
- Daily backup schedule
- Weekly backup schedule
- Monthly backup schedule
- Specify the Retention Setting if you selected Standard as the Backup Data Format.
- Specify the type of Compression.
- Specifies the type of compression that is used for backups.
- Compression is often selected to decrease disk space usage, but also has an inverse impact on your backup speed due to the increased CPU usage.
- The available options are:
- If your backup image contains uncompressible data (such as JPG images or ZIP files), you can allocate additional storage space to handle such data. As a result, if you select any compression option and you have uncompressible data in your backup, it can result in an increase in disk space usage.
- If you change the compression level from No Compression to either Standard Compression or Maximum Compression, or if you change from either Standard Compression or Maximum Compression to No Compression, the first backup that is performed after this compression level change is automatically a Full Backup. After the Full Backup is performed, all future backups (Full, Incremental, or Verify) will be performed as scheduled.
- If your destination does not have sufficient free space, you can consider increasing the Compression setting of the backup.
- Specify the Encryption settings.
- Select the type of encryption algorithm that is used for backups.
- Data encryption is the translation of data into a form that is unintelligible without a deciphering mechanism. The Arcserve UDP Agent (Windows) data protection uses secure, AES (Advanced Encryption Standard) encryption algorithms to achieve maximum security and privacy of your specified data.
- The available format options are No Encryption, AES-128, AES-192, and AES-256. (To disable encryption, select No Encryption).
- A full backup and all its related incremental and verify backups must use the same encryption algorithm.
- If the encryption algorithm for an incremental or verify backup is changed, a full backup must be performed. This means after changing encryption algorithm, the first backup will be full, despite the original backup type.
- For example, if you change the algorithm format and you submit a customized incremental or verify backup manually, it is automatically converted to a full backup.
- When an encryption algorithm is selected, provide (and confirm) an encryption password.
- The encryption password is limited to a maximum of 23 characters.
- A full backup and all its related incremental and verify backups must use the same password to encrypt data.
- If the encryption password for an incremental or verify backup is changed, a full backup must be performed. This means after changing encryption password, the first backup will be full, despite the original backup type.
For example, if you change the encryption password and you submit a customized incremental or verify backup manually, it is automatically converted to a full backup.
- Arcserve UDP Agent (Windows) provides encryption password management so that you do not need to remember encryption passwords.
- Password is also encrypted.
- Password is remembered and not required (if you restore to the same machine).
- Password is required if you restore to a different machine.
- Password is not required if you are attempting to export a recovery point that contains encrypted data and the recovery point belongs to backups performed on the current machine.
- Password is always required if you are attempting to recover encrypted data from an exported recovery point.
- Password is not required to browse to an encrypted recovery point.
- Password is required to perform a BMR.
- When encryption is enabled, the activity log is updated.
- A message is recorded in the activity log to describe the selected encryption algorithm for every backup.
- A message is recorded in the activity log to indicate why an incremental or verify backup was converted to a full backup (password change or algorithm change).
- Note: Encryption settings do not have to remain the same for your backups. You can change these settings at any time, including after several backups of the same data.
- Specify the Throttle Backup.
- You can specify the maximum speed (MB/min) at which backups are written. You can throttle the backup speed to reduce CPU or network use. However, limiting the backup speed, has an adverse effect on the backup window. As you lower the maximum backup speed, it increases the amount of time of perform the backup. For a backup job, the Job Monitor on the Arcserve UDP Agent (Windows) home page displays the average Read and Write speed of the job in progress and the configured throttle speed limit.
- Note: By default, the Throttle Backup option is not enabled and backup speed is not being controlled.
- Calculate the Estimated Backup Size.
- Displays the estimated usage of the destination volume.
- Note: For more information about using these estimated backup calculations, see Estimate Future Backup Space Requirements.
- Click Save Settings.
Notes:
You can specify a local path (volume or folder), or remote shared folder (or mapped drive) for the backup location, or you can browse to a backup location.
Click the green arrow icon button to verify the connection to the specified location.
Example: You attempt to back up your entire local machine consisting of Volumes C, D, and E and also specify Volume E as your destination. The Arcserve UDP Agent (Windows) only backs up Volumes C and D to Volume E. Data from Volume E is not included in the backup. If you want to back up all local volumes, specify a remote location for your destination.
Important! Verify that your specified destination volume does not contain system information. Or else it will not be protected (backed up) and your system will fail to recover after Bare Metal Recovery (BMR) if necessary.
Note: Dynamic disks are restored at disk-level only. If your data is backed up to a volume on a dynamic disk, you are not able to restore this dynamic disk during BMR.
Default: Full Backup
Note: If the backup destination has changed and catalog jobs are pending, the catalog job first runs and completes on the old location before running on the new location.
Full Backup
The next backup that is performed is going to be a Full Backup. The new backup destination does not have any dependency on the old backup destination. If you continue with a full backup, the previous location is no longer needed for backups to continue. You can select to keep the old backup for any restores or if you do not want to perform any restores from there you can delete it. The old backup will not affect future backups.
Incremental Backup
The next backup that is performed is going to be an Incremental Backup. The next incremental backup to the new destination is performed without copying all the backups from the previous destination. However, for this option, the new location is dependent on the previous location because the changes include only the incremental data (not the full backup data). Do not delete the data from the previous location. If you change the backup destination to another folder and attempt to perform an incremental backup, and the former backup destination does not exist, the backup fails.
Note: With the Full installation of Arcserve UDP, you can specify to use an Arcserve UDP Recovery Point Server as the backup location. If you do, the Protection Settings Backup Destination displays the Arcserve UDP Recovery Point Server Settings, including the Hostname, Username, Password, Port, Protocol, and the Plan Summary.
You can back up the entire machine or selected volumes.
Back up the entire machine
Lets you back up the entire machine. All volumes on the machine are backed up.
Note: If you select the full machine backup option, Arcserve UDP Agent (Windows) automatically discovers all disks or volumes attached to the current machine and Arcserve UDP Agent (Windows) includes them in the backup.
Example: If a new disk is attached to the machine after the backup setting is configured, you do not need to change the backup settings and the data on the new disk will be protected automatically.
Select individual volumes to back up
This volume filtering capability lets you specify to back up only the selected volumes. You also have the option to Select or clear selection of all listed volumes.
Note: If some volumes are selected explicitly for backup, only the selected volumes are backed up. If a new disk or volume is attached to the machine, manually change the volume selection list to protect the data on the new disk or volume.
When you select this option, a listing of all available volumes display, with the corresponding volume information and notification messages.
Note: Computers that adhere to the Extensible Firmware Interface (EFI) use the EFI System Partition, which is a partition on a data storage device. The EFI System partition is critical for Bare Metal Recovery (BMR). Therefore, when you select boot volume "C" on a UEFI system, the EFI System Partition is selected automatically for the backup source for BMR and an information message is displayed.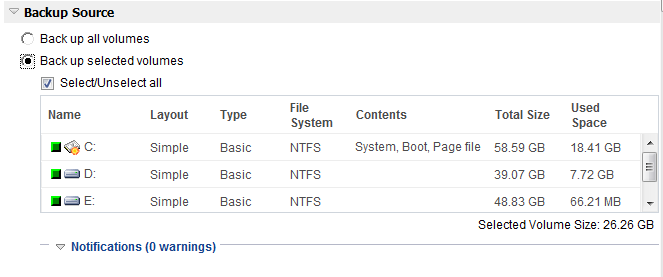
Name
Specifies the name of the volume drive letter, mount point, volume GUID (Globally Unique Identifier) name.
Layout
Indicates the simple, spanned, mirror, stripped, RAID5 (backup of a RAID 5 volume on Microsoft Dynamic Disks is not supported; but backup of hardware RAID is supported).
Type
Indicates the type, basic or dynamic.
File system
Lists the following file systems: NTFS, ReFS, FAT, FAT32 (backup of FAT, FAT32, and exFAT is not supported).
Contents
Indicates whether the application is (SQL/Exchange), System, Boot, Page file, Removable Device, VHD, 2-TB Disk.
Total size
Specifies the size or the capacity of the volume.
Used Space
Indicates the space, files or folders and volume data occupies.
The notification messages display for any of the following conditions:
If the specified backup destination is on the local volume, a warning message displays notifying you that this volume is not backed up.
If system/boot volume is not selected for backup, a warning message displays notifying you that the backup is not usable for BMR.
If you select boot volume "C" on a UEFI system, the EFI system partition is selected automatically for the backup source for BMR and an information message is displayed.
If the application data files are on a volume that is not selected for backup, the application name and database name display for reference.
Standard
Standard Backup Data Format allows you to set the number of recovery points to retain or the number of recovery sets to retain and includes a basic repeat backup schedule. The Standard format is the legacy format used in releases of Arcserve D2D and Arcserve Central Applications.
Advanced
Advanced Backup Data Format allows you to set the number of recovery points to retain and includes advanced scheduling. The Advanced format is a new data storage format, dividing source disks into multiple logical segments. Compared to the Standard format, backup, restore, and merge job throughputs are greatly improved.
If the Advanced Backup Data Format is selected, advanced scheduling will be enabled. Advanced scheduling consists of the following:
Note: If you selected Advanced as the Backup Data Format, the retention setting is specified on the Advanced Schedule Settings dialog.
You can set the retention setting based on the number of recovery points to retain (merges sessions) or based on the number of recovery sets to retain (deletes recovery sets and disables infinite incremental backups).
Default: Retain Recovery Points
Recovery Point
This is the recommended option. With this option selected, you can fully leverage the infinite incremental backup capabilities and save storage space.
Note: If you selected Advanced as the Backup Data Format, then you can only specify the number of recovery points to retain.
Recovery Set
This option is generally used for large storage environments. With this option selected, you can create and manage backup sets that help you manage your backup window time more efficiently when you are protecting a large amount of data. You can use this option when backup time is a priority over space constraints.
Note: Recovery sets are only available if you are backing up to a location that is not a data store. Recovery sets are not supported with RPS deduplication. They are also not available for Advanced format backup to non-RPS locations.
For more information about setting the Recovery Point and Recovery Set options, see Specify Retention Settings.
No Compression
No compression is performed. This option has the lowest CPU usage (fastest speed), but also has the highest disk space usage for your backup image.
Standard Compression
Some compression is performed. This option provides a good balance between CPU usage and disk space usage. Standard compression is the default setting.
Maximum Compression
Maximum compression is performed. This option provides the highest CPU usage (lowest speed), but also has the lowest disk space usage for your backup image.
Notes:
- Your backup protection settings are saved.