Add a Cloud Account for Microsoft Azure Compute
Add a Microsoft Azure Compute cloud account to copy Files or recovery points to cloud storage. You can use this account while creating tasks for Virtual Standby to Cloud or Instant Virtual Machine on Microsoft Azure plans.
Note: To add a Cloud Account for Microsoft Azure, you must meet the prerequisites. For details, view Prerequisites.
Follow these steps:
- Log into Arcserve UDP, and click the resources tab.
- From the left pane, navigate to Destinations, and click Cloud Accounts.
- The Destinations: Cloud Accounts page is displayed in the center pane.
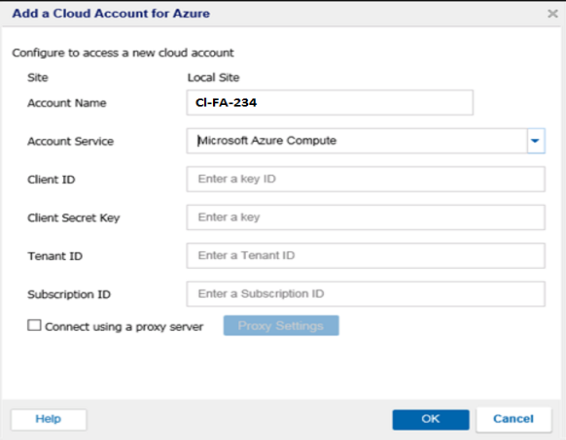
- Click Add a Cloud Account.
- The Add a Cloud Account page is displayed.
- For Account Name, provide a unique name.
- Account Name specifies the name of the cloud storage. This name will be added to Console for identifying the cloud account. Each cloud account must have a unique storage name.
- Select the option from the Account Service drop-down list.
- Multiple fields appear for configuration.
- Enter details in the following fields to configure and click OK:
- The cloud account is added to the Console.
Client ID
Refers to the Application ID of the Azure Active Directory application. Copy your Client ID prepared in the text editor.
Client Secret Key
Refers to the authentication key generated for the Azure Active Directory application that you enter as Client ID. Copy your Client Secret Key prepared in the text editor.
Important! This Secret Key is crucial for maintaining the security of your accounts. You should keep your keys and your account credentials in a secure location. Do not embed your Secret Key in a web page or other publicly accessible source code and do not transmit it over insecure channels.
Tenant ID
Refers to the ID of the Azure Active Directory where you created the Azure Active Directory application. Copy your Tenant ID prepared in the text editor.
Subscription ID
Refers to a Globally Unique Identifier (GUID) that uniquely identifies your subscription to use Azure services. Copy your Subscription ID prepared in the text editor.
Proxy Settings
Specifies the proxy server settings. Select Connect using a proxy server to enable this option. If you select this option, you must also include the IP address (or machine name) of the proxy server and the corresponding port number that is used by the proxy server for internet connections. You can also select this option if your proxy server requires authentication. You then must provide the corresponding authentication information that is required to use the proxy server.