Add a Copy Recovery Points Task to the Plan
The copy recovery task copies the recovery points from the backup destination to Cloud or a shared folder or local volume.
Note: If a backup job is in progress and you pause the plan, the backup job will get over and the copy recovery points job will not start. When you resume the plan again, the copy recovery points job is not resumed automatically. You have to manually run another backup job to start the copy recovery points job.
Follow these steps:
- Click Add a Task from the left pane.
- A new task is added to the left pane.
- From the Task Type drop-down menu, select Copy Recovery Points.
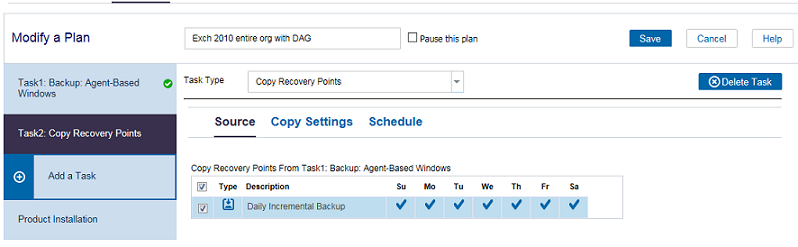
- The Copy Recovery Points task is added. You do not have to configure the Source tab in the Copy Recovery Points (CRP) task you can view the backup destination from the Backup task.
-
- Note: You can configure Copy Recovery Point path to a customized location by using the below registry key.
-
Path: HKEY_LOCAL_MACHINE\SOFTWARE\Arcserve\Unified Data Protection\Engine\AFCopySession
Key Name: LocalTempPath
Key Type: REG_SZ (String)
Key Value: “Local_disk_path”
- From the Source tab, select a schedule.
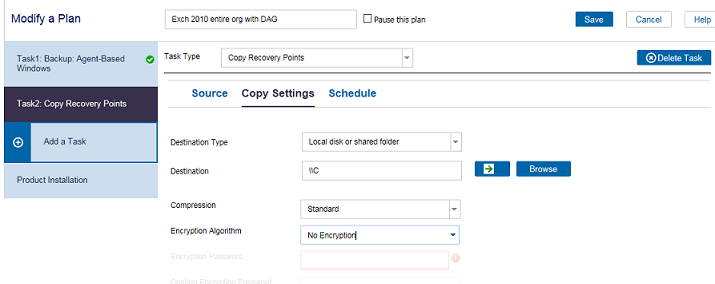
- Click the Copy Settings tab and enter the details.
- Click the Schedule tab and specify the job schedule.
- Using the schedule option, you can add multiple schedules for a recovery point. Also consider the following details:
- If no schedule is configured, then the Copy Recovery Points job runs immediately after completion of backup job.
- Now, you can configure the Copy Recovery Points for start time and end time.
-

- CRP always tries to check the session available in given time.
- During the specified time if any backup session configured in the Source tab is available, then CRP copies the session to respective destination.
- You can also configure retention points for Daily, Weekly, and Monthly.
- Note: Number of successful backups is counted for any daily, weekly, and monthly backups that are configured.
- Click Save Changes.
- The changes are saved and the copy recovery points task is automatically deployed to the node.
Destination Type
Specifies the type of destination. You can select one of the options from Cloud storage or a local or shared folder. You cannot opt for Recovery point server as destination type.
For local or shared folder, enter the details as displayed below.
If you select Cloud Storage, enter details as displayed below.

You need to select the Storage Service and add a cloud storage.
For detailed information about the directory structure, view Recovery Points Directory Structure in S3 cloud bucket.
Storage Service
Lets you select one of the options from the multiple available storage service.
Cloud Storage
Lets you select the cloud account of the selected storage service. If the drop-down list does not display any account then click Add to add an account.
Destination
Specifies the destination where you want to keep the copy recovery points.
Note: Click arrow to validate the provided destination. The arrow is visible when you enter destination.
Compression
Specifies to select a compression level for the recovery point copies. Compression is typically performed to decrease your disk space usage, but also has an inverse impact on your backup speed due to the increased CPU usage. The available options are:
No Compression - Compression is not performed. Files are pure VHD. This option has the lowest CPU usage (fastest speed), but also has the highest disk space usage for your backup image.
No Compression - VHD - Compression is not performed. Files are converted to .vhd format directly, without the need for manual operations. This option has the lowest CPU usage (fastest speed), but also has the highest disk space usage for your backup image.
Standard Compression - Some compression is performed. This option provides a good balance between CPU usage and disk space usage. This setting is the default setting.
Maximum Compression - Maximum compression is performed. This option provides the highest CPU usage (lowest speed), but also has the lowest disk space usage for your backup image.
Note: If your backup image contains incompressible data (such as JPG images or ZIP files), additional storage space can be allocated to handle such data. As a result, if you select any compression option and you have incompressible data in your backup, it can actually result in an increase in your disk space usage.
Encryption Algorithm
Specifies the type of encryption algorithm that is used for the recovery point copies. The available format options are No Encryption, AES-128, AES-192, and AES-256.
Encryption Password
Specifies to provide an encryption password that will be used to encrypt the destination session. When you restore from the copy recovery points, you must provide this password to confirm your authentication.
Confirm Encryption Password
Specifies to reenter the password.
You have successfully created and deployed the copy recovery points plan.