Add a File Copy Task to the Plan
The file copy task lets you copy individual files to the specified destination. The original copy is retained after you have copied the files to the specified destination. File copy is not dependent on catalog jobs. If the backup destination is a deduplication or non-deduplication data store, the Catalog folder is moved to the backup destination. The catalog job is a part of the file copy job. The file copy job runs on recovery point server and by doing so Arcserve UDP offloads the task from agents.
Arcserve UDP supports file copy from a replication data store. ;
Pre-flight Check for File Copy Nodes: You can also perform Pre-flight Check (PFC) for file copy. Only those node that are added for file copy are eligible for PFC. To perform PFC for file copy, right-click the node from All Nodes and select Filecopy Preflight check.
Note: If a backup job is in progress and you pause the plan, the backup job will get over and the file copy job will not start. When you resume the plan again, the file copy job is not resumed automatically. You have to manually run another backup job to start the file copy job.
Follow these steps:
- Click Add a Task from the left pane.
- A new task is added to the left pane.
- From the Task Type drop-down menu, select File Copy.
- The File Copy task is added.
- Click the Source tab and specify the details.
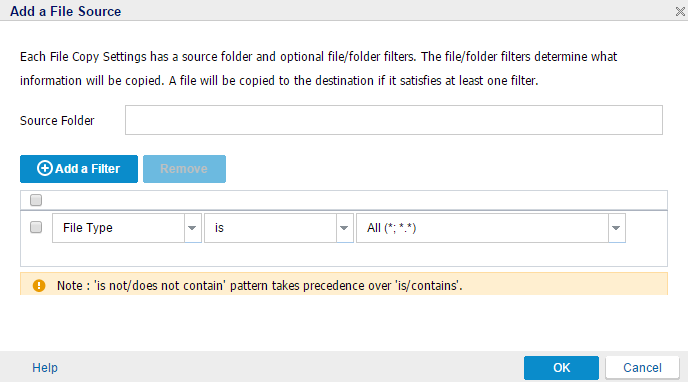
- Click Add Source Path.
- The Add a File Source dialog opens.
- Specify the path of the source folder that you want to copy.
- Click Add a Filter.
- The filter is added below the Add a Filter button. You can add multiple filters and can also remove the filters. For more information, see Add File Copy Filters.
- Select the filter from the list and click OK.
- The Add a File Source dialog closes.
- Click the Destination tab and specify the destination details.
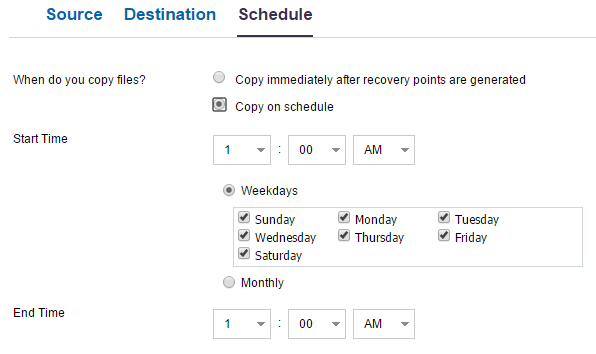
- Click the Schedule tab and specify the file copy schedule.
- If a file copy job runs beyond the end time, the job will continue to run until it is complete. The next file copy job does not run until the previous file copy job is complete even if a scheduled job overlaps the running job.
- The File Copy job runs as specified in the schedule.
- Click Save.
Recovery Points Source for File Copy
Let you select the source of recovery points. If there is only one source, the source is displayed automatically. If there are more than one source, you have to select the correct source from the drop-down list.
Types of Recovery Points
Lets you select the recovery points for file copy. You can select either of the following two options:
Copy files from selected backup types(s)
You can select either Daily Backups, Weekly Backups, Monthly Backups. The daily, weekly, or monthly options are enabled depending on the schedule of the source backup. For example, if the source backup has only monthly backup scheduled, then the Copy files from selected backup types(s) option has only Monthly Backups enabled.
Copy file from the first of every backup(s)
You can specify the backup number that you want to copy. For example, if you specify 3, then the third backup will be copied. File copy supports up to 700 recovery points to copy from.

You can avoid skipping Windows System (C:\Windows) and program files (C:\Program Files, C:\Program Files (x86)) directories using the following configuration:
Add the following XML tag, if not present already or update in the FileCopyDebugSetting.xml file present under $UDPHome\Engine\Configuration folder:
<SkipWindowsFolders>0</SkipWindowsFolders>
The XML file appears as below:
<?xml version="1.0" encoding="UTF-8"?>
<HKLM>
<AFArchiveDLL>
..........
<SkipWindowsFolders>0</SkipWindowsFolders>
</AFArchiveDLL>
</HKLM>

Destination Type
Specifies that the destination types is a network share or a cloud storage. For either destination option, if the connection to the specified destination is lost or broken, Arcserve UDP makes several attempts to continue the file copy job. If these reattempts are not successful, a makeup job is then performed from the point where the failure occurred. In addition, the activity log is updated with a corresponding error message and an email notification is sent (if configured).
Network Share
Specifies that the destination is a shared folder. When selected, lets you specify the full path of the location where you want to move or copy the source files/folders.
Destination Folder
Specifies the destination where the copied files are stored. The destination can be any local volume or folder or a file share accessible by any uniform naming convention (UNC) path. This field is available when you select Network Share as the destination type. You can also browse the destination folder.
Cloud Storage
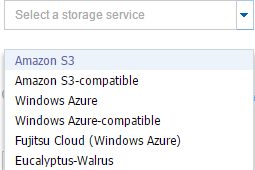
Specifies that the copied files are stored in a cloud environment. Arcserve UDP currently supports file copying to multiple cloud vendors, such as Amazon S3 (Simple Storage Service), Amazon S3-compatible, Windows Azure, Windows Azure-compatible, Fujitsu Cloud (Windows Azure), Eucalyptus-Walrus, and Fujitsu Cloud Service K5. These cloud vendors are publicly available web services that let you store and retrieve any amount of data, at any time from anywhere on the web in a safe and secure environment.
Note: To eliminate any potential clock skew error when attempting to connect to the cloud, verify that your machine has the correct time zone set and the clock is in sync with the global time. Always check the time of your machine against the GMT time. If the time of your machine is not synchronized with the correct global clock time (within 5 to 10 minutes), your cloud connection may not work. If necessary, reset the correct time for your machine and rerun your file copy job.
Storage Device
Select the device type from the drop down list.
Cloud Storage
Select the cloud storage path from the drop-down list. The drop-down list is available if you have specified your cloud storage details. If you are specifying the cloud storage account for the first time, click Add to add your cloud account. When you select Cloud Storage from the next time, the account will be displayed in the Cloud Storage drop-down list.
Note: For more information on adding a cloud account, see Add a Cloud Account.
Compression
Specifies the type of compression that is used for the File Copy jobs.
Compression is performed to decrease your storage space at the File Copy destination, but also has an inverse impact on your file copy speed due to the increased CPU usage.
Note: For a compressed File Copy job, the Activity log displays only the uncompressed size.
The available options are:
Standard Compression
Some compression is performed. This option provides a good balance between CPU usage and storage space requirement. This is the default setting.
Maximum Compression
Maximum compression is performed. This option provides the highest CPU usage (lowest speed), but also has the lowest storage space requirement for your file copy.
Enable Encryption
Specifies to use encryption for file copying.
Data encryption is the translation of data into a form that is unintelligible without a deciphering mechanism. Arcserve UDP data protection uses secure, AES-256 (Advanced Encryption Standard) encryption algorithms to achieve maximum security and privacy of your specified data. When an encryption is selected, you must provide (and confirm) an encryption password.
Note: When you modify a file copy task, the Encryption or Compression cannot be modified.
File Retention
Retains the files in the file copy destination if the specified criteria is met.
File created within the last
Specifies the amount of time (years, months, days) that the stored data is retained at the destination location. At the end of the specified retention time period, the stored data is purged from the destination.
Important! At the end of the specified retention time when the data is purged from the destination, all of this purged data is no longer stored or saved.
Note: The Retention Time purge process is only triggered if the File Copy Schedule option is enabled.
File version less than
Specifies the number of copies retained and stored at the destination location. After this number is exceeded, the earliest (oldest) version will be discarded. This cycle of discarding the oldest stored version repeats as newer versions are added to the destination, allowing you to always maintain the specified number of stored versions.
For example, if your specified File Versions retention count is set to 5 and you perform five file copies at times t1, t2, t3, t4, and t5, these file copies become the five file copy versions retained and available to recover. After the sixth file copy is performed (new version is saved), Arcserve UDP will remove the t1 copy and the five available versions to recover are now t2, t3, t4, t5, and t6.
By default, the number of copies retained at the destination location before discarding is 15.
The changes are saved and the file copy task is automatically deployed to the node.