Add a Storage Array for NetApp
You can add a NetApp storage array using three options.
Follow these steps:
- From the Add a Storage Array dialog, select NetApp from the Storage Vendor drop-down option.
-
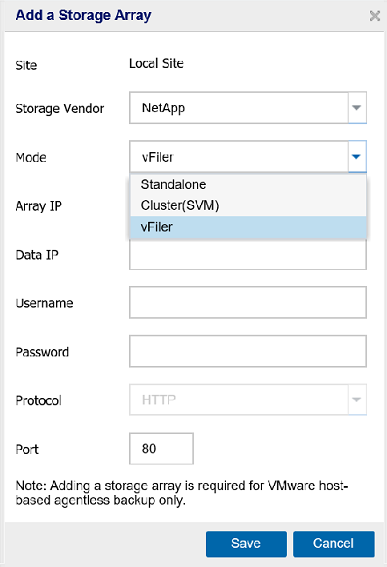
- From Mode, select one of the following options for the type of array:
- Provide the following details for the specific type of array:
- Click Save.
Standalone
Specifies that the storage array is a standalone appliance.
Cluster(SVM)
Specifies that the storage array belongs to a cluster of arrays.
vFiler
Specifies that the storage array is a vFiler.
Site
Specifies the name of the site.
Array IP
Specifies the IP address of the array. For 7-mode, provide the IP address that can access the iSCSI interface and NFS. VMware(ESXi) uses the IP address to access the storage array for read and write operations. For cluster and vFiler, provide the management IP address of the Storage Array or management IP address of the Storage Virtual Machine (SVM).
To find the Array IP address, refer to the topic Find Array and Data IP of the SVM Storage Array for the Arcserve UDP Console.
Data IP
Specify the Data access IP (Logical Interface) of the storage virtual machine (SVM), where the target machines (ESXi) can access this storage array for read and write operations. This option is applicable for Cluster and vFiler only. If the Storage Virtual Machine supports only FC protocol, then enter NA.
To find the Data IP address, refer to the topic Find Array and Data IP of the SVM Storage Array for the Arcserve UDP Console.
Username
Specifies the user name to connect to the storage array.
Password
Specifies the password for the user name.
Protocol
Specifies the protocol to connect to the array.
Port
Specifies the port number of the array.
Default: 443 (HTTPS), 80 (HTTP)
The storage array is added to the Console.