Specify the Instant Virtual Machine Details
Specify the details for the Instant VM. The options may vary depending on the hypervisor.
Follow these steps:
- Specify the name and description of the Instant VM.
- Specify the folder location of the Instant VM on the recovery server.
- You can browse the volume information of the recovery server.
Note: If you select VMware vSphere as the VM location, the selected folder mounts as NFS Datastore to VMware. A shared icon appears on this folder in the local machine.
- Specify the Instant VM settings.
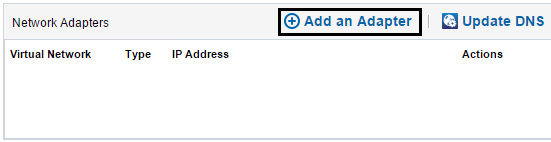
- Add network adapters.
- Note: For a Linux Instant VM, at least one virtual NIC can be used to connect to Linux Backup Server.
- Click the Add an Adapter button to add an adapter and specify the details of the network.
- You can add multiple network adapters. After adding a network adapter, you can edit and delete the network adapter from the Actions column.
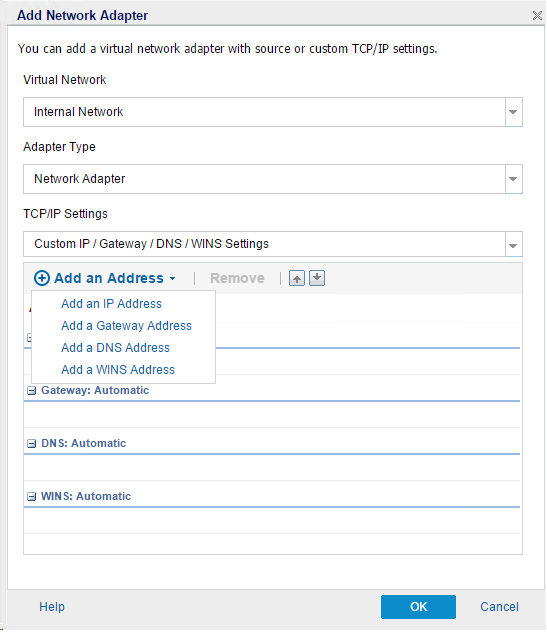
- Specify the Virtual Network, Adapter Type, and TCP/IP Settings. If you want to specify the IP address of the Instant VM, you can click Add an Address and select the address you want to configure.
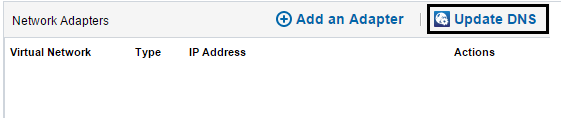
- Update DNS.
- Note: This feature is only available for Windows Instant VM.
- Click the Update DNS button to specify DNS details.
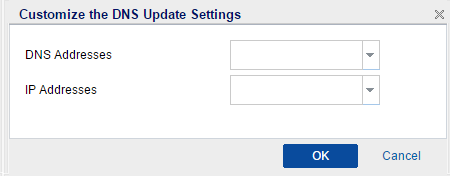
- Click Add a DNS Address to add a DNS update record. Click Remove to remove DNS update record. Click Up and Down button to adjust the sequence of the records.
- Select a DNS Address and an IP Address from the drop-down list and then click OK.
- Specify the Time to Live (TTL).
- Specify the DNS Authentication.
- Verify the free disk space of VM Files Folder capacity.

Note: The Monitor free disk space of VM Files Folder capacity check box is selected by default. The capacity bar appears in yellow in Instant Virtual Machines page, if the free space of VM Files Folder capacity is lesser than the threshold value. The default threshold value is 3%. You may change the value, if required.
- Select the Specify disk controller type for the virtual machine check box and select the type of the disk controller for the virtual machine from the drop-down.

Note: The Specify disk controller type for the virtual machine check box is available if you have selected VMware vSphere as the VM location.
The instant virtual machine is created applying the specified disk controller in the VMware.
- To redirect the virtual disk updates to the VMware Datastore, follow these steps:
- Select the Redirect virtual disk updates to VMware Datastore check box.

Note: The Redirect virtual disk updates to VMware Datastore check box is available if you have selected VMware vSphere as VM location.
- Select the required VMware Datastore from the drop-down.
The updates of the virtual disk are redirected to the selected VMware datastore.
- Select the Redirect virtual disk updates to VMware Datastore check box.
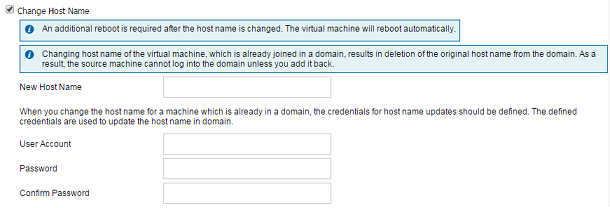
- To change the Instant Virtual Machine hostname, follow these steps:
- Click the Change Host Name check box to update the hostname of the Instant Virtual Machine.
- Specify a New Host Name for the Instant Virtual Machine. If the source machine is in a domain, provide the User Account and password.
- Note: If the source machine is in a domain, the account should have the permission to change the hostname in domain.
- (Optional) For Linux Instant VM, select the Recover data automatically after Instant VM is started option to enable the automatic recovery of data when the instant VM target is started.
VM Name
Specifies the name of the Instant VM. The name of the source node with a prefix is the default name of the Instant VM. Some special characters are not allowed in the name, such as ‘@’, ‘\’ and so on.
Description
(Optional) Specifies the description for the Instant VM.
CPU Count
Specifies the number of CPU that you would require in the Instant VM.
Memory Size
Specifies the size of memory that you would require in the Instant VM.
Note: You can specify the Update DNS detail information if you have specified an IP address and DNS address in the Network Adapter and the source machine is in a domain.
For Microsoft DNS Server, enter the username and password. For Bind Server, you need to specify the full path, including the file name of the key file in the Recovery Server.
The default behavior of Linux Instant VM is to recover the necessary data first and start the VM. If the option is not selected, then when the VM starts the remaining data is not recovered even if used a normal VM. If the option is enabled, the remaining data is recovered at the backend when you are using the VM. You can also preserve the Instant VM target permanently when the data recovery is finished.
Note: When status of the Linux Instant VM target is Power Off, Instant VM job fails when Powered On again after merging the recovery point as a merge job is scheduled.
Now, you can submit the job.