Specify the Source
The Source page lets you specify the Exchange Online source nodes that you want to protect. You can select more than one Exchange Online source nodes in a plan. If you have not added any nodes to the Console, you can add Exchange Online source nodes from the Source page.
Note: You can save a plan without adding any source nodes but the plan is not deployed unless you add any nodes.
You can also manage Exchange Online nodes using Public folder Mailbox Support for Exchange Online Protection.
Follow these steps:
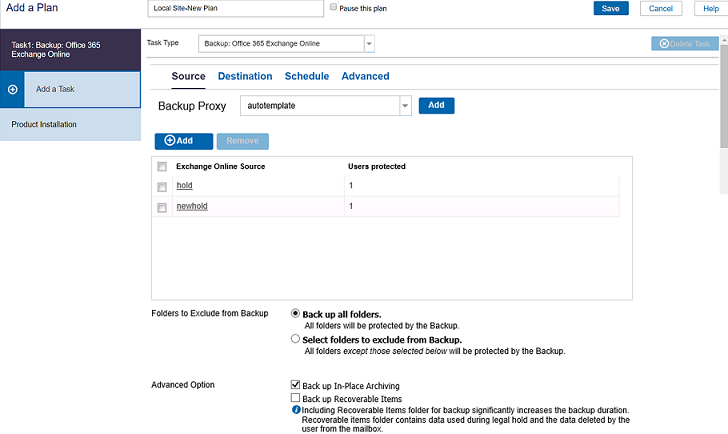
- Click the Source tab.
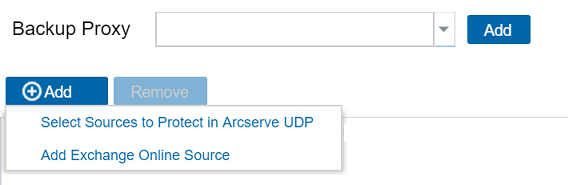
- Add backup proxy using one of the following options:
- Select the Backup Proxy from the drop-down list.
All the Exchange Online backups and restores are executed from the backup proxy. The RPS servers are listed and added, by default.
- Click the Add button placed in front of Backup Proxy to add a new Backup Proxy to the list.
- Select the Backup Proxy from the drop-down list.
- Add Exchange Online node using one of the following options:
- Click Add and then click Select Source to Protect in Arcserve UDP.
- The Add Nodes to Plan dialog is displayed.
- Select a node and click Connect.
- Note: You can also search for the Exchange Online nodes that you want to protect in Search.
- Select the Protect complete Office 365 Exchange Store check box to protect all the Exchange Online accounts across all the pages.
Note: To add all the Exchange Online accounts to the protected list, you may click the right (>) arrow.
The Exchange Online accounts that you selected are added.
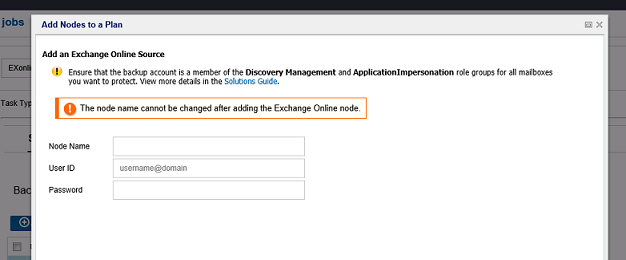
- Click Add and then click Add Exchange online Source in Arcserve UDP.
- Note: Unlike other nodes, you cannot add the Exchange Online node from All Nodes page. You can add an Exchange Online node only in a plan or when you modify a plan.
- Enter the user name of Exchange Online backup account that meet the prerequisites in Admin Username
- Enter password and click Connect.
- Select the Exchange Online accounts that you want to protect and click the right arrow (>) to move them to the protected list.
- Click Save.
Multiple Exchange online nodes can use the same user account (service account) of Exchange online. To add Exchange node by plan, now you need to specify the node name, user name, and password. You can specify the node name of Exchange online node name and cannot change after creating the node.
Note: Updating / changing the user account may change the number of protected mailboxes. You need to verify that the new / updated service account have impersonation rights for the mailboxes to be protected.
Note: You can also provide a non-admin account for Office 365 backups. Such an account has access to its own mailbox only.
Note: Select the Protect complete Office 365 Exchange Store check box to protect all the Exchange Online accounts across all the pages. To add all the exchange online accounts listed on the page to the protected list, click the right (>) arrow.
The Exchange Online accounts that you selected are added.
- From the Folders to Exclude from Backup section on the Source tab, select the desired check box.
- From the Advanced Option, select the desired check box.
- To allow Exchange Online Protection support Archiving Mailbox, select the check-box of Backup up In-Place Archiving.
- Select the check box of Backup up Recoverable items to enable to protect the mailbox that enables the In-Place Hold or Litigation Hold feature.
Note: For more information about Archiving Mailbox, refer to the link.
Note: For Archiving In-Place Hold and Litigation Hold for Exchange Online, refer to the link.
Note: To enable both the features in the mailbox at the same time to back up the recoverable items in Archiving mailbox, select both the options Backup up In-Place Archiving and Backup up Recoverable items.
The source is specified.