Restore an Active Directory
After you have installed the Active Directory in different volumes and have performed a backup for both volumes, you may want to restore the volumes with the Active Directory. This scenario describes how you can restore the backed up Active Directory volumes.
Note: Verify that you have completed the prerequisites and backed up Active Directory volumes.
Follow these steps:
- Access the restore method selection dialog in one of the following ways:
- Log in to Arcserve UDP.
- Click the resources tab.
- Select All Nodes in the left pane.
- In the center pane, select the node and click Actions.
- Click Restore from the Actions drop-down menu.
- Log in to Arcserve UDP Agent (Windows).
- From the home page, select Restore.
- From the Restore screen, click Restore Active Directory.
- The Restore Active Directory dialog opens.
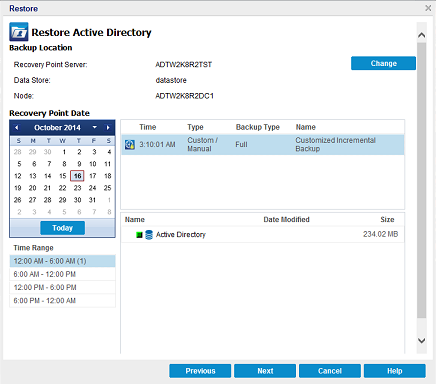
- From the Restore Active Directory screen, perform the following steps:
- From the calendar, select Backup date for the Active Directory that you want to restore.
- From the Time range, select Backup time.
- From the Restore Active Directory screen, select a recovery point that is identified with Time, Type, Backup Type, and Name.
- From the Name section, select an Active Directory backup session to restore.
- Click Next.
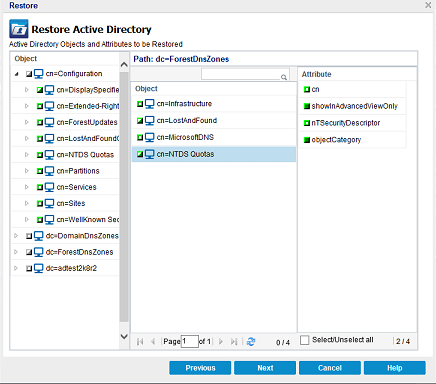
- Select the following options to further define the objects, path, and attributes to restore:
- From the Object column, select the name of an object. The paths related to the selected object are displayed.
- From the Path column, select a path. The attributes related to the selected path are displayed.
- From the Attribute column, select one or more attributes.
- Click Next.
- The Restore Options screen is displayed.
- From the Restore Options, select the following objects according to your requirement:
- If the selected object was renamed after backup, click the "Restore with original name of Renamed Objects" option to restore the renamed object.
- If the selected object was moved to another container after backup, click the "Restore to original location of Moved Objects" option to restore the moved object.
- If the selected object was deleted permanently after backup, click the "Restore with the new object ID of Deleted Objects" option to restore the permanently deleted object.
- Click Next.
- The Restore Summary screen is displayed
- Review the details and perform one of the following action:
- Click Previous, if you want to modify the details.
- Click Finish to run restore.
From Arcserve UDP:
All the added nodes are displayed in the center pane.
The restore method selection dialog opens.
Note: You are automatically logged in to the agent node and the restore method selection dialog is opened from the agent node.
From Arcserve UDP Agent (Windows):
The restore method selection dialog opens.


Note: You can use the search icon to browse for the path.
Note: If you do not select this option, the object will not be restored.
Note: If you do not select this option, the object will not be restored.
Note: Using this option helps you keep the restored object with the new object ID.
A status message is displayed to inform you when the Restore job is completed. If the restore is unsuccessful, view the logs and try again.