Specify the Advanced Settings
Specify the backup schedule, recovery set settings, and pre-backup and post-backup settings on the Advanced page.
The following diagram displays the Advanced page of the Backup Wizard. In this diagram, None option is selected for the Schedule Type.
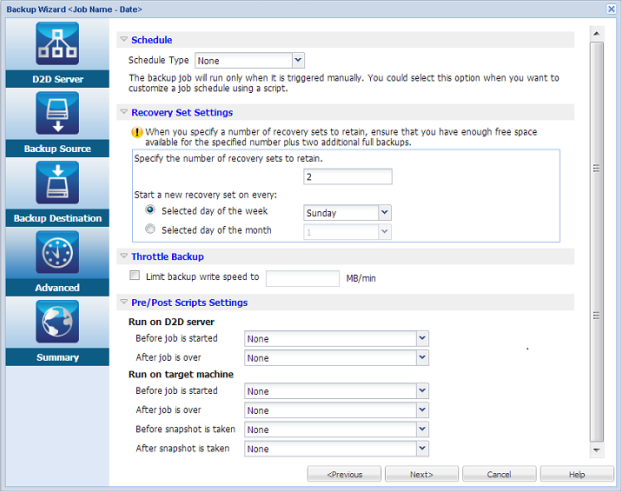
The following settings are available on the Advanced page:
- The Schedule settings ensure that the backup job runs periodically at a specified time.
Important! Set the same timezone between UDP Server and Linux Backup Server. After you change the timezone in both the servers, you must restart the UDP management service or Linux Backup Server for the changes to take effect.
- The Recovery Set Settings ensures periodic maintenance of the recovery sets. If the number of recovery sets exceeds the specified number, then the oldest recovery set is deleted to maintain the specified number all the time.
- The Throttle Backup setting lets you enable and specify the maximum speed (MB/min) at which the backups are written.
- The Pre/Post Scripts Settings defines the scripts that can be run on the Backup Server and the target node. You can configure the scripts to take specific actions before the start of a job, during the job is running, or after the completion of the job.
To optimize the management of your Recovery Points, you should consider the following recommendations when scheduling the frequency of your backups:
- For systems that are protected with Incremental Backups performed every 15 minutes, you should schedule a Full Backup every week (to refresh your base image).
- For systems that are protected with Incremental Backups performed every hour, you should schedule a Full Backup every month (to refresh your base image).
Note: If the amount of space used to store your backup images is a concern, you should consider scheduling your Full Backups less frequently to consume less storage space.
Follow these steps:
- Set the start date and time by selecting one of the following options from the Schedule Type drop-down list:
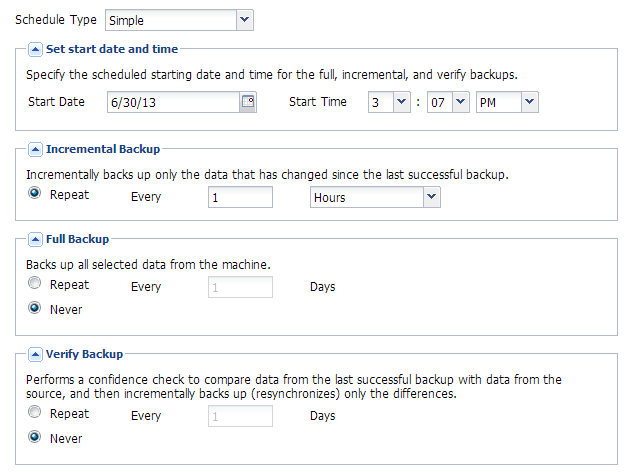
Simple
The Simple schedule type is not available when you create a new schedule. However, if you are modifying an old backup job that had Simple schedule, you can configure the Simple schedule.
Select the Simple option to schedule the Incremental Backup, Full Backup, and Verify Backup per the specified Start Date and Start Time. For each type of backup, you can also specify the repeat duration for a backup or never repeat a backup. The start date and time is fixed for all types of backup. So, you cannot specify a different start date and time for different types of backup.
Note: For more information about the backup types, see Understanding the Types of Backup.
Custom
Select the Custom option to specify multiple backup schedules each day of the week. You can specify different start date and time for different types of backup. You can add, modify, delete, and clear the Custom schedule. When you click Clear, all the Custom backup schedules are deleted from the Custom Schedule Tray.
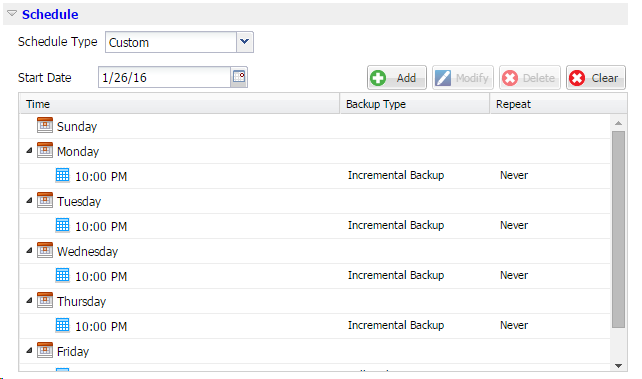
To add a backup schedule, follow these steps:
- Click Add.
The Add backup schedule dialog opens.
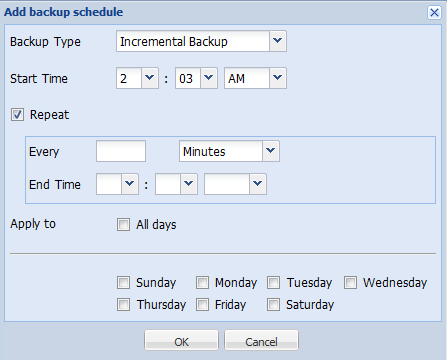
- Specify your backup schedule options and click OK.
The specified backup schedule displays on the Custom Schedule Tray.
None
Select the None option to create the backup job and stores the job in the Job Status tab. This option will not run the job because there is no specified schedule. When you submit the job, the status of the job changes to Ready. When you want to run the job, you have to select the job and click Run Now from the Job menu. Each time you want to run the job, you must run the job manually. You can also write a script to run this job at your own customized schedule.
- Click Add.
- Specify your recovery set settings.
Note: For more information about the recovery sets, see Understanding the Recovery Sets.
Specify the number of recovery sets to retain
Specifies the number of recovery sets retained.
Start a new recovery set on every:
Selected day of the week
Specifies the day of the week selected to start a new recovery set.
Selected day of the month
Specifies the day of the month selected to start a new recovery set. Specify 1 through 30, or the last day of the month.
Note: The Backup Server checks for the number of recovery sets in the configured backup storage every 15 minutes and deletes any extra recovery set from the backup storage location.
- Specify the throttle backup value.
You can specify the maximum speed (MB/min) at which backups are written. You can throttle the backup speed to reduce CPU or network use. However, limiting the backup speed has an adverse effect on the backup window. As you lower the maximum backup speed, it increases the amount of time of perform the backup. For a backup job, the Job Status tab displays the average Read and Write speed of the job in progress and the configured throttle speed limit.
Note: By default, the Throttle Backup option is not enabled and backup speed is not being controlled.
- Specify your pre-backup settings and post-backup settings in Pre/Post Scripts Settings.
These scripts run script commands for actions to take before the start of the job and/or upon the completion of the job.
Note: The Pre/Post Script Settings fields are populated only if you already created a script file and placed it at the following location:
/opt/Arcserve/d2dserver/usr/prepost
Note: For more information about creating the pre/post scripts, see Manage Pre/Post Scripts for Automation.
- Click Next.
- The Summary page opens.
The custom schedule is specified.
Note: If at a given time there is more than one type of backup scheduled to be performed simultaneously, the type of backup that will be performed is based on the following priorities:
- Priority 1 - Full backup
- Priority 2 - Verify backup
- Priority 3 - Incremental backup
For example, if you schedule all three types of backups to be performed simultaneously, Arcserve UDP Agent (Linux) will perform the Full Backup. If there is no Full Backup scheduled, but you scheduled a Verify Backup and Incremental Backup to be performed simultaneously, Arcserve UDP Agent (Linux) will perform the Verify Backup. A scheduled Incremental Backup is performed only if there is no conflict with any other type of backup.