

When you submit a backup job, ON-Bar evaluates your backup privileges and IDS status, and submits the job to Arcserve Backup. You can view one (or more) job per dbspace, blobspace, or logical log being backed up.
To back up an IDS database
You can back up data using the Agent for IBM Informix only when IDS is online.
Note: Be sure to submit the #LOGFILE# backup with each salvage operation when IDS is offline.
Important! The agent supports only single, non-concurrent backups and restores. It does not support parallel operations.
Selecting the server in Backup Manager is equivalent to the following ON-Bar full-backup command (for Informix 11.10, 11.50, or 11.70):
onbar_d -b -w
Note: When you select a full Informix server backup (that is, one that includes all IDS objects on the server), the system backs up all files located in the \etc directory under the Informix home directory. The \etc directory must contain ONCONFIG, IXBAR, ONCFG, and other critical files. If the \etc directory does not contain these files, modify the Informix environment to ensure that the files are there.
Also, the Agent for IBM Informix backs up the files located in the \TAPEINFO directory under the agent directory to ensure the backup of the XBSATAPE.TBL file. The XBSATAPE.TBL file is critical for an IDS restore.
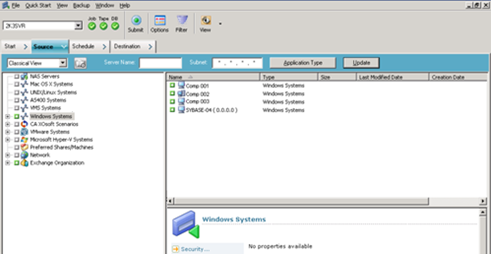
If you select individual dbspaces or blobspaces, the Informix server is automatically selected. The box to the left of the selection is partially shaded even when all objects are selected.
The box is partially shaded because dbspaces and the logical logs were individually selected. In this case, a full Informix server-level backup does not occur.
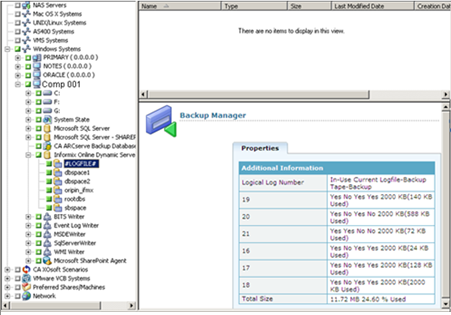
Important! For logical log backup options to work properly, you must select the #LOGFILE# entry.
Selecting the objects in Arcserve Backup is equivalent to the following ON-Bar commands for IDS Version 11.10, 11.50, and 11.70:
onbar_d -b sbspace rootdbs dbspace1 dbspace2 oripin_ifmx
onbar_d -l
The Backup Agent Backup Option dialog opens.
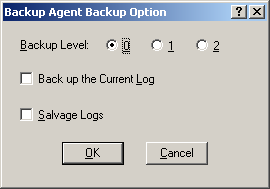
The following describes how backup levels are used:
Use this for a Full backup
Use this to back up changes since the Level 0 backup
Use this to back up changes since the Level 1 backup
ON-Bar Option: -L0
Description: Full backup
IDS Status: Online
ON-Bar Option: -L1
Description: Incremental backup based on the last Level 0 backup
IDS Status: Online
ON-Bar Option: -L2
Description: Incremental backup based on the last Level 1 backup
IDS Status: Online
ON-Bar Option: -c
Description: Backs up the current active logical log and other full logical logs that were not backed up.
IDS Status: Online
ON-Bar Option: -s
Description: Backs up all logical logs that reside on the disk
IDS Status: Offline
Note: By default, the agent performs a Level 0 backup.
Important! A full offline restore always attempts to salvage logical logs before restoring the root dbspace. If the salvage fails, the restore continues; however, transactions that cannot be salvaged are lost. Therefore, it is important that you keep copies of logical log backups until you are sure that you do not need them to complement a restore from a backup.
You can run the backup job at this point or schedule the job to run later.
For more information about scheduling options, see the Administration Guide.
The name appears in the Media field.
Depending on your selection, the job is either executed immediately or queued for execution.
When the operation is complete, the message, Backup Operation Successful appears.
Note: The first job submitted for backup is always a test job, with no actual data. It is used to trigger ON-Bar. If the job is successful, the message, Backup Operation Successful appears. This message indicates that ON-Bar was successfully activated. However, the actual backup process is still in progress. You can track the progress of the job using the Job Status option.
If a backup job fails because of a Arcserve Backup or agent environment variable (such as a request for unavailable media), then the ON-Bar process may stop responding. Use the Windows Task Manager to determine if ON-Bar is responding. If the ON-Bar process is responding, then run the following command from the agent directory:
stopxbsa.exe informix_server_instance_name
|
Copyright © 2015 Arcserve.
All rights reserved.
|
|