

The process for restoring data that was backed up using staging is identical to the process of restoring data that was backed up to any other type of storage media. However, staging provides you with the option to restore data from the location that is most suitable to your needs.
When you perform backup operations using staging, and the backed up data has been copied to its final destination media, the data can reside in two locations (the staging device and its final destination media). If you need to perform a restore operation and the data resides in two locations, you can restore the data directly from the staging device. Restore operations from staging devices are usually faster than tape-based restores.
Follow these steps:
Arcserve Backup searches the database for all backed up versions of this file, directory, drive, or volume.
Note: When using disk or tape staging, ensure that the staging tape is not offlined without formatting or erasing the staging tape. This will allow you to view the session details from the destination (migration) tape.
Next, specify the precise recovery point that you want to use for the restore job, as illustrated by the following example:
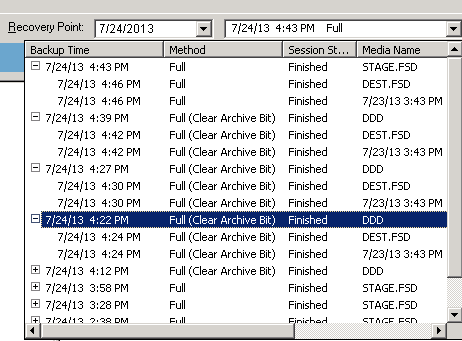
Note: Duplicate backup sessions can exist when clones of the session reside on the multiple media which might have happened because of staging backup jobs or tape copies. When the Media Name is an file system device (FSD) or data deduplication device (DDD), restoring data from a disk is generally faster than restoring from a tape. When you restore data from a disk, there are no delays caused by tape load and seek latency. When you need to restore data that exists in two locations (disk and tape), you can reduce the restore time by restoring directly from the disk rather than retrieving it from a tape.
Complete the required fields on the Submit dialog and click OK to start the restore process.
|
Copyright © 2015
|
|