

You can protect the Job Queue by backing it up using the following methods:
In all of these methods, the Job Queue is one of the last few objects backed up during the job. If you used the Database Protection Job, or included the Arcserve Backup database in the same backup job, the Arcserve Backup database and Job Queue will reside on the same backup media, and the Job Queue sessions will be between one and six sessions before the Arcserve Backup database.
In the event the Arcserve Backup Job Queue is damaged or is deleted in error, use the following steps to restore the Job Queue to the last backup.
To restore the Arcserve Backup Job Queue
Expand the Windows Systems object and locate the Arcserve Backup server, or the remote server where the Arcserve Backup database is located.
Expand the Arcserve Backup server, locate and click the Arcserve Backup database.
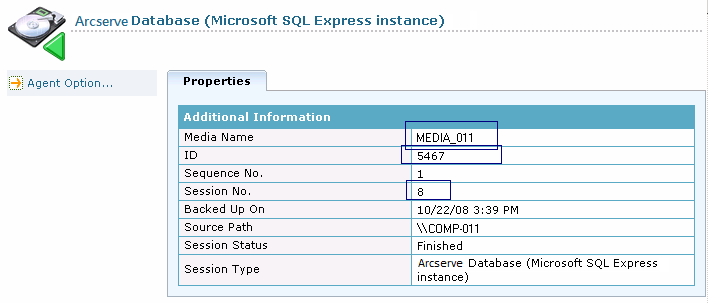
From Properties on the Restore Manager window, locate and notate the Media Name, the ID, and the Session Number for the Arcserve Backup database.
Select Restore by Session from the restore methods drop-down list.
The Session directory tree opens.
Locate the session that contains the Arcserve Backup database, and start searching upward from there. The session path of the Job Queue backup session will end in 00000001.QSD, and the Session Type will be Arcserve Job Queue. Locate the session that contains the Job Queue backup session, as illustrated below.

Click the check box next to the session containing the Job Queue backup session.
Note: The Client Agent for Windows must be installed on the system containing the alternate location and the alternate location must be an empty directory (For example, C:\Temp). The best practice is to specify directory on the Arcserve Backup primary or stand-alone server.
Submit the job.
All services stop on the primary or stand-alone server.
Copy all Job Queue files under the folder that you restored to the following directory:
ARCSERVE_HOME\00000001.qsd
Note: <ARCSERVE_HOME> represents the directory where you installed Arcserve Backup. By default, Arcserve Backup is installed in the directory that follows:
C:\Program Files\CA\ARCserve Backup
All Arcserve Backup services restart on the primary or stand-alone server.
Open the Job Queue Manager and you will see that the job queue has been restored to its original form. The Arcserve Backup Job Queue is restored, and you can resume normal operation.
|
Copyright © 2015
|
|