

|
|
|
This section describes the process of recovering from a disaster on Windows Server 2003, Windows Server 2008, and Windows 7 systems using WinPE (Windows Pre-installation Environment) recovery CD.
Note: CA ARCserve Backup Disaster Recovery provides various utilities on each screen that help you resolve problems that you encounter during this process. For more details on these utilities, see How to use Disaster Recovery Utilities.
To recover Windows Server 2003, Windows Server 2008 and Windows 7 systems from a disaster using WinPE
The Windows Boot Manager screen opens.
Be aware of the following:
In addition, there are two separated ISOs for EFI/uEFI and IA64 platforms for Disaster Recovery located under the DR directory of the CA ARCserve Backup Installation DVD:
You need to burn them to a CD or DVD first before performing disaster recovery on the EFI/uEFI or IA64 platforms.
Note: After a full backup, you can save the disaster recovery information to the location where it can be used during the disaster recovery process.
Note: It is not necessary to select EFI/uEFI or IA64 operating systems since they are on one separate CD.
The Select DR Information screen opens.
A list of Disaster Recovery Information you specified is displayed.
Be aware of the following:
To browse network shared folders, do the following:
Note: To verify that the device driver and IP address are configured properly, click on the appropriate link from the left pane on any CA ARCserve Backup Disaster Recovery screen.
The Pre-flight Check screen opens.
This screen provides a configuration list for you to detect and resolve potential environment issues. Essentially, for each item selected from the Configuration list, a description of that item is displayed at the bottom of the screen describing the issue.
Note: For an updated status of the Configuration List, click Rescan Status.
Based on the disaster recovery information selected, the following items display on the screen:
This item displays the status of the network connection.
-- Error for remote disaster recovery
-- Warning for local disaster recovery
This item displays the status of a hard disk.
If Password Management is used during backup time, a Click Here link appears for you to open the Enter caroot password screen.
If iSCSI disks are configured during backup time, a Click Here link appears for you to open the iSCSI disk connection configuration screen to help you configure iSCSI connections.
In this screen, the Original backup system iSCSI information section displays the iSCSI connections during backup time and the Current system connected iSCSI target section displays iSCSI connections during disaster recovery time.
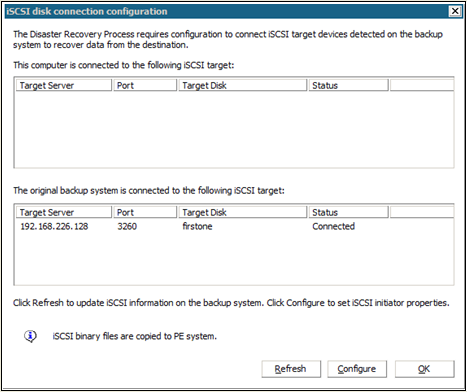
Click Configure to open the iSCSI Initiator Properties screen.

Note: The iSCSI configuration and related binaries are saved as part of the disaster recovery information in which disaster recovery restores them by default. If disaster recovery fails to detect iSCSI binaries, then you will have to select a path that contains iSCSI binaries and copy them to the WinPE environment.
If you are recovering a primary or standalone server with CA ARCserve Backup Database locally installed, then the below ASDB Recovery Configuration screen opens and lets you recover your sessions automatically. You will need to enter your CA ARCserve Backup Database credentials.
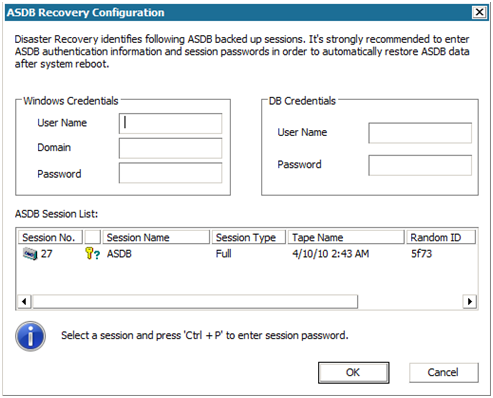
The following icons appear next to each CA ARCserve Backup Database session. They are as follows:
If ACSLS (StorageTek Automated Cartridge System Library Software) was configured during backup time, all related ACSLS configurations and binaries are saved as part of the Disaster Recovery information. Disaster Recovery restores the ACSLS configuration information automatically.
Be aware of the following:
Cluster Configuration display if the backup server is a cluster node. If it is a cluster node, WinPE searches for an available cluster virtual node. If the cluster virtual node is available, WinPE DR omits the restore process of the cluster shared disk; otherwise Disaster Recovery will restore the cluster shared disk.
The USB Backup Device Configuration is used during backup time where you configure backup devices (for example, tape drives, Iomega changers, and digital storage drives. For some USB backup devices, you may need to install additional drivers.
The Client Agent Service is a critical service used to communicate with backup servers for data recovery. Disaster Recovery will always start this service if the disaster recovery is local. If disaster recovery is remote, you can maintain the connection by clicking the link "Click Here" in the bottom pane of the screen to restart the Client Agent Service.
The Tape Engine Service is used only for local Disaster Recovery (DR).
Note: If a file system device (FSD) or data deduplication device (DDD) was used during backup time, Disaster Recovery checks for available remote FSDs or DDDs during the start of the Tape Engine Service. If there are remote FSDs or DDDs, you can maintain the connection by clicking the link "Click Here" in the bottom pane of the screen to restart the Tape Engine Service. If FSDs or DDDs are not available, you can configure an FSD or DDD in the Device Authentication screen.
The Automatically Restore Disk Partition screen appears.
CA ARCserve Backup Disaster Recovery automatically restores your disk partitions according to the saved disk layout information.
The Select sessions to restore screen appears.
CA ARCserve Backup Disaster Recovery lets you specify sessions allocated to each drive, in hard disk, and also helps assign a session password. You can also recover incremental/differential backup sessions simultaneously.
Based on the session encryption status, you will find four types of icons in the Select sessions to restore screen:
Note: This dialog opens for full sessions only.
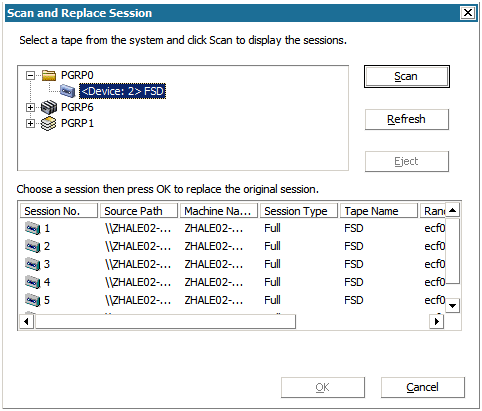
Note: The Eject button is used only for removable disk drives, like an RDX drive but some removable disk drives cannot be ejected in Disaster Recovery mode where you will have to switch media.
Important! You must restore volume C and System State sessions under the Session Name column, otherwise disaster recovery fails.
This screen confirms the sessions you selected.
The Start Restore Process screen appears.
This screen displays a progress bar on the estimated time remaining of the data recovery.
Note: During data recovery, if your session password was not set, you will need to provide the password. CA ARCserve Backup allows three attempts to enter your password. After three attempts, the session will fail to restore.
The Prepare to Reboot screen appears.
Note: This screen automatically reboots in 30 seconds or gives you 30 seconds to cancel if the option on the Start Restore Process screen: Automatically reboot after all sessions restored successfully, is selected. If the option is not selected, CA ARCserve Backup Disaster Recovery lets you reboot or cancel manually.
After your machine reboots, CA ARCserve Backup Database Recovery Wizard opens to help you restore CA ARCserve Backup Database sessions.
Be aware of the following:
| Copyright © 2011 CA. All rights reserved. | Tell Technical Publications how we can improve this information |