

To ensure that your Arcserve Backup installation functions properly, complete the following tasks:
Ensure that you can view database information and Activity Log data in the Job Status Manager.
Ensure that you can view database information and Activity Log data.
Ensure that the Device Manager detects all devices attached to the primary server and all member servers.
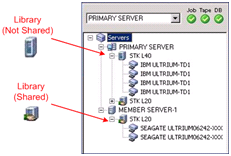
The following diagram illustrates the Device Manager window with a primary server with attached devices and a member server and attached device. The primary server is attached to a library that is not shared, and the member server is attached to a library that is shared.
If the Device Manager does not detect all of your devices, complete the following tasks:
If Arcserve Backup cannot detect the devices after you complete these tasks, contact Technical Support.
Note: For information about configuring devices, see the Administration Guide.
Ensure that all Arcserve services started successfully.
Note: The Manager Console may stop responding intermittently while the cluster group is moving to a different node.
Ensure that the backup job completes successfully.
Ensure that restore job completes successfully.
Ensure that information about the jobs display on the Job Queue tab and in the Activity Log.
|
Copyright © 2015
|
|