Installing and Upgrading CA ARCserve Backup in a Cluster-aware Environment › Deploy CA ARCserve Backup Server on MSCS › Upgrade CA ARCserve Backup from r12, r12.5, and r15 to r16 in an MSCS Cluster Environment
Upgrade CA ARCserve Backup from r12, r12.5, and r15 to r16 in an MSCS Cluster Environment
This section describes the steps you must perform to upgrade CA ARCserve Backup r12, r12.5, and r15, including the latest service packs, in an MSCS cluster-aware environment, to this release.
Before you begin, you should review the information in Upgrade CA ARCserve Backup from a Previous Release.
When upgrading CA ARCserve Backup to r16 in an MSCS cluster environment, the following procedure must be performed to protect your clustered backup data. The procedure supports the following CA ARCserve Backup r12, r12.5, and r15 upgrade scenarios in an MSCS cluster environment:
- Primary server upgrade SQL Server to SQL Server
- Primary server upgrade SQL Server Express to SQL Server Express
- Member server upgrade to r16 Member server
This upgrade procedure assumes that you are operating in a two-node cluster environment, with Node A representing the initial Active Node and Node B representing the initial Passive Node.
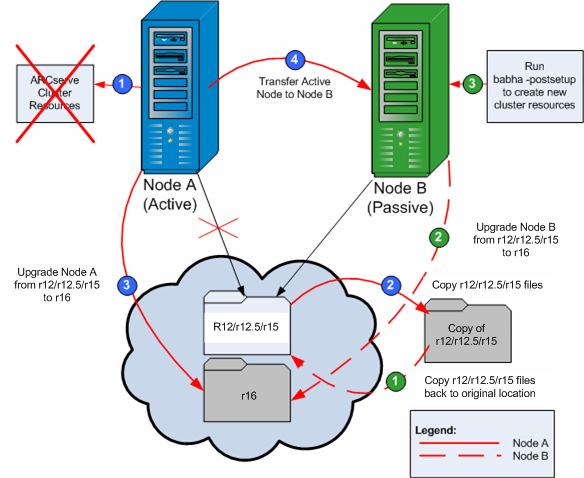
In the diagram, the upgrade steps are illustrated.
To upgrade CA ARCserve Backup from r12, r12.5, and r15 to r16 in an MSCS cluster environment
Important! Before you start the following procedure, verify that you synchronize the CA ARCserve Backup registry on the active node and the passive node. You can synchronize the registries using the Move Group option in the Cluster Administrator.
On Node A:
- Delete the ARCserve cluster resources for r12/r12.5/r15 as follows:
- Access the Cluster Administrator.
The Cluster Administrator dialog appears.
Note: Cluster Administrator is a utility provided by Microsoft and is accessed from the Administrative Tools group of the Start menu.
- Select the ARCserve Group that the ARCserve server is deployed in, and locate the corresponding ARCserve cluster resources. Right-click on each ARCserve cluster resource and from the pop-up menu, select Delete.
The ARCserve cluster resources for r12/r12.5/r15 are deleted.
- Copy the CA ARCserve Backup r12/r12.5/r15 installation directory files into a temporary location.
A backup copy of the CA ARCserve Backup r12/r12.5/r15 files is located in another location from the original files.
- Perform CA ARCserve Backup r16 upgrade installation for Node A. See Upgrade CA ARCserve Backup from a Previous Release.
- The installation path location for CA ARCserve Backup r16 upgrade must be the same location where r12/r12.5/r15 is currently located.
CA ARCserve Backup for Node A is upgraded from r12/r12.5/r15 to r16. Do not set up new ARCserve cluster resources at this time.
- Move the active node from Node A to Node B, as follows:
- Access the Cluster Administrator. The Cluster Administrator opens.
- Select the ARCserve Group for Node A, right-click on the group name from the shortcut menu and select Move Group.
- If there are only two nodes in the cluster, the active node status is automatically transferred from the initial active node (Node A) to the other node (Node B), making Node B the active node, and Node A the passive node.
- If there are more than two nodes in the cluster, a pop-up screen opens, allowing you select the node to which you want to transfer the active status. When you select the node for transfer, the node you specified becomes active and the previously-selected node becomes passive. Repeat this procedure for each node in the cluster.
On Node B:
- Copy the CA ARCserve Backup r12/r12.5/r15 installation directory files from the temporary location back into the original location.
The CA ARCserve Backup r12/r12.5/r15 files are now located back in the original location.
- Do one of the following:
- Continue to the next step if you are upgrading a member server or a primary server that uses a remote deployment of Microsoft SQL Server to host the CA ARCserve Backup database.
- For all other upgrades, do the following:
- Access the following directory on the shared disk in the cluster-aware environment:
ARCserve_Home\SQLASDB\data
Select all of the files in the above directory.
Right-click the selected files and click Properties on the pop-up menu.
The Properties dialog opens.
- Click the Security tab.
Click Add and select the Network Service security group.
Set the Network Service security group permissions to Allow Full Control.
Click OK, and then click OK on the Properties dialog.
- Perform CA ARCserve Backup r16 upgrade installation for Node B with the same settings selected for Node A (domain name, server type, installation path, installed options, and so on). For more information, see Upgrade CA ARCserve Backup from a Previous Release.
- From the command line console, run the babha -postsetup utility to set up new ARCserve cluster resources. The babha -postsetup utility is located in the %bab_home% directory.
The new ARCserve cluster resources (ARCserve HA, ARCserve ASDB, ARCserve Registry, and ARCserve Share) are created.
Note: CA ARCserve Backup does not support recovering the CA ARCserve Backup database when the last backup of the CA ARCserve Backup database was completed before you upgraded to this release. As a best practice, you should back up the CA ARCserve Backup database as soon as possible after the upgrade is complete. For information about backing up the CA ARCserve Backup database, see the Administration Guide.
More information:
How to Verify a Cluster-aware Installation and Upgrade

