Previous Topic: Restore Transportable VSS Backups Using Microsoft Exchange WritersNext Topic: Microsoft Hyper-V VSS Writer


Restore Transportable VSS Backups Using Microsoft Exchange Writers

The following example displays individual sessions and the series of steps involved in using Arcserve Backup to perform a VSS backup.

Be aware of the following behavior as it applies to HDVSS backups:

Follow these steps:

  1. Copy the latest version of eseutil.exe, exchmem.dll, and ese.dll to the following directory on the backup server:
    C:\Program Files (x86)\CA\ARCserve Backup\COM64
    

    Note: The Exchange utilities can be found in the following directory on the server where the Agent for Microsoft Exchange is installed:

    C:\Program Files\Exchange Server\V14\Bin
    
  2. On the Source tab of the Restore Manager, choose the Restore by Session restoration type.

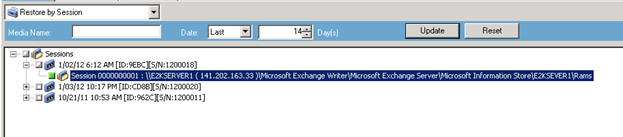
    Microsoft Exchange backups are listed as separate sessions. Click the green icon next to the session's name to restore all of the Components included in the session. To restore an individual Component, expand the session and select the Component's name.

    Microsoft Exchange Restore by Session List

  3. On the Destination tab of the Restore Manager, choose the destination to which to restore the files. Choose one of the following:

    By default, files are restored to their original location. If you choose to restore files to an alternate location, a list of computers, directories, and files appears, from which you can select a specific destination. For more information about restore locations, see Restore Locations.

  4. From the Schedule tab of the Restore Manager, choose the appropriate options to schedule your job.
  5. Click Submit on the Restore Manager to begin the restore operation. A Security dialog opens.

    Important! Verify that all storage groups are offline before the restore job starts.

  6. In the Security dialog, enter the authentication information for the production server and click OK. The Submit Job dialog opens.
  7. In the Submit Job dialog, select Run Now or select Run On and specify a specific date and time. Click OK. The restore job is added to the job queue. Use the Job Status Manager to monitor the progress of the restore job.
  8. Before you submit the restore job, copy the Exchange utilities to the agent folder on the backup server. This step lets you perform an integrity check after the job completes.