

The Enable Static Backup option lets you submit scheduled backups of source groups and computers and maintain a static set of source volumes. With static backups, you can submit staging and deduplication backups of UDP data.
You can submit static backup jobs only to UDP recovery point servers that appear below the UDP recovery point Servers object, which includes UDP Agent-based servers and UDP Agentless VM nodes.
Static backups affect only the immediate subordinate objects of the source group or the computer specified when the job was submitted. Subsequent backups will not include objects and volumes that were added to the source group or the computer after you submitted the backup. Arcserve Backup backs up the original source volumes dynamically. Subsequent job executions will include changes to only the files and folders contained in the original source volumes.
Note: For more information, see Static Job Packaging.
Follow these steps:
The backup types appear.
The Source directory tree appears.
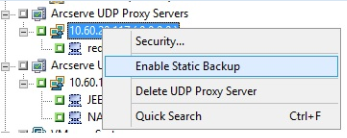
Expand the UDP Recovery Point Servers object and browse to the UDP Recovery Point Servers that you want to back up.
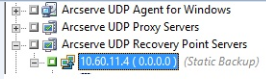
The Static Backup option is applied to the computer, as illustrated by the following screen:
Note: The Static Backup option remains applied to the specified computer until you disable this option. You can repeat this step to disable the Enable Static Backup option.
Note: For more information, see Rotation Schemes and Custom Schedules.
The Destination groups directory tree appears.
The storage group is applied.
The Options dialog opens.
Note: For more information, see Global Backup Options.
Click OK.
The backup options are applied.
Select a drive or volume contained in the computer.
Repeat the previous two steps to apply backup options to the specified drive or volume.
(Optional) Repeat this step for all drives or volumes in the computer.
The Submit Job dialog opens.
The job is submitted.
|
Copyright © 2016
|
|