

Using the Agent in RMAN Mode › Restore Using the Agent for Oracle in RMAN Mode › Restore and Recover Databases and Database Objects
Restore and Recover Databases and Database Objects
You can restore and recover a complete database backed up online or offline by performing the following steps.
Note: Before starting the Restore Manager, start Arcserve Backup.
To restore a complete database backed up offline or online
- Open the Restore Manager, select the Source tab, and then select the Restore by Tree view.
- Expand the Windows Agents, and then expand the Oracle host below the Windows Agents.
- Select the database you want to restore, or select the database objects to restore.
- To set the Oracle Restore Options, select the Source tab, right-click the Oracle database you want to restore and select Local Options.
The Oracle Restore Options dialog opens.
- To set restore options, click the Oracle Restore Options tab.
The Agent for Oracle Restore Options tab opens.
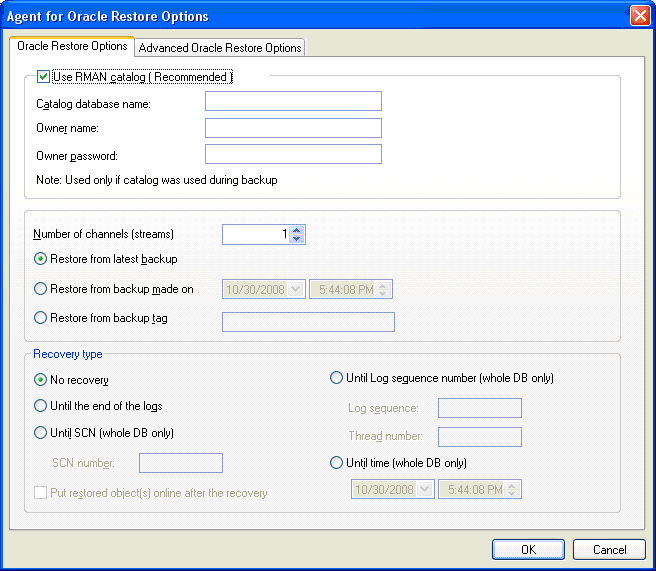
- Enter details in the following fields, if necessary.
- Use RMAN catalog (Recommended)--Ensure the Use RMAN catalog (Recommended) check box is selected and enter the catalog owner name and owner password.
- Number of Channels (Streams)--When you enter a number in the Number of Channels (Streams) option, the agent tells RMAN the maximum number of channels to use. RMAN then determines how many channels it actually allocates to the restore operation. RMAN submits the jobs in parallel, one for each channel.
Note: Since RMAN determines the appropriate number of channels to use, RMAN may use less than the number of channels you specify.
- Restore From Latest Backup--When you select the Restore From Latest Backup option, the agent tells RMAN to use the latest available backup.
Note: No Recovery is the default selection in the Recovery Types section of the Oracle Restore Options tab. Ensure you select one of the other Recovery Types, if you want to recover your database after restoring it.
- Restore From Backup Made On--When you select the Restore From Backup Made On option, you specify the date and time as the upper time limit of the backup from which you want to restore. RMAN will perform the operation on files up to, but not including, the specified time. This option is useful when you have a database that you must bring back to a known state (consistency level). You can also use this option when you know the latest backup is inaccessible. In that case, you can use this option in conjunction with the Until End of Logs recovery option to restore the database from an older backup set and "replay" all transactions to bring the database to its latest state.
Note: No Recovery is the default selection in the Recovery Types section of the Oracle Restore Options tab. Be sure to select one of the other Recovery Types if you want to recover your database after restoring it.
- Restore From Backup Tag--When you select the Restore From Backup Tag option, you specify the tag that was used during backup to indicate which backup sessions to restore. The tag is the logical name assigned to a particular backup (for example, Monday Morning Backup).
Note: No Recovery is the default selection in the Recovery Types section of the Oracle Restore Options tab. Ensure that you select one of the other Recovery Types if you want to recover your database after restoring it.
Other recovery options include:
- No Recovery--Selecting this option restores the data but does not perform any recovery. You must recover the database yourself and then put it back online. You generally use this option when you already know that a restore cannot be recovered, such as when additional restore jobs are required or you need to set up before starting the recovery process.
- Until the End of Logs--RMAN recovers the database, tablespaces, and data files up to the current time.
- Until SCN (Whole DB Only)--RMAN recovers the database up to the specified System Change Number (that is, a checkpoint number). This recovery is valid for the entire database only. The database is opened with the resetlogs option.
- Until Log Sequence Number (Whole DB Only)--RMAN recovers the database up to the specified Archived Log Sequence. This recovery is valid for the entire database only. The database is opened with the resetlogs option.
- Until Time (Whole DB Only)--RMAN recovers the database up to the specified point in time. This recovery is valid for the entire database only. The database is opened with the resetlogs option.
Important! When using one of these recovery methods, all logs are reset to the last registered date in the control file, so any data recovered after this date will be lost and cannot be retrieved.
- Put Restore Object(s) Online after Recovery--When selected, this option puts the tablespaces and data files online and opens the database after the recovery has been performed.
- (Optional) You can update the following Advanced Oracle Restore Options.
- Archived Logs Selection--You can select one of the archived logs selection options listed below.
- Do Not Restore--Selecting this option does not restore any of the archived logs.
Note: This option is checked automatically.
- Time Based--This option restores the archived logs based on the time they were created, and not on the time they were backed up. If you are using this option, you must also enter a value either in the From Time field or in the Until Time field.
- Thread--This option lets you specify the thread number used to identify the Oracle instance. The default value of the thread is 1 for the Oracle instance in exclusive mode.
- SCN Based--This option restores the range of archived logs by SCN (System Change Number).
- Log Sequence Based--This option restores the archived logs by the archived log sequence number.
- Include Control File--Select this option if you want to restore the control files. Keep in mind that you should restore the control files only if they are corrupted or lost.
Important! Restoring a control file resets all the logs causing you to lose the most recent data once the database is started. There is no way to recover this data.
- Block Size (Oracle 9i)--If you use this option, the size of the data blocks must match the block size used during backup; otherwise, the restore will fail.
- List Backup Sets for Selected Objects--When selected, it sends a request to list all backup sets that include the objects you selected.
Note: This option does not restore the selected objects. To restore the selected objects, you must submit another restore job.
- Validate Backup Set Number--This option asks RMAN to validate the integrity of a backup without actually restoring it.
- Load RMAN Script--Use the load RMAN script option to enter the path of your RMAN script.
Important! If the load RMAN script option is enabled, all options that are selected in Restore Manager will be ignored, and the RMAN script will be loaded and executed. However, if only the parameter file in the Restore Manager is selected, then the parameter file is restored and the RMAN script will not be executed.
Click OK.
- Select the Destination tab, and uncheck Restore files to their original location(s) option, if you want to restore the database or the database objects to an alternative location.
- Expand the target Windows agent, enter the username and password.
Click OK.
- Select the Oracle database under the target Windows agent and click Submit on the toolbar.
The Restore Media dialog opens.
- Select the backup server that you want to perform the restore operation and click OK.
The Session User name and Password dialog opens.
- Enter the username and password details.
Enter the Oracle username and password in DBAgent tab. In addition, since the Use RMAN catalog (Recommended) option is checked by default, you must enter the Owner Name and Owner Password of the RMAN catalog, unless the box is unchecked.
- Click OK.
The Submit Job dialog opens. Complete the required fields on the Submit Job dialog and click OK.
The job is submitted.
Note: For more information about submitting jobs, see the Administration Guide.
Copyright © 2016 .
All rights reserved.
|
|