

Restore and Recover Virtual Machines › Restore Methods › Recover an Entire Virtual Machine
Recover an Entire Virtual Machine
You can recover an entire virtual machine from a CA ARCserve Central Host-Based VM Backup session.
This backup method is similar to performing BMR. With this method you can recover the Windows guest operating system, applications, and data.
Follow these steps:
- Log in to the application and click Node on the Navigation bar.
From the Node screen, expand the group containing the node that you want to restore.
Click the check box next to the node that you want to restore and then click Restore on the toolbar. The application logs you into CA ARCserve D2D.
- From the Restore dialog, click Recover VM.
- The Restore dialog opens. The Backup Location and Virtual Machine fields are populated based on the VM that you selected from the Node screen. If desired, change these values.
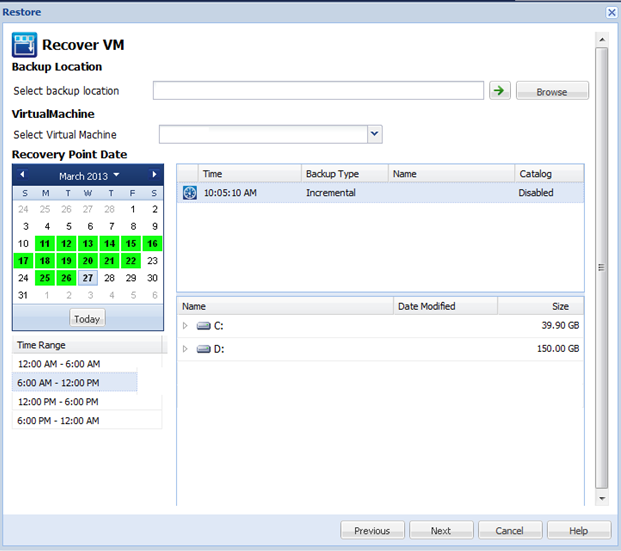
Specify the source where your virtual machine backup sessions are stored. Enter user credentials if prompted.
The drop-down menu lists all the virtual machines at the location in the Backup Location field.
- From the calendar, click the date for the virtual machine image you want to recover. From the Time Range list, click the backup image to recover. The content that corresponds with your selection is displayed for your reference. You cannot select individual volumes, folders, or files. The entire virtual machine is restored.
- Click Next. On the Restore Options dialog, select the restore destination.
- Restore to Original Location
-
Restores to the Virtual Machine to the original location from where the backup image was captured. By default, this option is selected.
For more information, see Restore VM to Original Location.
- Restore to an Alternative Location
-
Restores to the Virtual Machine to a different location from where the backup image was captured.
For more information, see Restore VM to an Alternative Location.
- Specify the conflict resolution and post recovery options. By default, these options are not selected.
- Overwrite existing Virtual Machine--Replaces any existing virtual machine images on the vCenter/ESX server.
- Power on Virtual Machine--Starts the virtual machine after the restore process finishes.
- Click Next. Enter vCenter/ESX Server credentials for the backup source, if prompted and click OK.
- On the Restore Summary dialog, verify that all options are correct. If not, click Previous to go back. If yes, click Finish to launch the recovery process.
Copyright © 2013 CA.
All rights reserved.
|
|