

|
|
|
Virtual Standby lets you search CA ARCserve D2D recovery points and file copies for specific files or folders to restore.
To restore data using Find Files/Folders to Restore
From the Node screen, expand the group containing the node that you want to restore.
Click the check box next to the node that you want to restore and then click Restore on the toolbar.
The Find Files/Folders to Restore dialog opens.
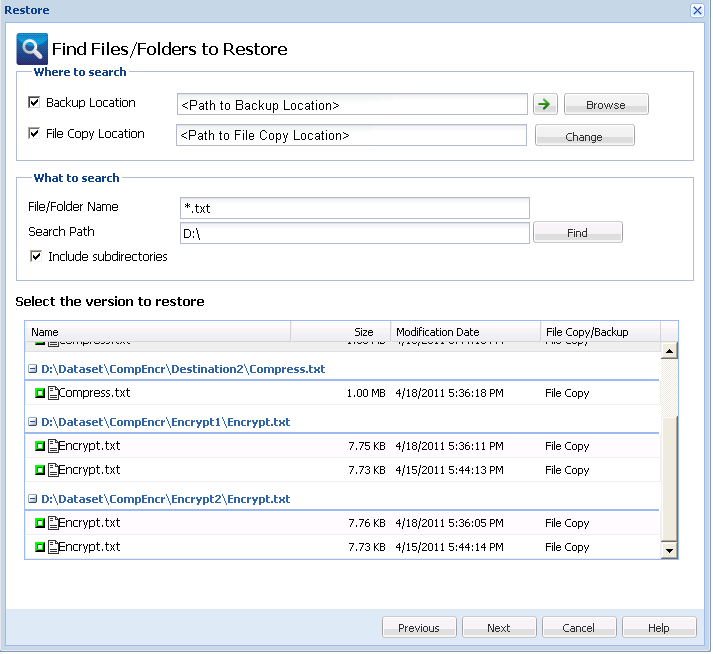
You can either specify a location or browse to the location where your backup/archive images are stored. If necessary, enter the User name and Password credentials to gain access to that location. You can click green arrow validate icon to verify proper access to the source location.
Note: The File Name field supports full name searching and wildcard searching. If you do not know the complete file name, you can simplify the results of the search by specifying the wildcard characters "*" and "?" in the File Name field.
The wildcard characters supported for the file or folder name are as follows:
For example, if you specify *.txt, all files with a .txt file extension appear in the search results.
Note: If necessary, you can also specify a path to further filter your search and select whether to include or not include any subdirectories.
The results of the search display. If the search discovers multiple occurrences (recovery points) of the same searched file, it will list all occurrences sorted by date (with the most recent listed first). It will also indicate if the searched file has been backed up or archived.
The Restore Options dialog opens.
If necessary, you will need to enter the User Name and Password credentials to gain access to that location.
Note: If this option is not selected any active file will be skipped from the restore.
By default, this option is selected.
When the Create Root Directory option is not selected (unchecked), the file/folder to be restored will be restored directly to the destination folder.
Example:
If during the backup you captured the files "C:\Folder1\SubFolder2\A.txt" and "C:\Folder1\SubFolder2\B.txt" and during the restore you specified to the restore destination as "D:\Restore".
If you select to restore the "A.txt" and "B.txt" files individually, the destination for the restored files will be "D:\Restore\A.txt" and "D:\Restore\B.txt" (the root directory above the specified file level will not be recreated).
If you select to restore from the "SubFolder2" level, the destination for the restored files will be "D:\Restore\SubFolder2\A.txt" and "D:\Restore\SubFolder2\B.txt" (the root directory above the specified folder level will not be recreated).
When the Create Root Directory option is selected (checked), the entire root directory path for the files/folders (including the volume name) will be recreated to the destination folder. If the files/folders to be restored are from the same volume name, then the destination root directory path will not include that volume name. However, if the files/folders to be restored are from different volume names, then the destination root directory path will include the volume name.
Example:
If during the backup you captured the files "C:\Folder1\SubFolder2\A.txt", "C:\Folder1\SubFolder2\B.txt", and also E:\Folder3\SubFolder4\C.txt" and during the restore you specified to the restore destination as "D:\Restore".
If you select to restore just the "A.txt" file, the destination for the restored file will be "D:\Restore\ Folder1\SubFolder2\A.txt" (the entire root directory without the volume name will be recreated).
If you select to restore both the "A.txt" and "C.txt" files, the destination for the restored files will be "D:\Restore\C\Folder1\SubFolder2\A.txt" and "D:\Restore\E\Folder3\SubFolder4\C.txt" (the entire root directory with the volume name will be recreated).
A password is not required if you are attempting to restore to the same machine from where the encrypted backup was performed. However, if you are attempting to restore to a different machine, a password is required.
Note: The following icons indicate whether the recovery point contains encrypted information and may require a password for restore.
Non-encrypted recovery point:
![]()
Encrypted recovery point:
![]()
Click Next.
The Restore Summary dialog opens.
Note: If you want to change the restore options that you specified, click Previous and go back to the applicable dialog to change the values.
Click Finish.
The restore options are applied and the data is recovered.
| Copyright © 2012 CA. All rights reserved. |
|