

Editing and Managing Scenarios and Hosts › Synchronize Registry Keys › Select Registry Keys for Synchronization
Select Registry Keys for Synchronization
The second step in configuring and running the Registry Synchronization option is selecting the registry keys on the Master host that you want to synchronize.
Notes:
- To select registry keys for synchronization, the scenario must be stopped.
- You cannot select registry keys for synchronization through the Scenario Creation wizard, only from the Properties pane of the Manager.
- Only keys are displayed for selection. You cannot select specific values for synchronization.
To select registry keys for synchronization on the Master
- In the Scenario pane, select the name of the Master host whose registry keys you want to synchronize.
- In the Properties pane, click the Root Directories tab at the bottom. The Master Root Directories information appears in the pane.
- Right-click the registry object that corresponds to your operating system and select Browse and Select Registry Keys from the shortcut menu. Alternatively, double-click the Registry object that corresponds to your operation system - either x86 or x64.
The Browse and select registry keys dialog opens and displays the Master host registry keys list.
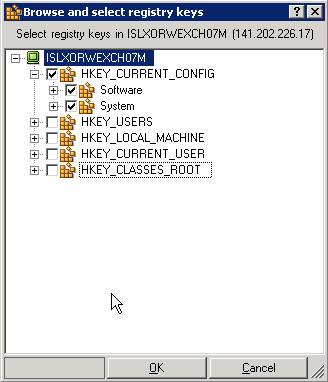
- Click the checkboxes of the registry keys you want to synchronize.
Notes:
- You cannot filter registry key selection.
- If you are manually entering a name and a path of a registry key that does not exist on the Master, the scenario verification may be successful, but the scenario stops running and an error message is issued. You should only enter the details of existing registry keys for replication.
- When you have finished selecting all the registry keys you want to synchronize, click OK.
The selected registry keys now appear in the Root Directories pane under the Master Root Directories column.
- Save your configuration by clicking the Save button on the Standard toolbar.
By default, the system automatically configures the Replica registry keys to be the same as the selected Master registry keys. If you want to change the name and storage location of the synchronized Replica registry keys, follow the instructions described in the next section.
Copyright © 2015 Arcserve.
All rights reserved.
|
|