

|
|
|
As part of scenario creation or modification, you can specify the services to manage. During scenario creation, the services management screens are displayed in the Scenario Creation Wizard. For existing scenarios, you can also manage services from the CA ARCserve RHA Manager Root Directories tab.
Services discovered on the specified Master server are automatically shown on the Services Discovery Result screen in the Scenario Creation Wizard.
The following steps are for Custom Application scenarios.
To manage services
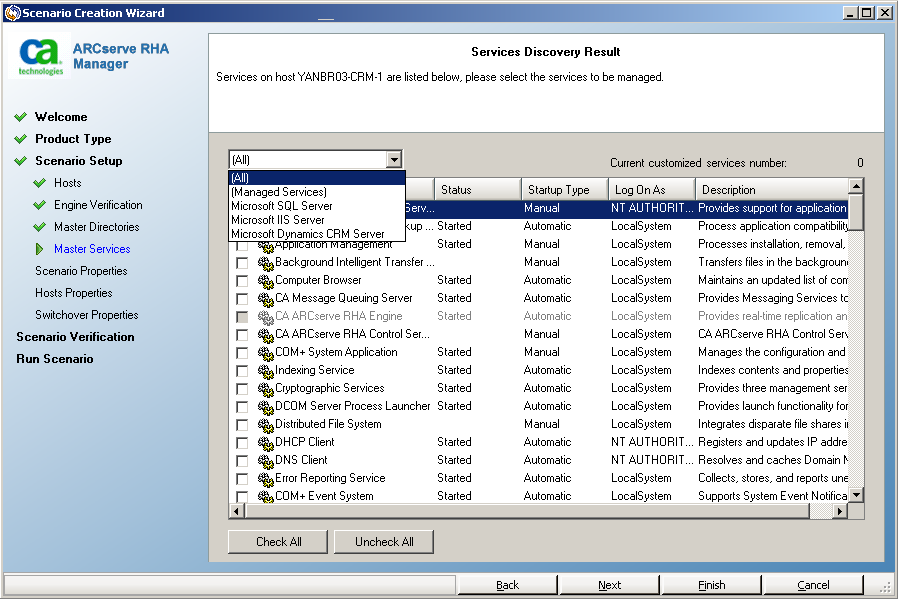
Important! Do not use Services Management to monitor every service on the Master server in a single scenario. This scenario type is not designed to protect an entire server.
You can import scenarios using an XML configuration file. (From the CA ARCserve RHA Manager, click Scenario, Import. Select Custom Application xml config (*.cxc), select the file name and then click Open.)
Specify the following values (they are not case-sensitive).
User-defined, for example, 1.0.
This value corresponds to the Product Type selection made in the Scenario Creation Wizard. "Dr" for Replication and Data Recovery Scenario. "Ha" for High Availability scenario. (Content Distribution is not supported.)
Is this an Assured Recovery scenario? Set this value to "TRUE" to specify AR. Omit the line or set this value to false if you don't want to perform Assured Recovery.
Provide a name for your scenario. If you omit this line, the default "customApp(1)" is used.
The RootDirs object can have several child nodes. Specify root directory values for the data and application you wish to protect. If you omit this line, you must specify the root directories using the CA ARCserve RHA Manager.
Specify the directory that should be excluded from the scenario.
Set the regular expression filter, "include="True", if you want to set the include filter, otherwise, CA ARCserve RHA sets the exclude filter.
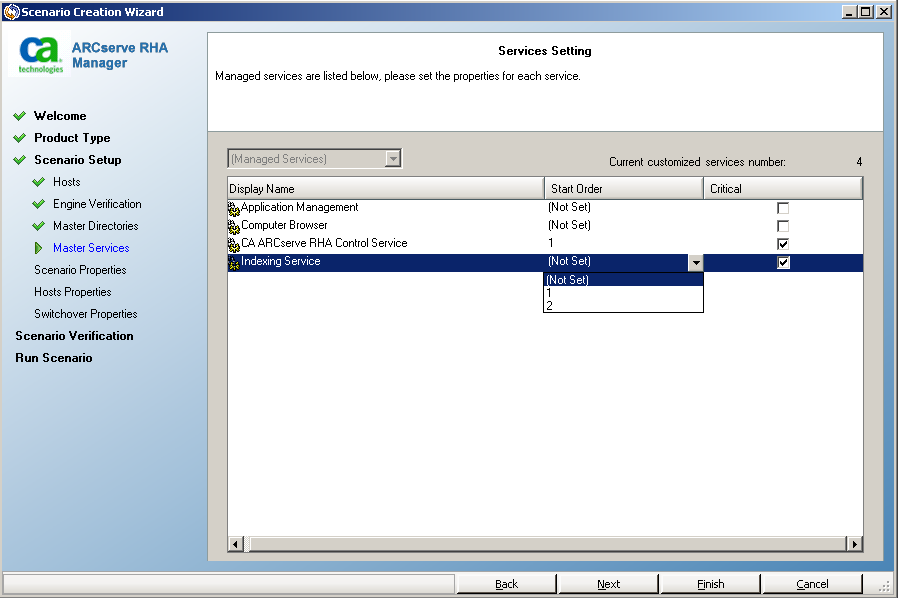
(Required) This object can have several child nodes to configure multiple services.
Specify the name of the service to monitor.
(Optional) "True" for critical. "False" for not critical. Services set as critical trigger switchover if failed.
(Optional) Specify "1" for first, "2" for second.
Example
The example shows values in italics for a MySQL Custom Application scenario. In this example, the data is stored in C:/MySQL/data and the application files are stored in C:/Program Files/MySQL/MySQL Server 5.1. The service, MySQLDemo, is marked critical, which means CA ARCserve RHA will trigger the switchover process if this service fails because this is an HA scenario.
<?xml version="1.0"?>
<CustomApplication >
   <Product      val="Ha"/>
   <IsAR         val="True"/>
   <ScenarioName val="Demo_scenario"/>
   <RootDirs>
       <RootDir  val="C:/MySQL/data">
            <ExcludePath_Filter   val="aaa"/>
            <ExcludePath_Filter   val="bbb"/>
       </RootDir>
       <RootDir    val="C:/Program Files/MySQL/MySQL Server 5.1">
             <ExcludePath_Filter val="ccc"/>
             <ExcludePath_Filter val="" />
        </RootDir>
        <FileRegExpr_Filter include="True" val="*.txt  bbb ccc?.doc hhh" />
     </RootDirs>
     <ApplicationServices>
         <Service   val="MySQLDemo" is_critical="True" start_order="1"/>
         <Service   val="SQLTest" is_critical="False"  start_order="2"/>
      </ApplicationServices>
    </CustomApplication>
Each scenario is assigned to a default scenario group called Scenarios. You can use this group for all scenarios you create, or you can add new groups to organize your scenarios according to your own criteria. Scenario groups are displayed on both the Manager and the Overview Page.
In distributed server environments, in which several servers (database server, application server, web front end server) comprise the environment, you must create individual scenarios to protect all the servers in the deployment. If an Is Alive check triggers switchover, only the affected server is failed over to its Replica. The resulting data split, where some operations are applied to original Master servers and other operations are applied to the Replica in the failed scenario, can introduce performance issues.
Scenario groups let you manage related scenarios, such as those protecting all servers in a distributed environment, as a single entity. For example, for end-to-end protection in a distributed server environment, you may have a SQL scenario to protect the database component, and several application-specific scenarios to protect application servers. A scenario group lets you set switchover properties at the group level, instead of at individual server levels.
For more information, see Enable Scenario Group Management.
Scenario Group Management lets you manage related HA scenarios as a single entity. Switchover can be configured so that when one server fails, all servers in the scenario group switch over at once, alleviating the data split issue. Scenario Group Management applies only to high availability scenarios.
Note: You must manually create the required scenarios, assign each to the same group, and enable group management.
To enable Scenario Group Management
A confirmation message appears.
There are two ways to create a scenario group:
Note: We recommend planning and creating the scenario groups you want to use in advance. After you assign a scenario to a certain group, you cannot move it to another group.
To create a new scenario group
A New group folder is added to the Scenario pane.
The new group name appears on the following places: the Scenario pane, the Group drop-down list in the Scenario Creation Wizard, and the Overview Page.
Note: When no scenario is defined, empty scenario groups do not appear on the Overview Page.
When you create a scenario, you can configure the group properties using the Scenario Creation Wizard.
The group properties include:
If two scenarios are configured in the same Scenario Availability Set, the group switchover is initiated only when both scenarios fail. This function is not invoked when one of the options fail.
Note: The same group can have one or more Scenario Availability Sets, but one scenario cannot be configured in two different sets.
Before you can run a scenario group, CA ARCserve RHA performs a pre-run verification of each scenario in the group and reports any errors or warnings. Each scenario in the group must pass verification for the group to run.
To avoid SQL Server connection errors, make sure the Master and Replica servers use the same port, or make sure the SQL Server service is running as a local system, which sets SPN properly.
To run a scenario group
The Run dialog opens.
The status for all scenarios in the group changes to Running.
You must stop a group that is currently running if you want to add or remove scenarios. To stop a group, you must stop all scenarios in that group. Click Stop on the Manager toolbar for each scenario in sequence. There is no failure recorded by stopping scenarios.
| Copyright © 2012 CA. All rights reserved. | Tell Technical Publications how we can improve this information |