Previous Topic: ConsiderationsNext Topic: Scenario Properties


Create Oracle HA and DR Scenario

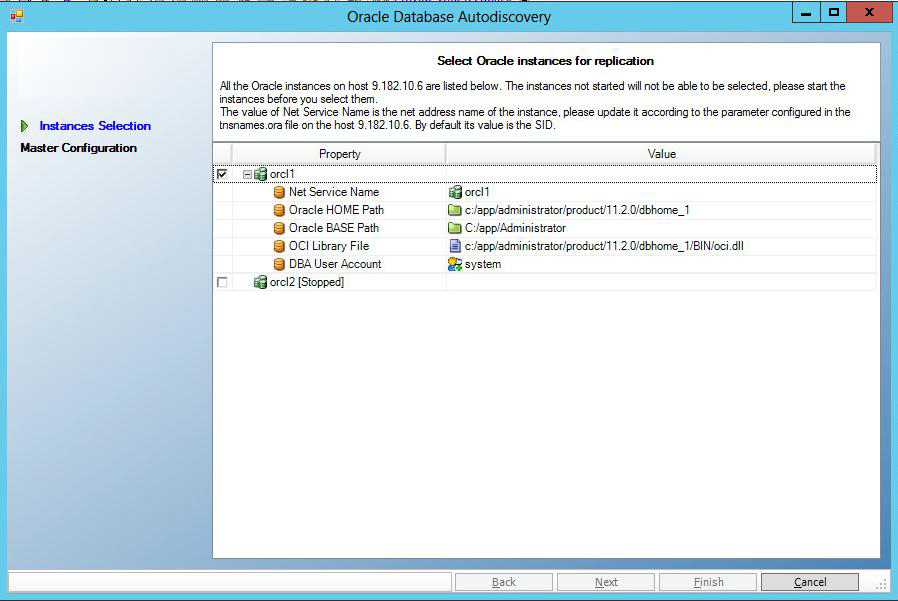
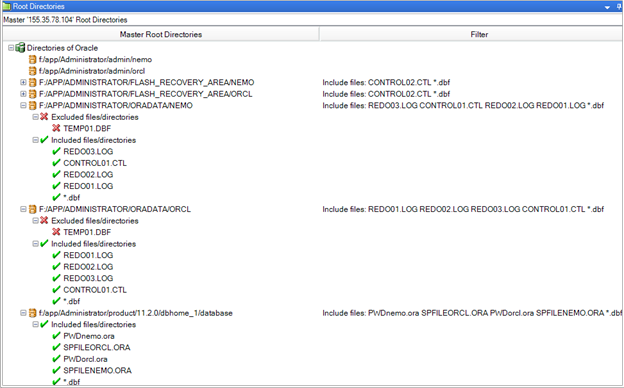
Protecting Oracle databases using Arcserve RHA requires scenarios that identify the Master and Replica servers, as well as properties that control scenario behavior. Auto-discovery is used to protect multiple Oracle instance in one scenario. RHA monitors all services for each Oracle instance and failure of a service triggers switchover.

RHA retrieves multiple Oracle instances from the registry. RHA also gets the ORACLE_HOME and ORACLE_HOME/ORACLE_BASE path from the Windows registry.

Follow these steps:

  1. Start Arcserve RHA Manager. From the Scenario menu, choose New or click the New Scenario button.
  2. From the Welcome dialog, choose Create a New Scenario; choose a scenario group and click Next.
  3. From the Select Scenario and Product Type dialog, select Oracle, High Availability Scenario (HA), the desired Tasks on Replica, if any, and then click Next.
  4. From the Master and Replica Hosts dialog, type a Scenario Name, enter the Hostname or IP Address and Port number for both Master and Replica servers. Click Next.
  5. From the Select Oracle Instances for replication screen, select one or more Oracle DB instances to replicate the scenario. On this screen, auto-discovery displays all Oracle instances. These instances are selected automatically. You can reconfigure the parameters including Net Service Name, Oracle Base Path, Oracle Home Path, OCI library file, and the user account for DB connection for each Oracle instance. You can then select the instances that you want to replicate.

    Oracle database autodiscovery

  6. Click DBA User Account.

    The Database Connection dialog opens.

    oracle db login

  7. Enter the database name, DBA username, and password and click OK.

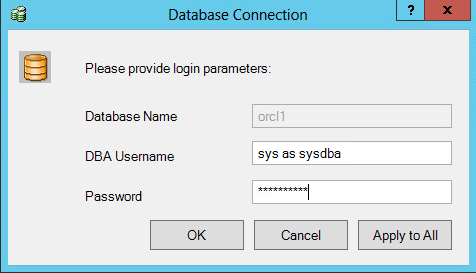
    Note: To apply credentials for all selected instance, click Apply to All.

    Enter credentials for an account with administrative privileges, such as "sys as sysdba", in the database so that Arcserve RHA can query the Oracle configuration on the Master server.

    For the database name, use the database "connection string" configured in the Oracle client configuration file tnsnames.ora on the Master server.

    Note: If you are using a 32-bit Oracle version on a 64-bit operating system, enter the global service name in the Database Name field, in the following format:

    IP <:port>/global_service_name. Omit the <:port> if the default port (1521) is used.

    Example:

    192.xx.xx.10/db1.test.com

    Enter the DBA Username and Password as usual and click OK.

    Also make sure that OCI Library File on the Select Oracle Instances for replication screen is updated to point to the 64-bit Oracle client OCI library file.

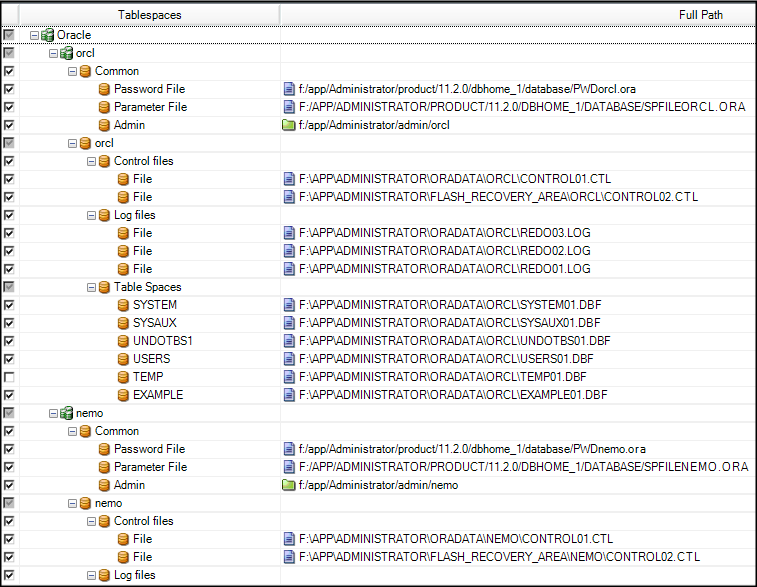
    The Tablespaces for Replication dialog opens.

  8. Review the list of results auto-discovered for each instance on the Master Server. Clear and select databases for replication, as desired, enable the "Replicate new user created files in listed root directories" option and click Next.

    Selecting this option automatically replicates tablespaces to Oracle databases as you add them. If this option is not selected, Arcserve RHA replicates only the databases that are selected at configuration time.

    Oracle tablespaces

  9. From the Root Directories dialog, review the list of folders to be replicated and click Next.

    master root directories

  10. From the Scenario Properties dialog, configure the settings that control the entire scenario. For more information, see the Arcserve RHA Administration Guide. For Oracle scenarios, we recommend enabling the Replicate NTFS ACL option, under Replication, Optional Settings. Click Next.
  11. From the Master and Replica Properties dialog, configure the desired settings and then click Next.
  12. Wait for the Switchover Properties dialog to appear. Configure the redirection settings as described in IP Redirection, and then click Next.

    Note: You can only use Move IP and Redirect DNS for an Oracle scenario.

  13. From the Switchover Initiation dialog, configure the desired Initiation options and click Next. We recommend setting only one of these to Automatic.

    Note: If you selected Assured Recovery in the Tasks on Replica options, that dialog appears now. For more information, see the Arcserve RHA Administration Guide.

  14. From the Scenario Verification dialog, ensure that no errors or warnings appear. While warnings do not prevent a scenario from running as errors do, both should be corrected before you proceed. Once successfully verified, click Next. The pre-run checks for HA verify master and replica settings, such as Oracle home, for each instance.

    Note: If the Oracle home path on the master is changed, reconfigure the parameters of Oracle instances and perform the auto-discovery again.

  15. Click Run Now to start data synchronization or click Finish to run the scenario later.