

For Hyper-V, it is possible to perform switchover at the individual VM level, rather than the whole Hyper-V server, which means you need a separate HA scenario for every virtual machine in the Hyper-V environment. To make scenario creation easier, you can select multiple VMs from the Master that inherit the same scenario properties. This 'multiple VM' scenario is then split into sub-scenarios so you can manage each virtual machine independently.
To create a new Hyper-V HA Scenario
The Welcome dialog opens.
Note: If you do not assign a Scenario Group Name, all scenarios you create default to the Scenarios Group. This group becomes part of the scenario name and updates automatically to Hyper-V after the scenario wizard is completed.
The Select Server and Product Type dialog opens.
The Master and Replica Hosts dialog opens.
You may be prompted for user credentials. If so, enter the appropriate credentials and click OK.
If you enabled engine verification, the Engine Verification dialog opens.
The Database for Replication dialog opens, listing the auto-discovered virtual machines found on the Master server you specified. By default, all virtual machines are selected for replication. For HA, the entire VM with all related files must be selected.
The Scenario Properties dialog opens.
The Master and Replica Properties dialog opens.
Wait while the Switchover Properties dialog retrieves information.
The Virtual Network Mappings dialog opens.
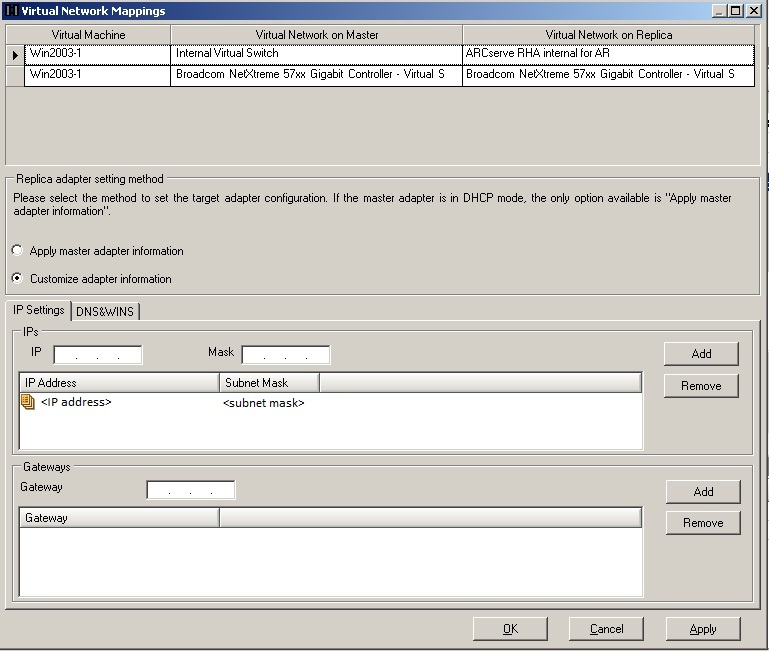
Specifies that the virtual machines on the replica use the same network adapter information as that of the master.
Specifies that you can manually enter the IP address, DNS, WINS, and Gateway information for the virtual machines.
Note: For virtual machines having boot volume on a dynamic disk, sometimes the network information does not configure successfully after switchover. You may have to manually set the IP address after the virtual machine starts up.
Limitation: If Hyper-v scenario protected VM sys volume is dynamic disk, some network mapping settings can't apply to the replica VM during Swithcover process. RHA doesn't support network mapping for this type virtual machine.
The Switchover and Reverse Replication Initiation dialog opens. We recommend setting Switchover to Automatic and Reverse Replication to Manual.
Wait while the Scenario Verification process completes.
If Scenario Verification lists any errors, you must resolve them to continue. If any warnings are listed, you should also resolve them to successfully continue. After making changes, click Retry to repeat verification.
Click Next.
The Scenario Run dialog opens.
|
Copyright © 2015 Arcserve.
All rights reserved.
|
|