Specify the Advanced Settings
The Advanced tab lets you specify some advanced settings for the backup job. The advanced settings include providing truncate log settings, providing the location of any scripts, and email settings.
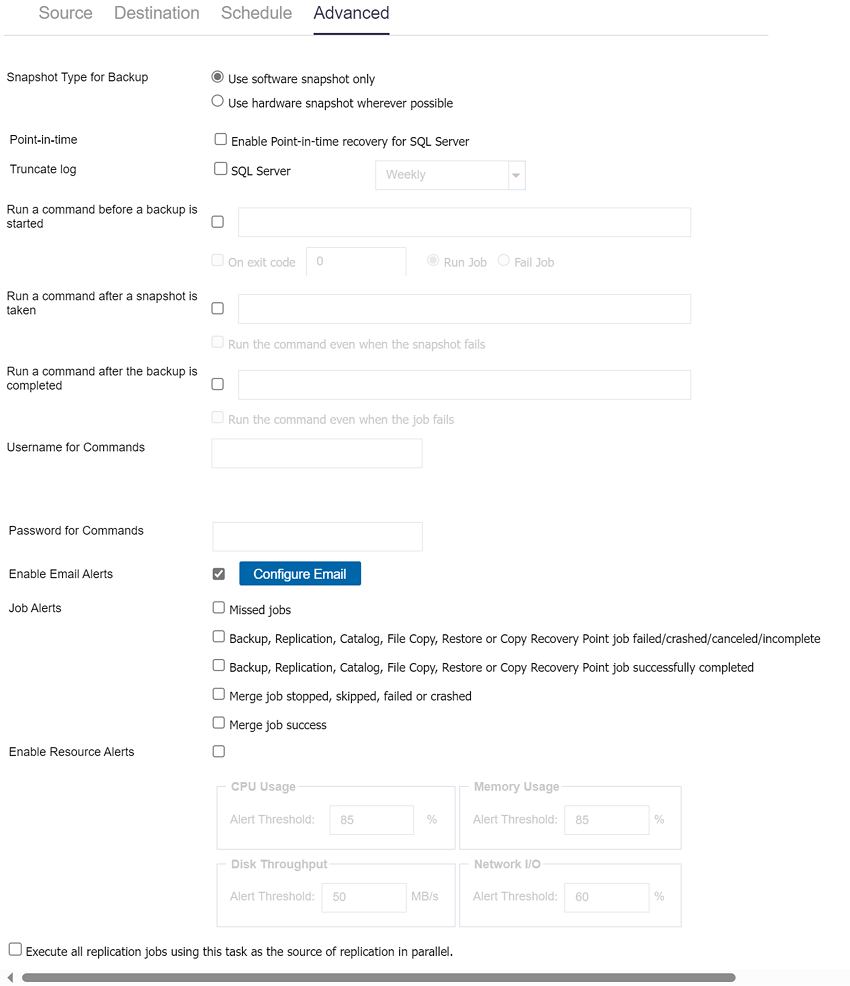
The following image displays the Advanced tab:
Follow these steps:
- Specify the following details.
- Configure the Plan Settings. Check the "SQL Server" option in the "Truncate Log" Section under the "Advanced" Tab, and then select "Daily".
- Set the registry key on the SQL Server machine where the UDP Agent hosts. "PurgeSqlLogPerHour" is the interval in hours for purging SQL Log.
- Click Save.
- Note: When you select a node as a backup source or backup proxy, Arcserve UDP checks whether the agent is installed on the node and if it is the latest version. Arcserve UDP then displays a verification dialog that lists all the nodes that either have an outdated version of the agent or does not have the agent installed. To install/upgrade the agent on these nodes, select the installation method and click Save.
- The changes are saved and a green check mark is displayed next to the task name. The plan page closes.
- Note: If you have to add another task, you must select the plan from the Resources tab and modify the plan. To modify the plan, click the plan from the center pane. The plan opens and you can modify it.
Snapshot Type for Backup
Select one of the following options for the backup snapshot.
Use software snapshot only
Specifies that the backup type uses only the software snapshot. Arcserve UDP will not check for hardware snapshot. The software snapshot utilizes less resources on the virtual machines. You can use this option if the server has lower configurations and processing speed.
Use hardware snapshot wherever possible
Specifies that the backup type first checks for a hardware snapshot. If all the criteria are met, the backup type uses hardware snapshot.
Point-in-time
Lets you enable point-in-time recovery for SQL server. For more information, see How to Perform PIT Restore.
Truncate Log
Lets you specify the schedule to truncate logs for SQL Server. You can specify the schedule as Daily, Weekly, Monthly, or Always.
Note: The UI option to truncate logs for the Microsoft Exchange server is removed from the "Advanced" settings of the plan. The logs are now truncated after every successful backup.
Enable purging logs at hourly interval for SQL via a registry switch
Path: HKEY_LOCAL_MACHINE\SOFTWARE\Arcserve\Unified Data Protection\Engine
Value Name: PurgeSqlLogPerHour (indicates the interval in hours for purging SQL Log.)
Value type: REG_DWORD
Run a command before a backup is started
Lets you run a script before the backup job starts. Specify the complete path where the script is stored. Click On exit code and specify the exit code for Run Job or Fail Job. Run Job indicates that the backup job will continue when the script returns the exit code. Fail Job indicates that the backup job will stop when the script returns the exit code.
Run a command after a snapshot is taken
Lets you run a script after the backup snapshot is taken. Specify the complete path where the script is stored.
To run the post snapshot script even during a snapshot failure, select Run the command even when the snapshot fails.
Run a command after the backup is completed
Lets you run a script after the backup job is completed. Specify the complete path where the script is stored.
Username for Commands
Lets you specify the user who is authorized to run a script.
Password for Commands
Lets you specify the password of the user who is authorized to run the script.
Enable Email Alerts
Lets you enable email alerts. You can configure email settings and can specify the types of alerts that you want to receive in an email. When you select this option, the following options are enabled for your selection.
Configure Email
Lets you configure the email settings. Click Configure Email and configure the email server and proxy server details. For more information about how to configure email alert settings, see Configure Email and Alert.
Job Alerts
Lets you select the types of job emails you want to receive.
Enable Resource Alerts
Lets you specify a threshold for CPU Usage, Memory Usage, Disk Throughput, Network I/O. You can provide the value in percentage. You will receive an email when the Alert Threshold value exceeds.
Execute all replication jobs using this task as the source of replication in parallel
Lets you execute all the replication jobs using this task as the source of replication in parallel. If you do not select this check box, all the replication jobs run in series (one after the other).
The backup plan is created and automatically deployed to the source node. The backup runs per the schedule that you have configured in the Schedule tab. You can also perform a manual backup at any time.