Ad-hoc Virtual Standby to Amazon EC2
This section provides information about how to configure virtual machine settings for creating an Ad-hoc Standby VM to Amazon EC2.
Follow these steps:
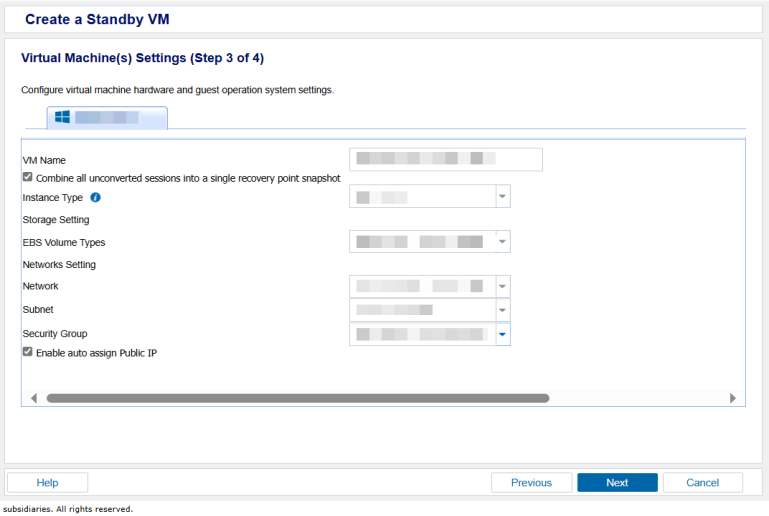
- On the Virtual Machine(s) Settings (Step 3 of 4) screen, specify the configuration details for the ad-hoc standby VM hardware.
- When the auto assign public IP is enabled, due to the limitation of AWS EC2, only one NIC is mapped to AWS EC2 and others are discarded.
- The IP address of the source machine cannot be inherited automatically into the Ad-hoc Standby VM.
-
- Click Next.
VM Name Prefix
Specify the prefix that you want to add to the display name for the virtual machine on the AWS EC2.
Default value: UDPVM_
Combine all unconverted sessions into a single recovery point snapshot
Specify whether to combine all unconverted sessions into a single recovery point snapshot when next scheduled VSB job takes place.
Default: Selected
Instance Type
Amazon EC2 provides a wide selection of instance types optimized to suit different use cases. Instances are virtual servers that can run applications. They have varying combinations of CPU, memory, storage, and networking capacity, and provide the flexibility to choose the appropriate mix of resources for your applications. For more information about instance types and how they meet your computing needs, view the link.
EBS Volume Types
General Purpose (SSD) volumes can burst to 3000 IOPS, and deliver a consistent baseline of 3 IOPS/GiB. Provisioned IOPs (SSD) volumes can deliver up to 20000 IOPS, and are the best for EBS-optimized instances. Magnetic volumes, previously known as standard volumes, deliver 100 IOPS on an average, and can burst to hundreds of IOPS. For more information about EBS volume types, view the link.
Network
Lets you define the VPC, subnets, the NICs and security group for the Virtual Standby virtual machine on AWS EC2.
Notes:
Same number of network adapters as source at last backup
Select this option to define how to map the virtual NIC to the network on EC2. Specify this option when the virtual machine contains virtual NICs and a virtual network.
Note: Those settings are available to configure only when the auto assign public IP is disabled.
The Summary screen appears.